Full Guide on How to Block Websites on iPhone
If you have a child that uses an iPhone and you do not want him to accidentally stumble upon an inappropriate website, such as an adult website, then you will need to learn how to block websites on iPhone. Blocking websites on your iPhone will prevent your kid or anyone that uses your iPhone from accessing any website that contains porn or any other kind of adult material. Blocking is also not just limited to adult websites, but you can pretty much block any website that you do not want to be accessed from your iPhone.
The option that allows you to block websites on iPhone is built right into the operating system of your iPhone, so you don't need to install a third-party app to be able to block a website on your device. Any website that you want to block can be blocked from the built-in option. The following guide shows how to block websites on iPhone XS/XS Max/XR//X/8/7/6 and what predefined options are available for you in the feature.
- Part 1. How to Block Adult Content/Websites on iPhone In iOS 12?
- Part 2. How to Block Websites on iPhone In iOS 11 and Earlier?
- Extra Tip: How to Remotely Monitor Browsing History on iPhone?
Part 1. How to Block Adult Content/Websites on iPhone In iOS 12?
If you have one of the newly announced iPhones, you will likely be running iOS 12 on it and so this section will teach you how to block websites on your iPhone running iOS 12.
If you don't already know, there is a new feature in iOS 12 called Screen Time that acts as a parental control feature and allows you to block access to various items including websites on your iPhone. You can use the feature to block adult content/websites on your iPhone and the following is how you can do it.
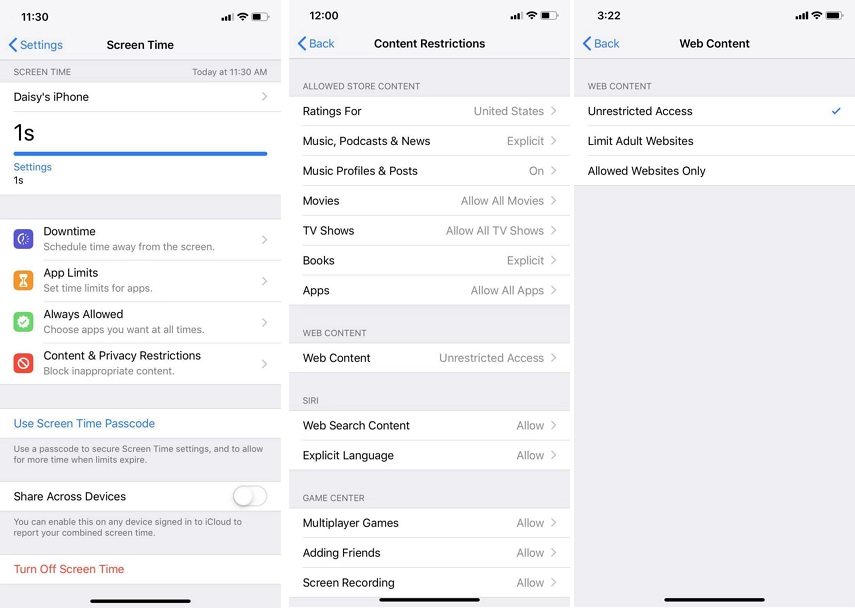
Step 1: The first thing you will need to do is launch the Settings app on your iPhone and then tap on the option that says Screen Time. It will let you access the parental control feature on your iPhone.
Step 2: If you have not already done so, enable the Screen Time feature on your device. Once that is enabled, tap on the option that says Content & Privacy Restrictions followed by Web Content.
Step 3: On the following screen, you will have three options to choose from. What these options do is explained below for you.
1. Unrestricted Access
This option should be enabled by default and as you may have already guessed, the feature gives unrestricted access to all the content on your iPhone. That means anybody can use whatever content or website on your device without any restrictions. In a nutshell, this feature puts no restrictions on anything.
2. Limit Adult Websites
What this option does is it limits access to websites that provide adult content. If you don't want your kids to be accessing any adult content websites, this is the option you need to enable on your iPhone.
3. Allowed Websites Only
This is the most extreme option and you should only use it if you know what you are doing. What this option does is it blocks all the websites on your device except for the ones that you specify in the feature. You can add whatever websites that you wish to be accessible to a list and only those in the list will be accessible from your device while the rest will remain unblocked.

Note Tips:
You need to set a Screen Time passcode to prevent others to change your Screen Times settings. If you find Sceen Time not working for parental controls that your child still can ignore the limit, it is possible because you don't set up the screen time passcode.
If you ever forget screen time passcode, you will not be able to change the screen time settings on your device. If you are in this situation already and you have no idea what to do, use Tenorshare 4uKey-iTunes Backup. It allows users like you to remove the Screen Time passcode from your device so you can access the feature settings.


Part 2. How to Block Websites on iPhone In iOS 11 and Earlier?
If you do not own one of the newly launched iPhones or if you have not updated your iOS to version 12 and are still on iOS 11 or earlier, the steps in this section will work for you. Just like iOS 12, iOS 11 also includes the restriction feature that lets you put a ban on certain websites on your iPhone and the following is how you enable the feature.
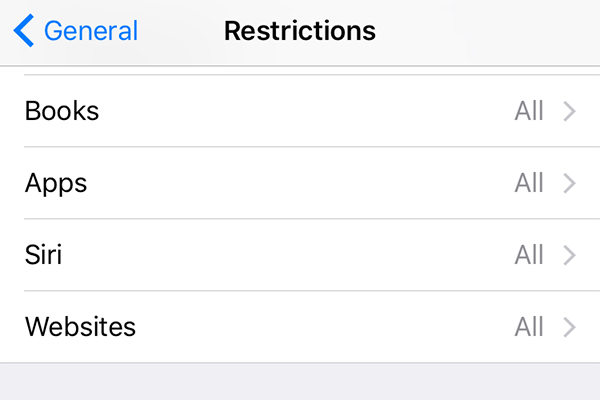
Step 1: Launch the Settings app on your iPhone and head to General > Restrictions > Enable Restrictions, type in your passcode, and tap on the option that says Websites.

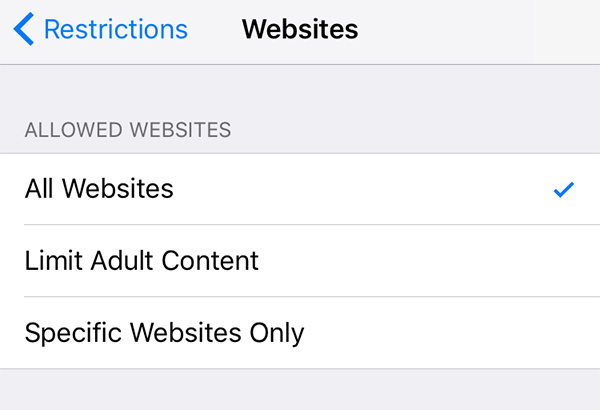
Step 2: On the following screen, you will get three options that you can choose from. Each option does a unique task and the following should explain to you what each feature does.

1. All Websites
In the Allowed Websites section at the top, the first option will be All Websites. What it means is that all the websites are accessible on your device now. That means there are no restrictions imposed on any website on your device and everything is accessible on it. Use this option if you don't want any restrictions at all on your iPhone.
2. Limit Adult Content
As the name implies, the option lets you limit access to the adult content on your device. It blocks all the adult content filled websites on your device and is an ideal option to choose when you give your iPhone to your kid for them to use it.
3. Specific Websites Only
If you only want certain websites to be accessible on your iPhone, choose this option. It will let you specify what websites you would like to have access to on your iPhone. The rest of the websites will remain blocked on the device.
Extra Tip: How to Remotely Monitor Browsing History on iPhone?
In all the above methods, it is assumed that a user will somehow try to access adult content on your iPhone. Assumptions can often go wrong and it's best to have evidence to prove your assumptions.
You can use a spy app Spyera or Xnspy, that allows you to monitor the browsing history of an iPhone user and lets you see what websites they access. That way you can find out if someone is indeed accessing adult content on your iPhone and then you can take appropriate measures, such as blocking websites, to keep the user away from such content.

Conclusion
At some point in your life, you may want to block certain websites on your iPhone and the above guide teaches exactly how to block websites on iPhone using various options. We hope you find this guide useful and hope it helps you keep your kids away from the content that is not appropriate for them.


Speak Your Mind
Leave a Comment
Create your review for Tenorshare articles

Tenorshare iCareFone
Best Free iPhone Transfer & iOS Backup Tool
Easily, without iTunes


