Top 9 Fixes to Destination Folder Access Denied Issue-You Need Permission to Perform This Action
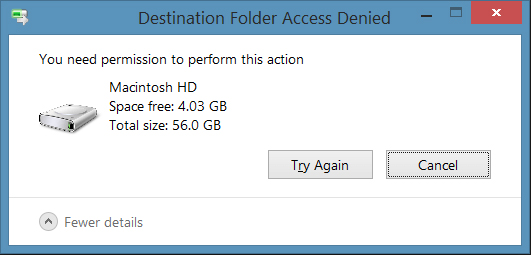
The error "Destination Folder Access Denied. Need Permissions to Perform this Action" normally occurs while trying to copy or move any folder or file to another location. It mainly occurs when multiple users are configured on one system or modifying an existing file or folder on the old operating system with the newly installed operating system. Although the reason can be different but it occurs due to the unavailability of the "Ownership". The ownership of the file or folder that is being accessed is associated with some other user's account. We have researched this issue and found out some exciting and time-saving solutions that you can try. So, let's get started.
- Fix 1. Change the Folder Ownership
- Fix 2. Set Permissions to the Inaccessible USB/Hard Drive
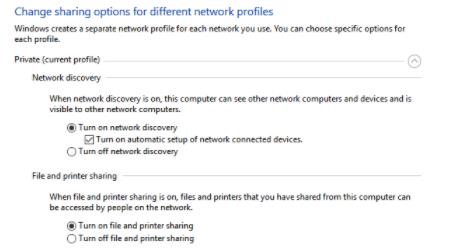
- Fix 3. Turn On Network Discovery & File Sharing
- Fix 4. Run CHKDSK
- Fix 5. Check Connectivity and Sharing
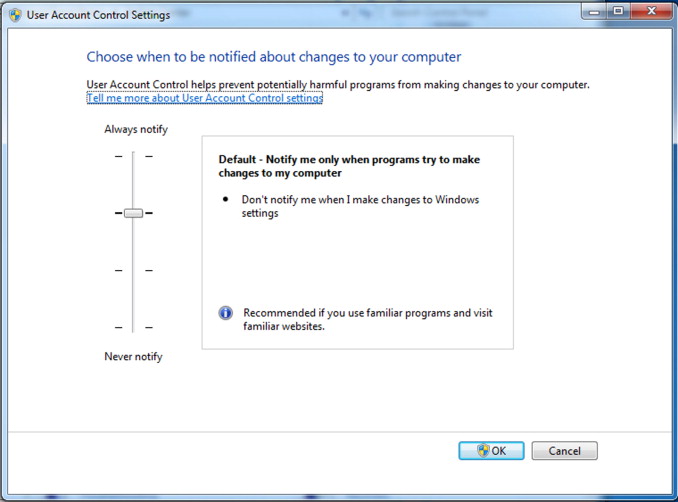
- Fix 6. Disable User Account Control
- Fix 7. Perform a Windows 10 Clean Boot
- Fix 8. Use Advanced Sharing
- Fix 9. Recover the Inaccessible Files
1. Fix Destination Folder Access Denied by Changing the Folder Ownership
You should take ownership of the folder to fix the destination folder access denied problem. Here's what you can do:
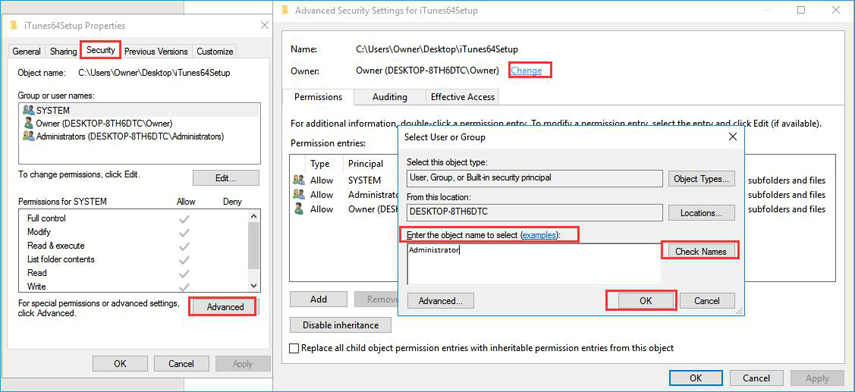
For Windows 10 Users- Go to the folder whose ownership you want to take and right-click on it. Then select the "Properties" item from the dropdown menu.
- In properties, click on "Security" and then "Advanced".
- Click the "Owner" tab and click "Change" on the popped up screen.
Now enter the user name and click the "Check Names" to see if the user exists. You can also click "Change" on the popped up screen and then enter the user name in the "Enter the object name to select (examples)" field. Once the user name of the new user is inputted, click "OK" to save the changes.

- Navigate to "Replace owner on sub containers and objects" and save your changes by clicking "Apply" and then the "Ok" button. Another way of doing that is by checking the "Replace all child object permission entries" option.
- Go to the folder whose ownership you want to take and right-click on it. Then select the "Properties" item from the dropdown menu.
- Click the "Edit" button in the properties and click "Ok" to confirm the dialog.
- Click "Add" to add other users or groups or you can also select "User/Group" from permission windows.
- Navigate to "Permission", Assign full access rights control permissions by checking "Full Control" under the "Allow" column.
- Save the changes by clicking the "OK" button and then click the "Ok" button for the "Properties Window" to exit.
After taking ownership of the file or folder, you need to check if your problem is solved. If not, move on to try the other methods listed below.
2. Fix the Destination Folder Access Denied by Setting Permissions to the Inaccessible USB/Hard Driver
Your account may need the required permissions to change the target file/folder. Follow the steps below to gain the permissions for this:
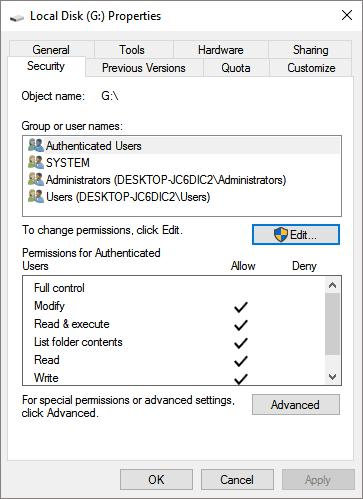
- Right-click the inaccessible USB/Hard drive, file, or folder and then select the "Properties" item from the dropdown menu.
-
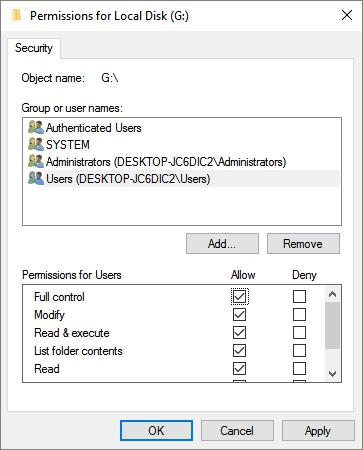
Select your username under "Group or user names" and click the "Edit" button.

-
Allow the permissions by checking the permissions checkbox and then click "OK". Gain the permissions to access the inaccessible hard drive by clicking the "Apply" button.

3. Fix Destination Folder Access Denied by Turning on Network Discovery & File Sharing
If you're getting this error while copying or moving a file to or from a network location, make sure the Network Discovery & File Sharing is enabled on both source and destination system.
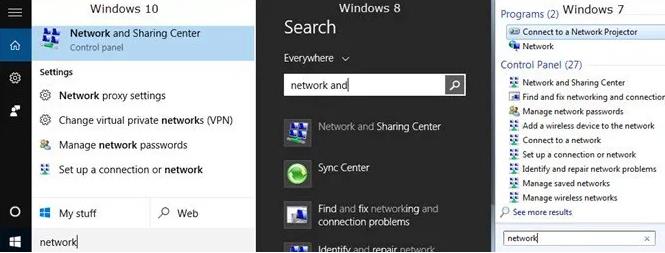
Step 1: Type Network and Sharing Center in the Windows search bar and hit enter to open it.

- Step 2: Navigate to the left pane and click "Change Advanced Sharing Settings".
Step 3: Click on the down arrow in front of "Home and Work" and make sure to turn on Network Discovery and File and Printer sharing.

4. Fix Destination Folder Access Denied By Running CHKDSK
You can use CHKDSK to solve the destination folder access denied error. Here are the steps:
Step 1: Open Command Prompt and type chkdsk c: /f /r (Whereas the drive letter "c" can be replaced with the letter of the inaccessible hard drive).

- Step 2: After entering the command, hit the enter button to begin the checking process.
- Step 3: Once the check process is completed, type exit and hit the enter button to complete the process.
5. Fix Destination Access Folder Denied by Checking Connectivity and Sharing
If you're getting the access folder denied error when accessing a shared folder, then there is a high possibility that the permissions on the other computer have messed up for no reason. In this solution, the computer that is sharing the folder is defined as a folder as a source computer whereas the computer(s) accessing it are the host(s).
- Step 1: Firstly, get the IP of the source computer by typing ipconfig/all in the command prompt.
- Step 2: After getting the local IP address, go to the host computer where this error is showing up, and enter this command in the command prompt: ping -t ip.address.here.
- After this, if you get the replies, it confirms that you are connected to the network. If you don't get the reply or it times out, it depicts either you're not connected to the Internet or you're connected but the firewall may be blocking it. Make sure it is connected and firewall/antivirus software is disabled for this.
- When the ping starts receiving replies, it is time to check the sharing permissions. To do so, go to the shared folder, right-click on it and select "Properties". Then click the "Sharing" tab from the menu and click the "Share" button.
- You will be able to check/add/delete users in the Share properties. Ensure that the user trying to access this folder from the other computer is listed here. Otherwise, you can add it easily via CMD (Command Prompt).
6. Fix Destination Folder Access Denied by Disabling User Account Control
UAC (User Account Control) can deny access to a folder as well. It can be re-enabled after testing the issue.
- Step 1: Open the Windows search bar and type "UAC".
- Step 2: Go to the search results and click Change User Access Control Settings".
Step 3: Drag the slider on the left side to "Never Notify" and click "Ok".

- Step4. Click "Yes" when a UAC warning window appears and Restart your computer to see if the issue persists.
7. Fix Destination Folder Access Denied by Performing a Windows 10 Clean Boot
You can also fix this error by performing a clean boot. To do so, follow the below-given steps to access the folder:
- Step 1: Open the Windows search bar, type MSConfig to open system configuration.
Step 2: Navigate to the "Services" tab of the system configuration dialog box. Check the "Hide all Microsoft Services" checkbox and click the "Disable all" button for not disabling the Microsoft Services.

- Step 3: Click on the "Startup" tab of the "System Configuration" and then click "Open Task Manager".
- Step 4: Go to the "Startup" tab in the Task Manager, and disable each startup item by clicking "Disable". Close the Task Manager.
- Step 5: Go back to the startup tab of the "System Configuration". Click "OK" and restart your computer.
8. Fix Destination Folder Access Denied by Using Advanced Sharing
We can use the "Advanced Sharing" option while accessing a source file shared on another computer. It provides more control over what is shared with whom and what level of access is granted to the other person.
- Step 1: Head to the source file or folder, right-click on it and click on the "Properties".
- Step 2: Go to the "Sharing" tab. Click the "Share" button and enter the username of the person who wants to modify it and click the "Add" button. You can skip it if the user already exists there.
- Step 3: In front of the username, under Permission Level and select "Read/Write", click "Share" and then "Done".
- Step 4: After this, go to the Advanced Sharing and click "yes" if the UAC warning appears. Put a check on it by clicking "Share this folder".
- Step 5: Click "Permission" and then click "Add".
Step 6: Enter "Username" and click "OK".

- Step 7: In the permissions panel below it, check the "Full Control" option under the "Allow" column. After doing so, click "Apply" and then click "Ok".
- Step 8: Click "Apply" and the "OK" in the Advanced Sharing window. Close the properties window.
9. Fix Destination Folder Access Denied by Recovering the Inaccesible Files
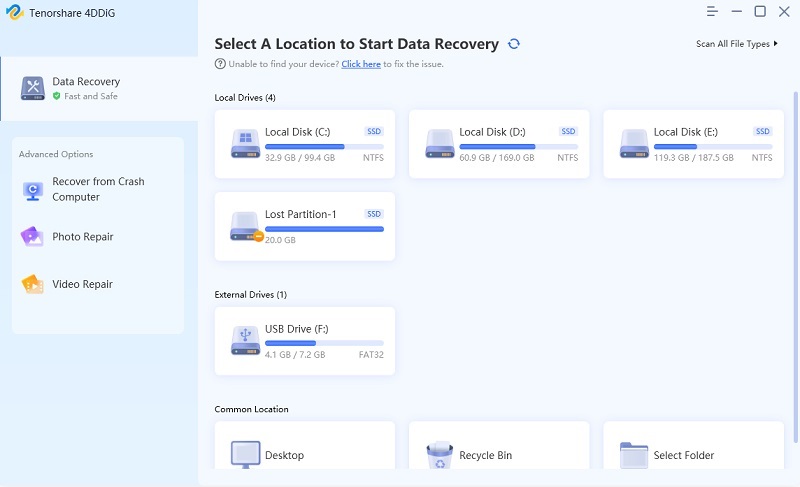
If you are unable to recover the inaccessible files with the above-provided solutions, explore the amazing data recovery software Tenorshare 4DDiG. You can easily recover all kind of inaccessible and lost files in Windows XP/7/8/8.1/10 by using it. We have mentioned its features to check out and steps to recover data with it below:
Features:- Recovers all kinds of accidentally deleted data.
- Recovers data from crashed computer.
- Provides BitLocker data recovery support.
- Recovers data from the raw partitions.
- Previews the data before recovering.
- Install and launch the Tenorshare 4DDiG software.Pick a location from the connected drives section from where you want to recover the data.
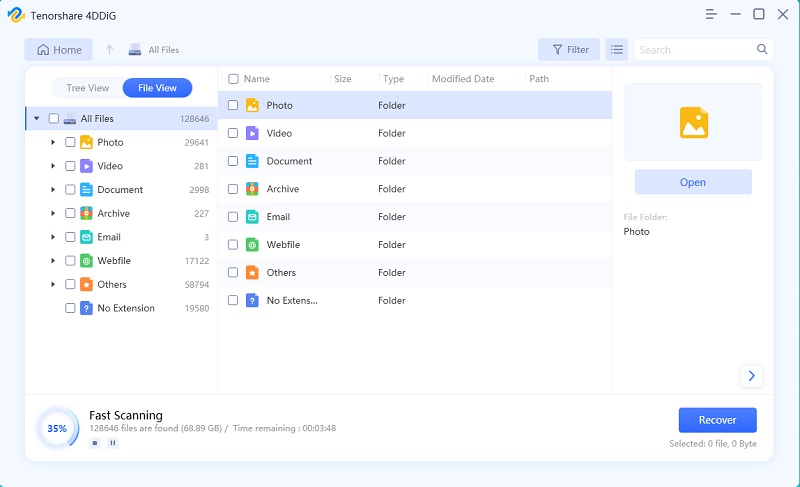
Click the "Scan" button and Tenorshare 4DDiG will begin to scan for the files in the selected location. It displays a progress bar with elapsed and remaining time. After the scanning is completed, the software will display a dialog box showing how many files it has recovered. You can use the deep scan feature if you are unable to find the required files in the found data.
After previewing and selecting the files, click the “Recover” button to save the recovered data to your computer.

Video tutorial on How to Recove Deleted Files from Recycle Bin after Empty in Windows 10/8/7?
The Bottom Line
The error message “Destination Folder Access Denied” is common and many people are getting it on their computers whenever they try to move copy or delete a file from local or shared storage. It can be easily solved by using the above-mentioned solutions. Tenorshare 4DDiG does not only provide the solution for access denied error but it gives a way to recover your files or folders. You can try its free version to know more about its exciting features.
Speak Your Mind
Leave a Comment
Create your review for Tenorshare articles

