Full Solutions for External/Internal Hard Drive Not Showing Up Windows 10/8/7
Are you looking for a solution to external hard drive not showing up on Windows issue? Well, your tension won't last long, as we have come up with an article that caters the issue in complete detail. Once you end up reading the post, you shall have 10+ solutions to your problem that hard drive not showing up on Windows 10.
- Part 1. Check Hard Drive Status
- Part 2. How to Fix External Hard Drive Not Showing Up Windows 10/8/7
- Part 3. Recover Data on Your Undetected External/Internal Hard Drive
Part 1. Check Hard Drive Status
Hard drives can be remarkably useful in transferring and storing your important data, but life turns difficult when your external hard drive doesn't show up on Windows. This has been shared trouble amongst various users, who got their hard drive installed after the purchase. There are several reasons that may cause a drive to remain undetected by the Windows. Some common ones include the improper connection between the components, bad sectors on your hard disk and an outdated disk driver.
Before we proceed to the solutions to fix external/internal hard drive not showing up in disk management, we would first need to verify the disk state, so that we can take adequate fixing measures.
Check connection:
Ensure that your drive is perfectly connected through working cables, and the connection isn't loose from either side.
Check File explorer Status
- Press "Windows+ E" to open the file explorer.
- At the left-hand column, check for your desired drive.
Check Disk management Status
- Press "Windows+X" buttons.
- Select disk management and look out for your desired drive.
- Check the state of your drive.
Check BIOS Status
- Restart your PC and press "F2" during reboot.
- Look out for system status under "setup status".
- Check whether your device appears in the column.
After a check at the hard drive status, you might be able to figure out the flaw you need to fix. Your hard drive would be detected in some of the cases while not in others. In any case, you don't need to worry as we have got detailed solutions to external/internal hard drive not recognized issue below.
Part 2. How to Fix External/Internal Hard Drive Not Showing Up Windows 10/8/7
Fix 1: Reconnect the Hard Drive
In case of a faulty connection between the computer and the drive, you would need to fix the connection, so that the drive shows up on your computer.
For external hard drives:
- Try reconnecting the drive using another USB port.
- Check the disk by connecting it to another computer.
- Change the current cable, and try connecting the drive through another cable.
For internal hard drives:
- Replace the USB cable with a SATA cable.
- Unplug and replug the device via the SATA cable and power cable with a short break.
- Test the drive on another computer to verify any error in the drive.
Fix 2: Format Hard Drive
Sometimes your drive might get corrupt due to irregular data transfer or virus infectionm, which can be a valid reason behind the drive not showing up. In such case, your drive shall be displayed as "RAW", and therefore it must be formatted to ensure proper usage in future. Here's how to do:
- Press the Window + R keyboards simultaneously and enter diskmgmt.msc within the box.
- From the pop-up, select "disk management".
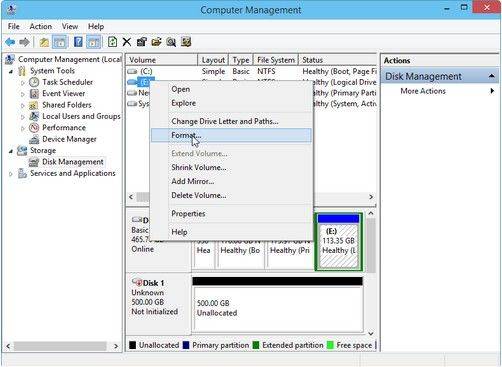
Right-Click on the corrupted device and choose "format".

- Tick the "quick format" checkbox, and confirm your call for the format.
Fomartting hard drive will cause data loss, so you'd better use data recovery software to back up the important files in the hard drive.
Fix 3. Change Hard Drive Letter
The solution considers the state when your drive is recognized in the disk management however isn't available in the file explorer. When two drives have the same drive letters, the explorer would view them as a new volume instead of separate disks. To fix the trouble, we would need to change the drive letter:
- Open disk management and look out for "new volume".
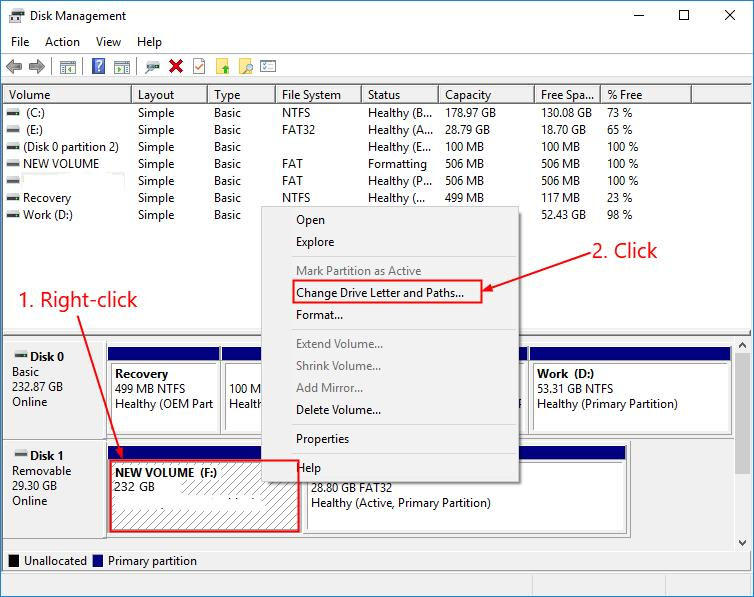
Right-click on the option and choose "change driver letter and paths".

- Change the disk letter to a unique letter and click "OK".
Fix 4. Allocate a New Partition
This method is another solution for fixing hard drive not showing up on Windows 10/8/7. Improper or No partitioning may lead to device not being detected in the files explorer, hence, to resolve the issue, we would need to allocate a new partition to the disk.
- Open device manager at your PC.
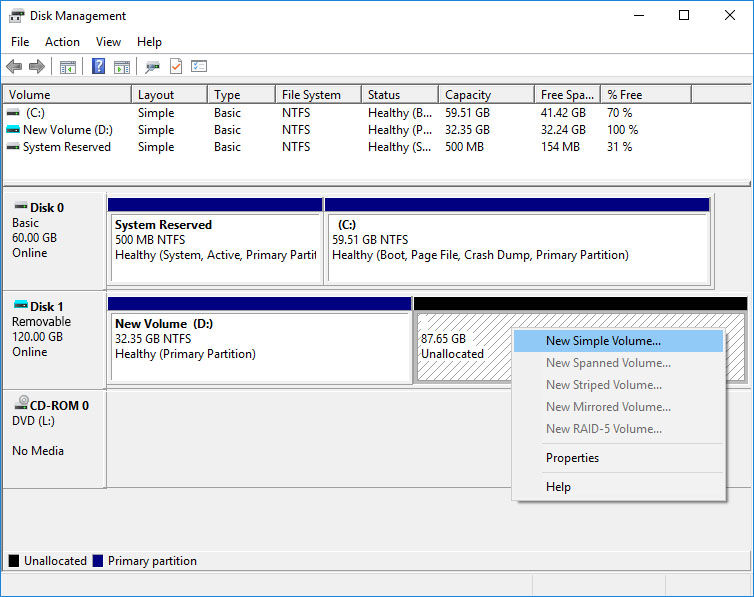
Right-click on the non-allotted disk and select "new simple volume".

- On the following screen, click "next".
- In the next few pop-ups, set the formatting of the disk as per your requirements.
- Lastly, format the drive and you're done.
If you directly create a new partition in the unallocated hard drive, then there's great possibility that the existed data will be rewritten. To avoid it, use data recovery software to back up your important files in advance.
Fix 5: Initialize New Hard Drive
Initializing a disk refers to rebuilding an MBR on the disk so that it can retain your data and protect it from getting erased. A non-initialized disk won't be recognized in the file explorer until it is initialized. Below are the steps to initialize the disk.
- Open "Disk management".
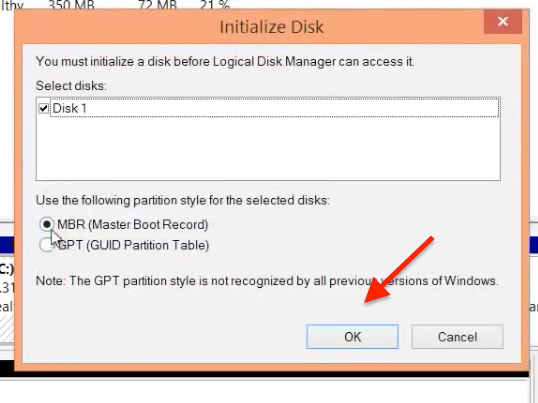
- Right-click on the non-initialized disk and select "initialize".
Choose GBT or MBR as the partition style and click "OK".

- The disk shall be initialized and would show up in the file explorer.
Fix 6. Enable Hard Drive in BIOS
Enabling the hard drive in BIOS is another effective method to fix the hard drive not showing up issue. When the hard drive is turned off in BIOS, the Windows system is unable to detect it. Here is the procedure to enable the hard drive in BIOS:
- Reboot the computer and press the F2 key until you enter the BIOS.
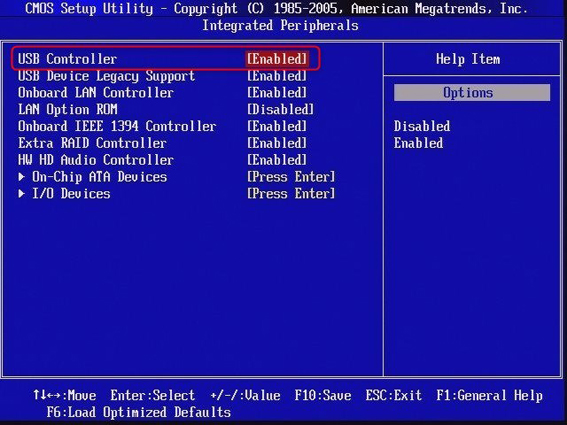
- From the BIOS utility, select "Integrated Peripherals" and hit the "Enter" button.
From the Integrated Peripheral settings, check whether the "USB controller" is enabled or not. If it is disabled, then enable it.

- After you have enabled the USB Controller, save and exit BIOS.
- The disk shall be initialized and would show up in the file explorer.
Fix 7. Update Driver in Device Manager
Sometimes, outdated drivers are the real culprits behind the external hard drive not showing up issue. Therefore, checking the driver and updating it is also a meaningful way to resolve the problem. Follow the steps to update the drivers:
- Right-click on "This PC" and select Manage.
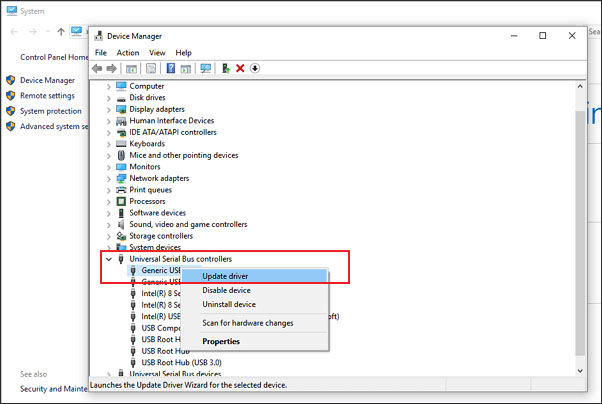
- When the "Computer Management Tool" launches, click "Device Manager" and then expand "Universal Serial Bus Controllers".
Right-click the unrecognized disk drive and select "Update driver".

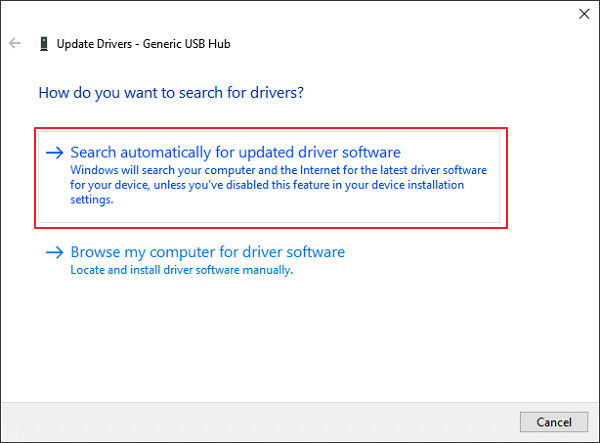
Then choose "Search automatically for updated driver software". The system will automatically start searching for drivers and will update them.

- When the drivers are updated, make sure to restart the computer.
Fix 8. Run Windows Hardware Troubleshooter
Windows Hardware and Devices Troubleshooter is a built-in tool to troubleshoot the issues that it finds. Here is the procedure you need to follow to troubleshoot the issue:
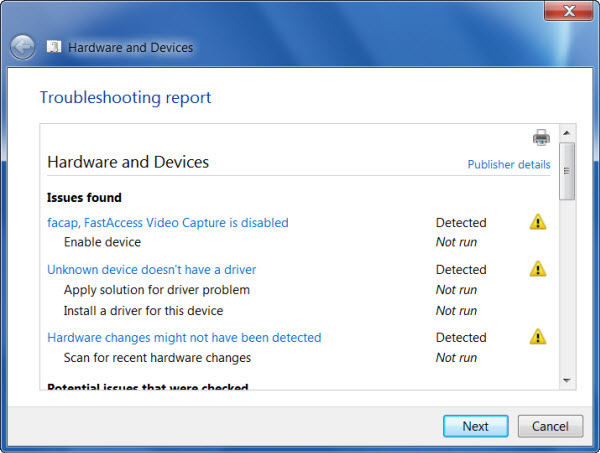
- Go to Settings > Update & Security > Troubleshoot and click on "Hardware and Devices" to launch "Windows Hardware Troubleshooter".
- Select "Next" to run the troubleshooter.
When the scan is finished, it will present you with a report. Click on "Next" to solve the problem.

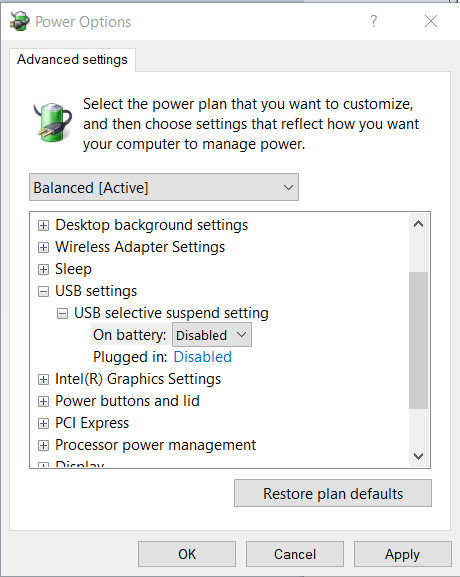
Fix 9. Disable USB Selective Suspend Setting
At last, if all of the above methods, the only option left is trying disabling the USB selective suspend setting. Follow the stepwise guide to disable USB selective suspend setting:
- Launch Control Panel.
- Navigate to Hardware and Sound > Power Options > Edit Plan Settings.
- Click on "Change Advanced Power Options".
Expand the USB settings category, and click USB selective suspend setting, and set it to Disabled.

Part 3. Recover Data on Your Undetected External/Internal Hard Drive
Tenorshare 4DDiG Windows Data Recovery is a reliable tool that can completely recover your data from the undetected internal or external hard drive. This software is up to now being trusted and used by millions of Windows users, also guarantees the highest success rate in the market. Moreover, Tenorshare 4DDiG helps recover data after accident deletion, formatting, partition error, system crash etc. The other main highlights of Tenorshare 4DDiG includes:
- Recovers over 1000+ types of data including pictures, videos, documents etc.
- Recover data at a amazingly fast speed.
- Available for both Mac and Windows.
Here's a step-by-step guide on how to use it:
- Install and launch Tenorshare 4DDiG on your computer. Choose "All Data" under "Everything"
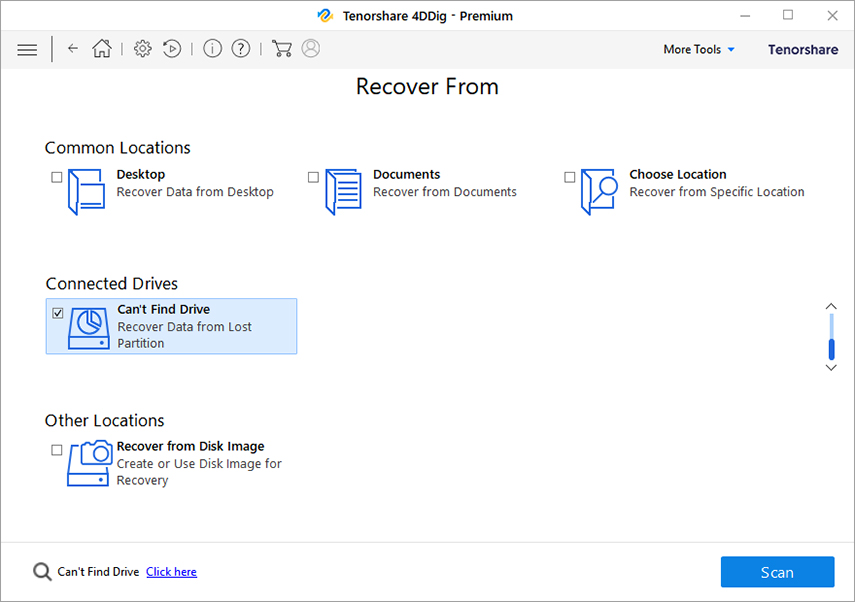
Choose "Can't Find Drive" feature from the main interface and then click on the "Next" button.

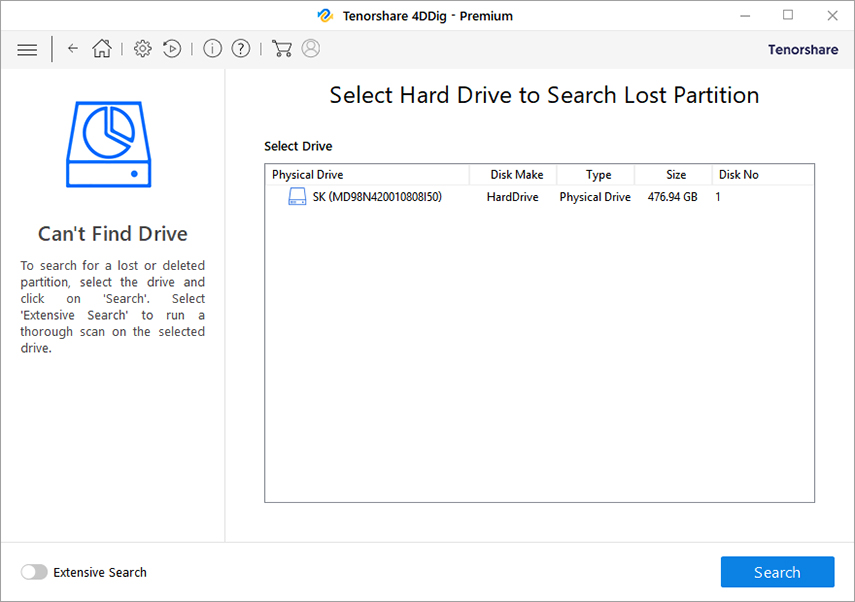
On the following screen, choose the hard drive from the list and then click on "Search".

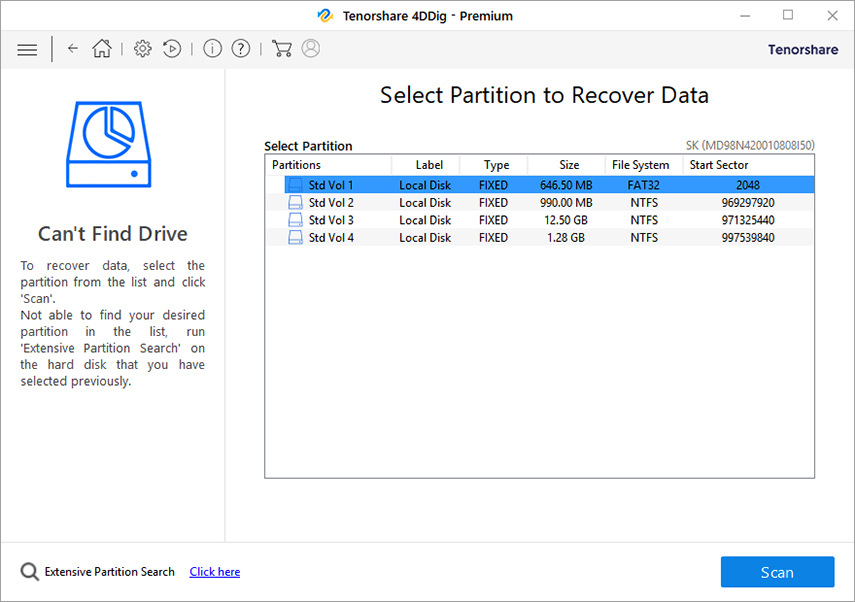
When the search results appear, select the lost partition and click on "Scan" button.

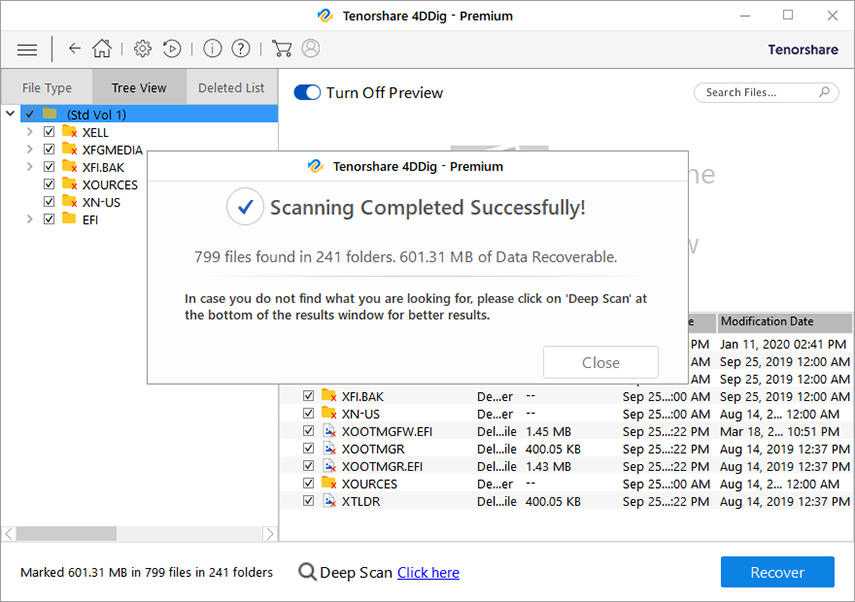
After the search is ended, choose the files that you want to recover and then click on "Recover" button.

Wrapping it Up:
We hope this article has provided enough light on the issue, and now after going through the article, the unrecognized hard drive issue would have been fixed on your computer. Besides, you can try Tenorshare 4DDiG Windows Data Recovery to recover data from deleted, formatted or unknown partition. , in case you accidentally delete PDF files.
Speak Your Mind
Leave a Comment
Create your review for Tenorshare articles

