Guideline for Tenorshare PDNob
Guideline for Win
Try Tenorshare PDNob Now
Learn how to use Tenorshare PDNob to edit, convert, and manage PDFs effortlessly in minutes. Download the latest version and streamline your document workflow today!
Try Tenorshare PDNob Now
Welcome to the PDNob PDF Editor user guide! This guide will walk you through the essential features of the editor, including how to edit, annotate, convert, and manage your PDF files efficiently. Whether you're a beginner or an advanced user, you'll find easy-to-follow steps to enhance your PDF editing experience.
Download & Install PDNob PDF Editor for Free
Step 1. Click the FREE DOWNLOAD button below, and the installation file will start downloading to your computer.
Step 2. For Windows users:
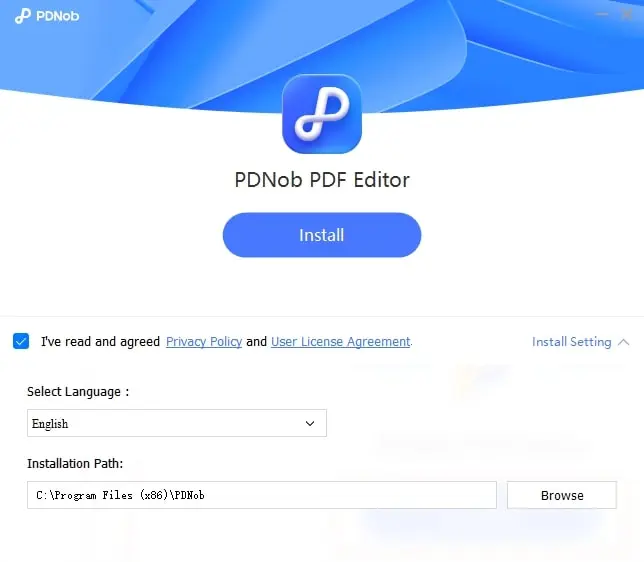
Once the download is complete, open your downloads folder and double-click the downloaded file. Follow the on-screen prompts to begin the installation. You will be asked to review and agree to the Privacy Policy and User License Agreement before clicking the Install button.
For Mac Users:
Once you launch the installer, you can start by reviewing our Privacy Policy and User License Agreement. Then click Install button after checking the box that agrees to the Privacy Policy and User License Agreement. In just a few seconds, PDNob PDF Editor will be ready to use on your Mac.

Create an Account
Step 1. Open PDNob PDF Editor: Once PDNob PDF Editor is installed, launch the program from your desktop or start menu.
Stpe 2. On the main interface, Click the User Logo in the upper right corner and select Create an account to enter your email and create a password. Then click the Send button, and a verification code will be sent to your email. Finally, enter the verification code before clicking Register.
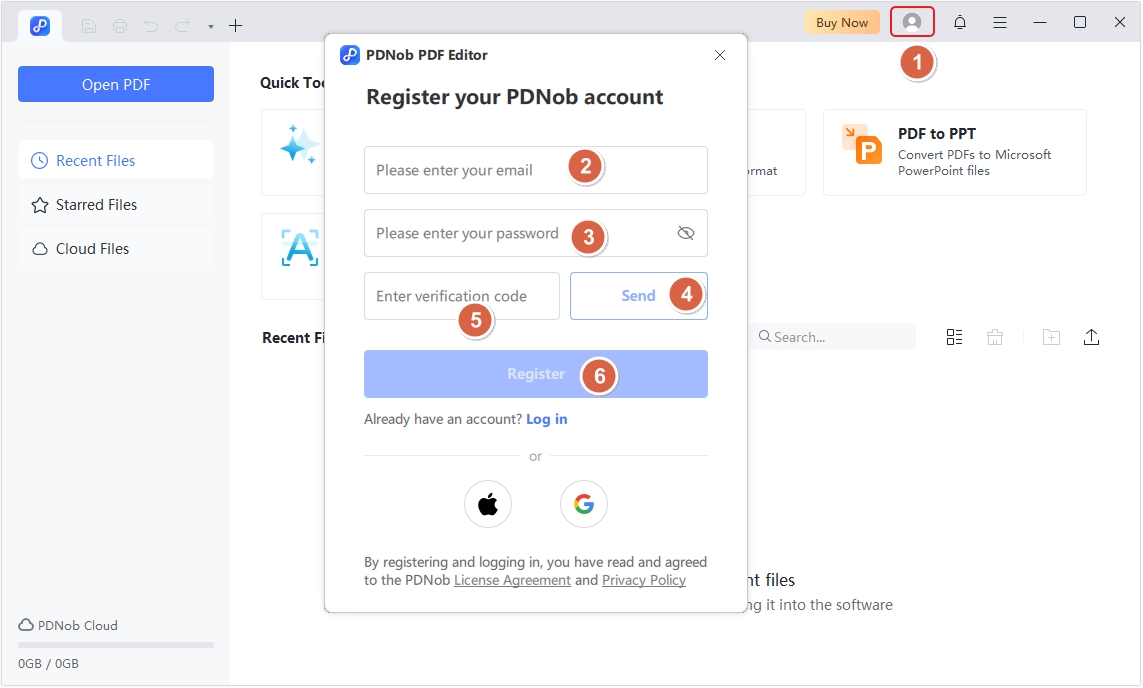
A verification email will be sent to your inbox. Open the email and click the verification link to activate your account.
You can sign up via Apple or Google. For a quicker registration process, you can also sign up using your existing Apple or Google account:
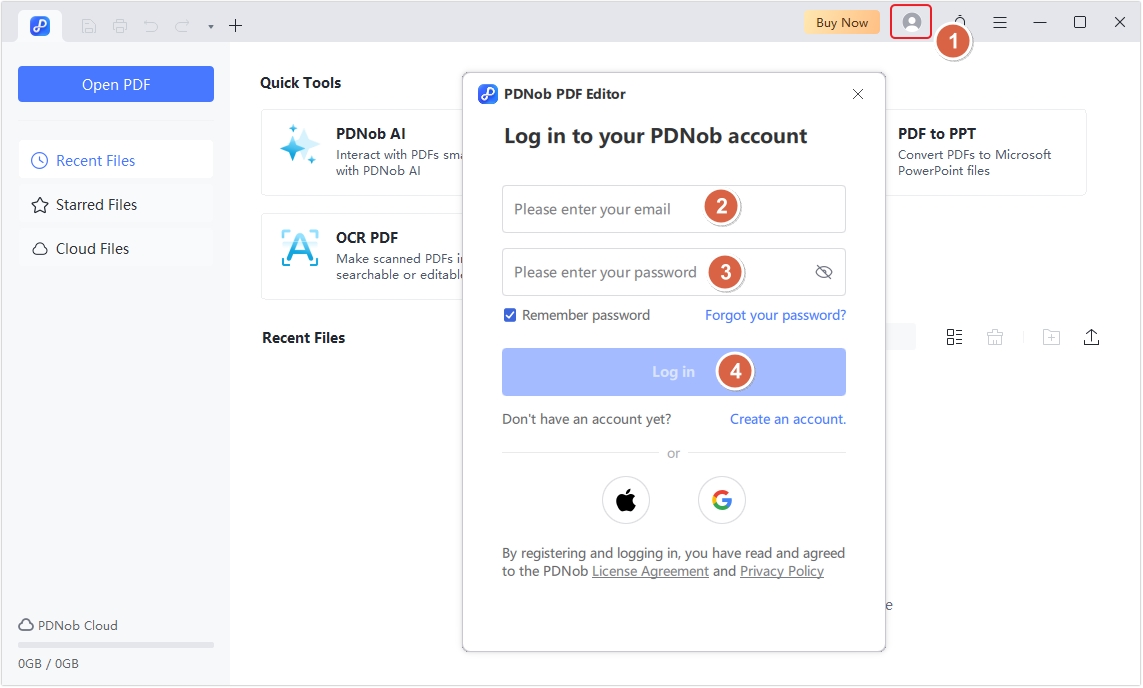
Step 3. Log in to your account. Click the Account Icon at the top, enter your email and password, and click Log in.
System Requirements
PDNob PDF Editor is compatible with Windows 10 64-bit and newer, macOS 10.15 and above. The minimum hardware requirements for Windows:
The minimum hardware requirements for Mac:
PDF AI
PDNob PDF Editor offers extensive AI features that allow you to summarize a PDF and ask any questions.
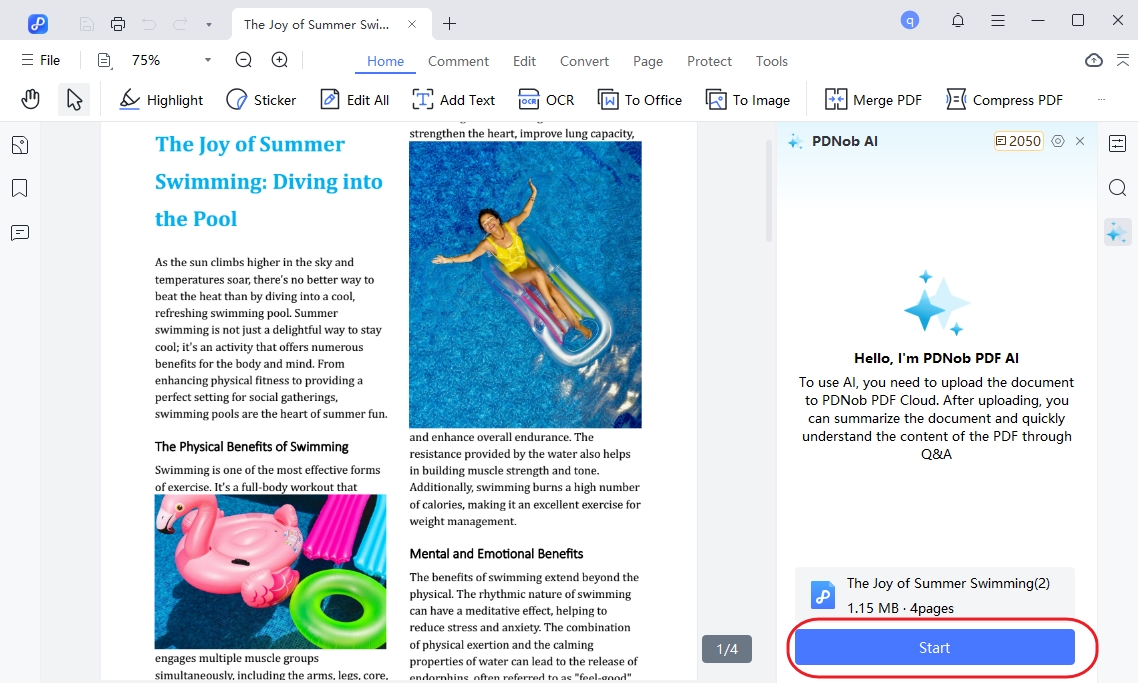
Step 1. Open PDNob PDF Editor and in the main interface, click on PDNob AI. This will prompt you to open the PDF document.
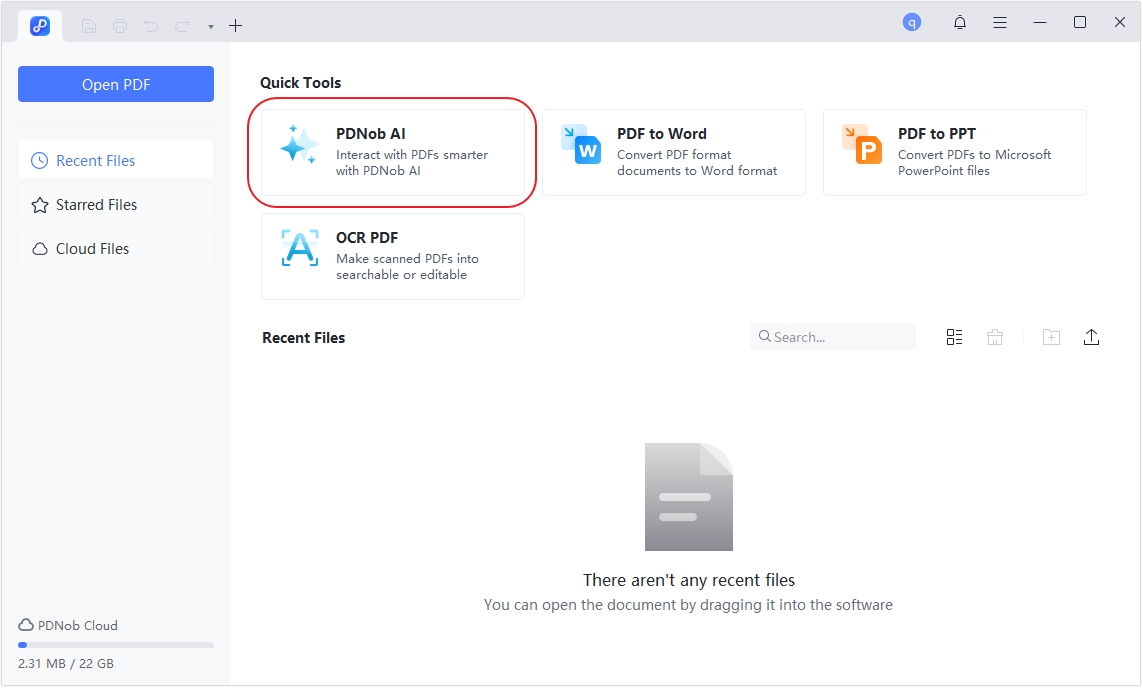
Step 2. Once the document is open, click on the Start button to allow PDNob AI to begin analyzing the document.
![]() Note:
Note:
PDNob PDF Editor has recently integrated DeepSeek AI, providing a smarter and more efficient way to manage, edit, and interact with PDFs. With the power of AI, DeepSeek can analyze and summarize long PDFs 300X faster than traditional methods.
Step 3. Select the DeepSeek AI you want and start asking questions, then DeepSeek AI will begin analyzing the document.

Convert PDF
PDNob PDF Editor comes with highly effective PDF conversion features that allow you to convert PDF to various formats. Here’s how to use this feature.
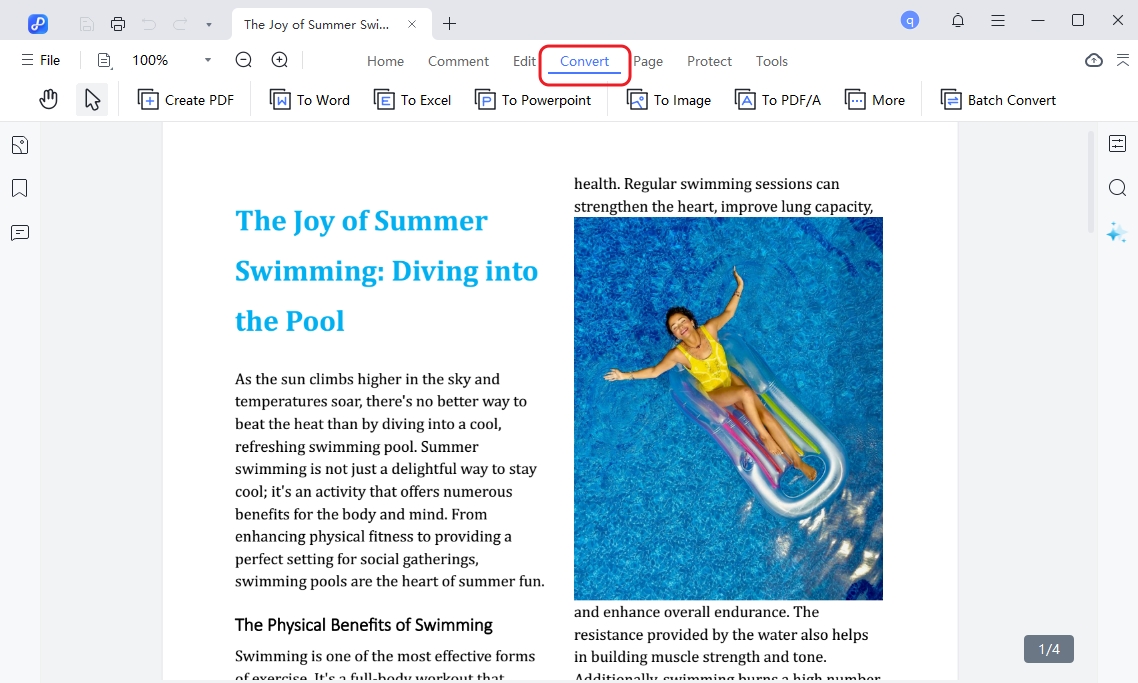
Step 1. Step 1. Click on the Convert tab in the top toolbar after adding your PDF file. A range of format options will appear in the navigation bar; select the format you'd like to convert your PDF into.
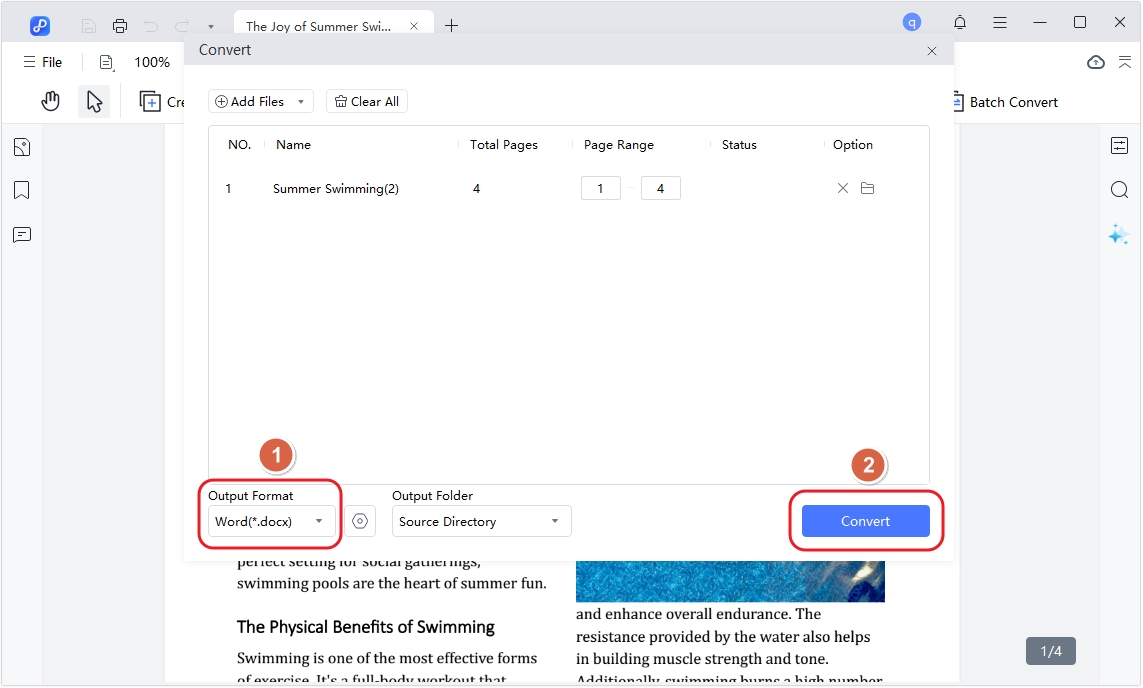
Step 2. In the pop-up window, set the page range and select your desired file format. Then, click the Convert button to start the conversion. Your PDF will be ready shortly.
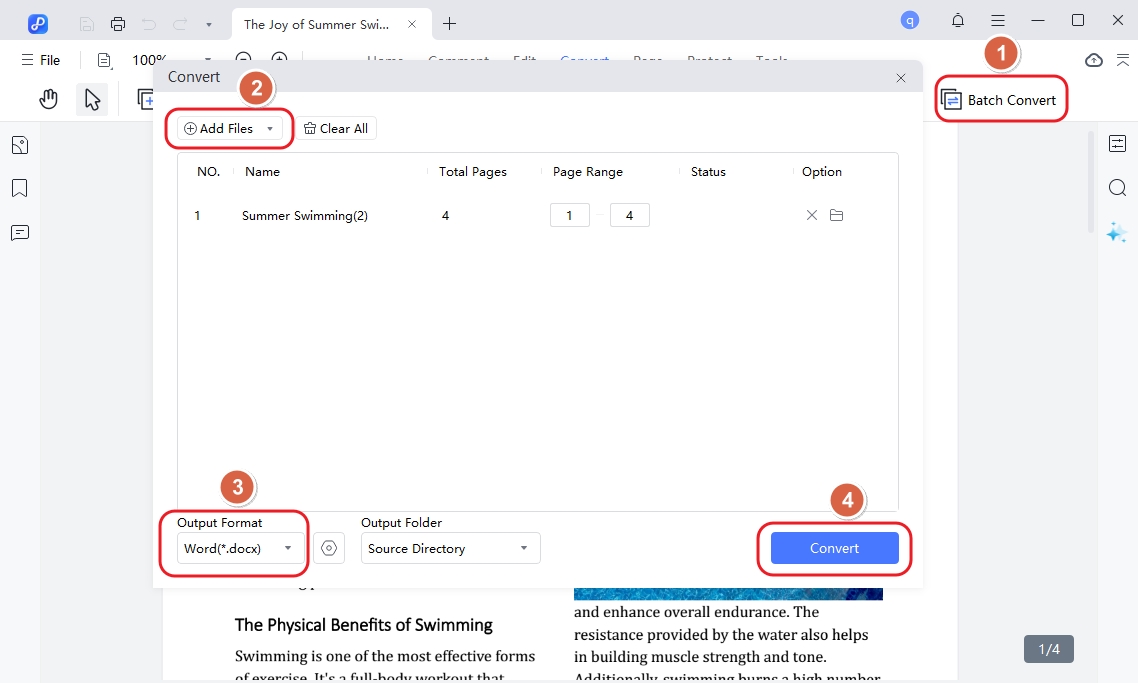
To batch convert PDFs with PDNob PDF Editor, select Batch Convert tab. Click Add Files to upload multiple PDFs, set the desired Page Range for each file (or leave it as the default for full conversion), and choose your preferred Output Format (e.g., Word, Excel). Next, select an Output Folder where the converted files will be saved. Finally, click Convert to begin the process. PDNob PDF Editor will handle the batch conversion, and your files will be ready in the specified folder shortly.
Edit PDF
Step 1. Open PDNob PDF Editor from your desktop or start menu. Click on the Open PDF button or drag and drop the PDF you want to edit into the workspace.
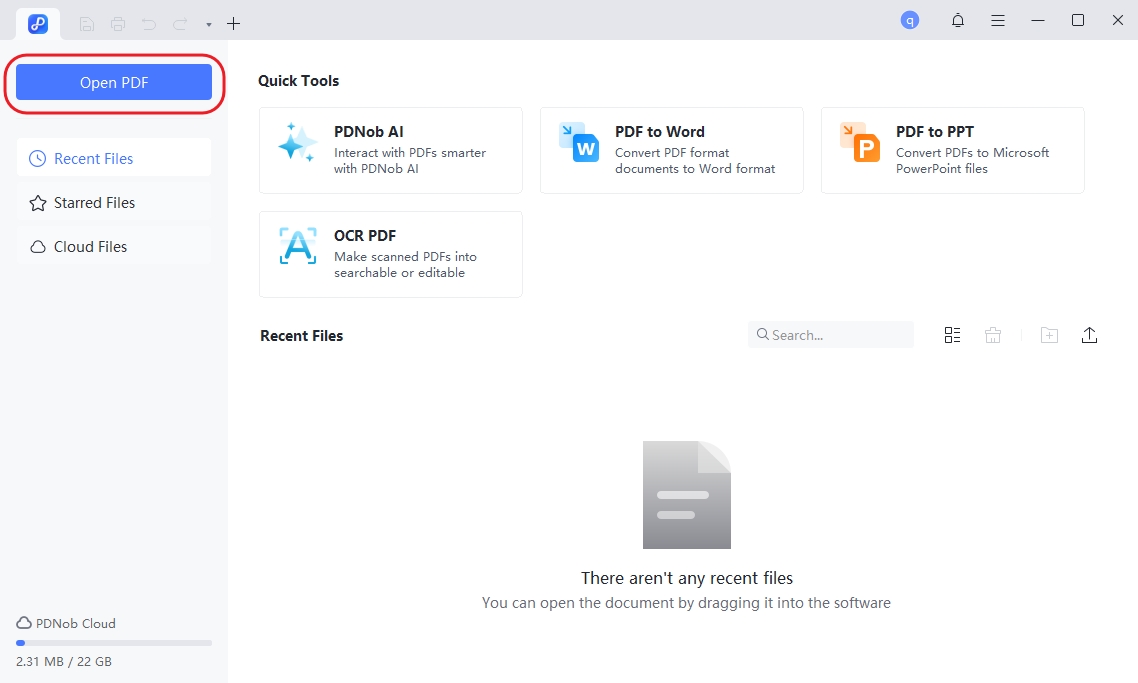
Step 2. Edit the existing text or add new text: Click the Edit button located on the top toolbar. Click on the text you wish to modify within the PDF. A text box will appear around the selected content. Once the text box appears, you can directly type to add or modify text. You can also adjust the font style, size, and color using the toolbar options.
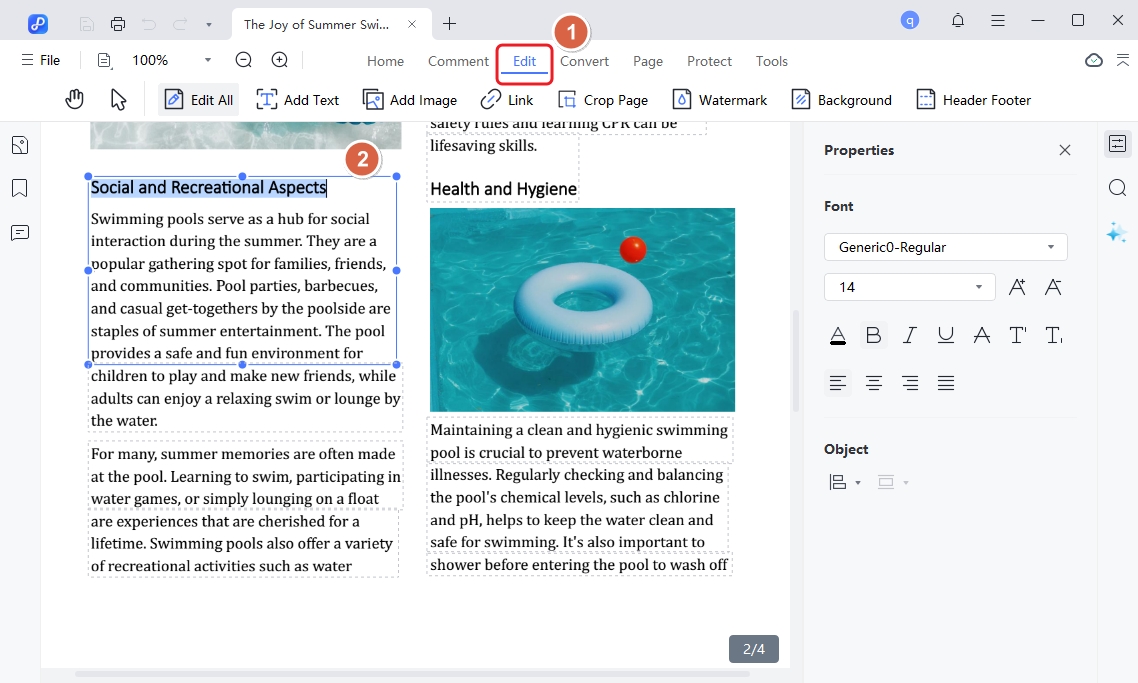
To add text to the PDF, click on the Add Text button under the Edit section.
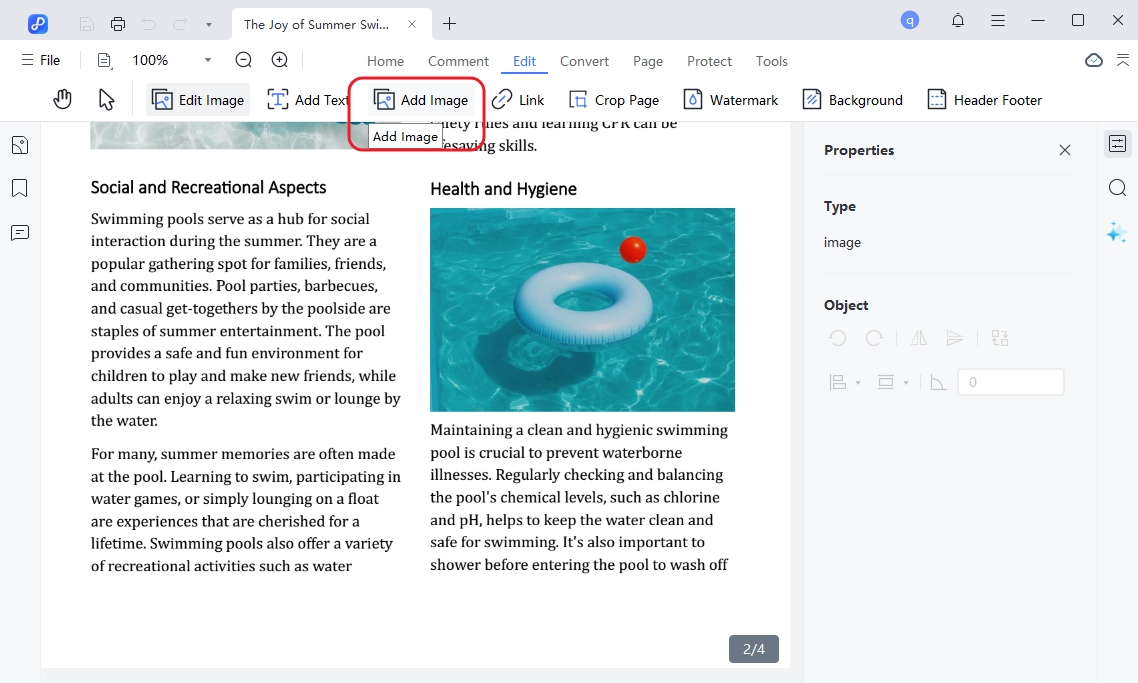
Step 3. Add Images to PDF: You can also add images to the PDF document very easily by simply clicking on the Add Image button.
OCR PDF
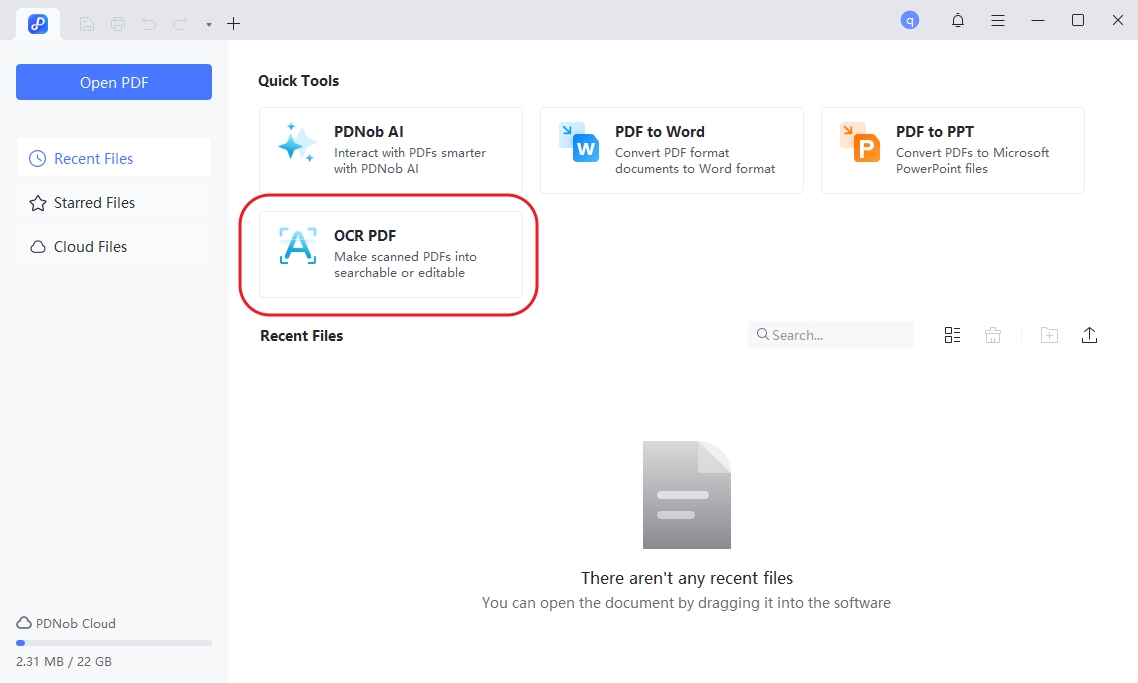
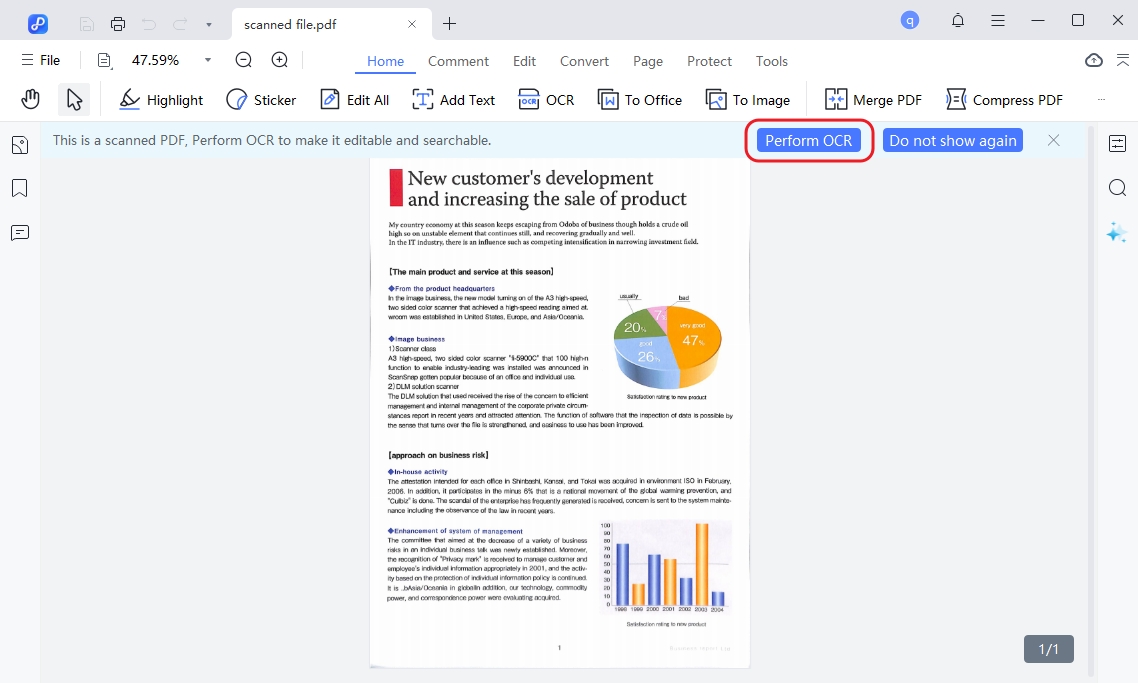
Step 1. Open PDNob PDF Editor and in the main window, select OCR PDF. This will allow you to browse your computer for the scanned PDF document.
Step 2. Once it is open, click Perform OCR at the top to convert the scanned PDF into an editable and searchable format.
Annotate PDF
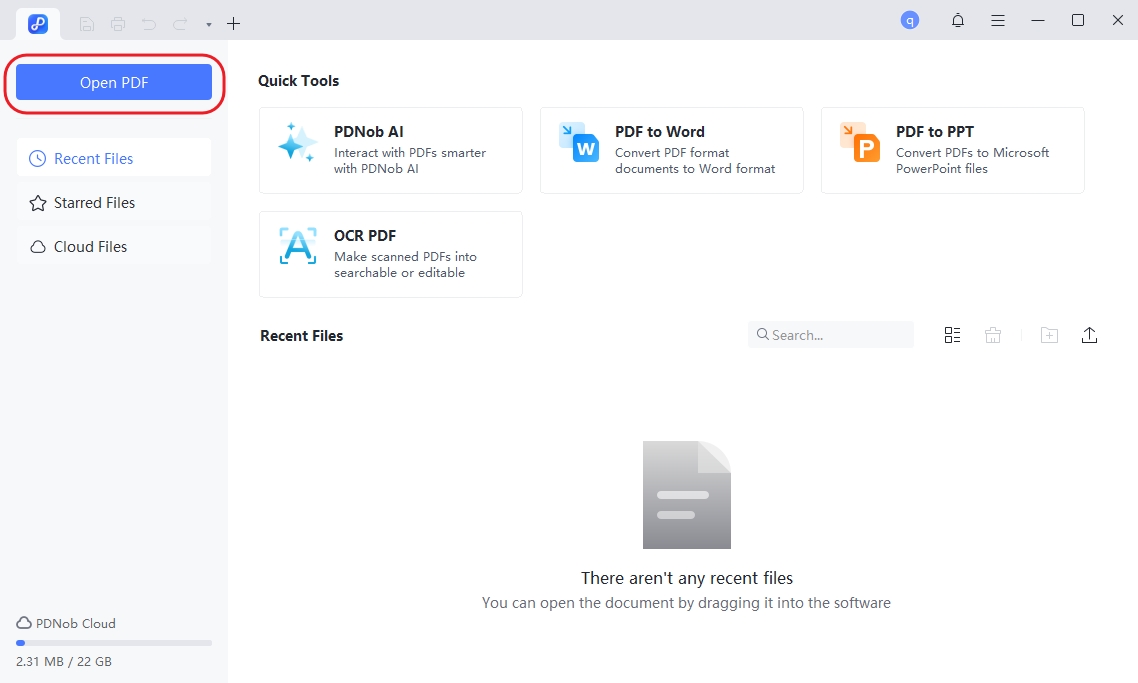
Step 1. Open PDNob PDF Editor and click Open PDF to import the PDF document to annotate.
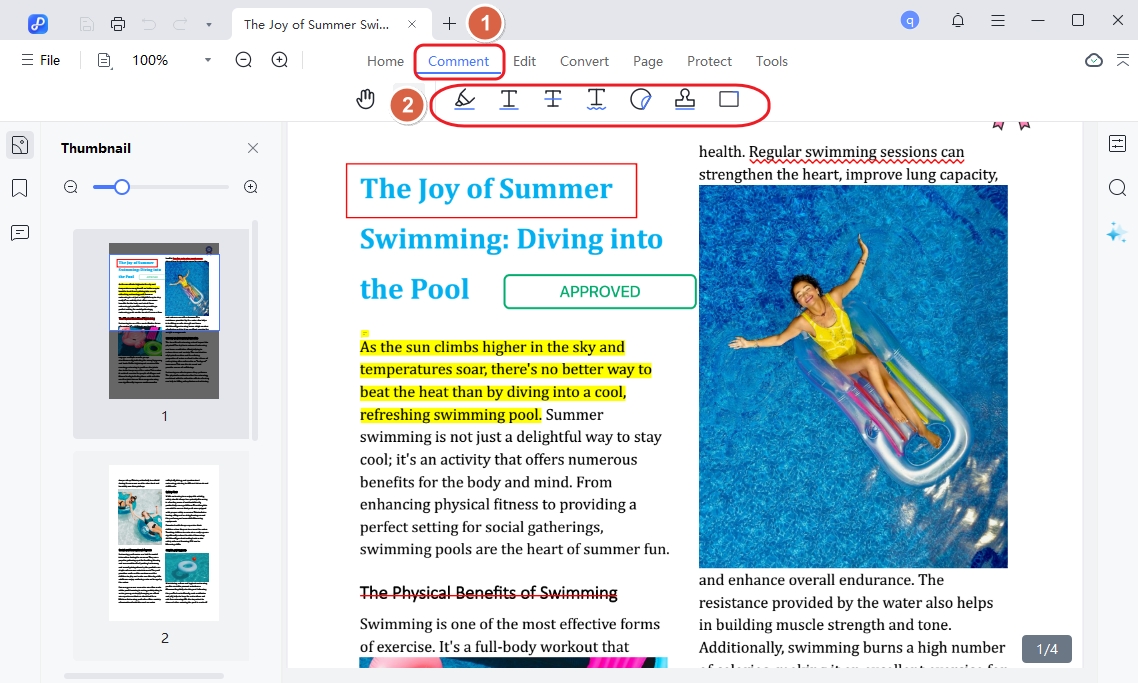
Step 2. Once the document is open, click on Comment in the main toolbar. Here, you will see various annotation tools including highlight text, strikethrough text, underline text, and stamps. Select the text to annotate and choose an annotation tool to use.
Organize PDF
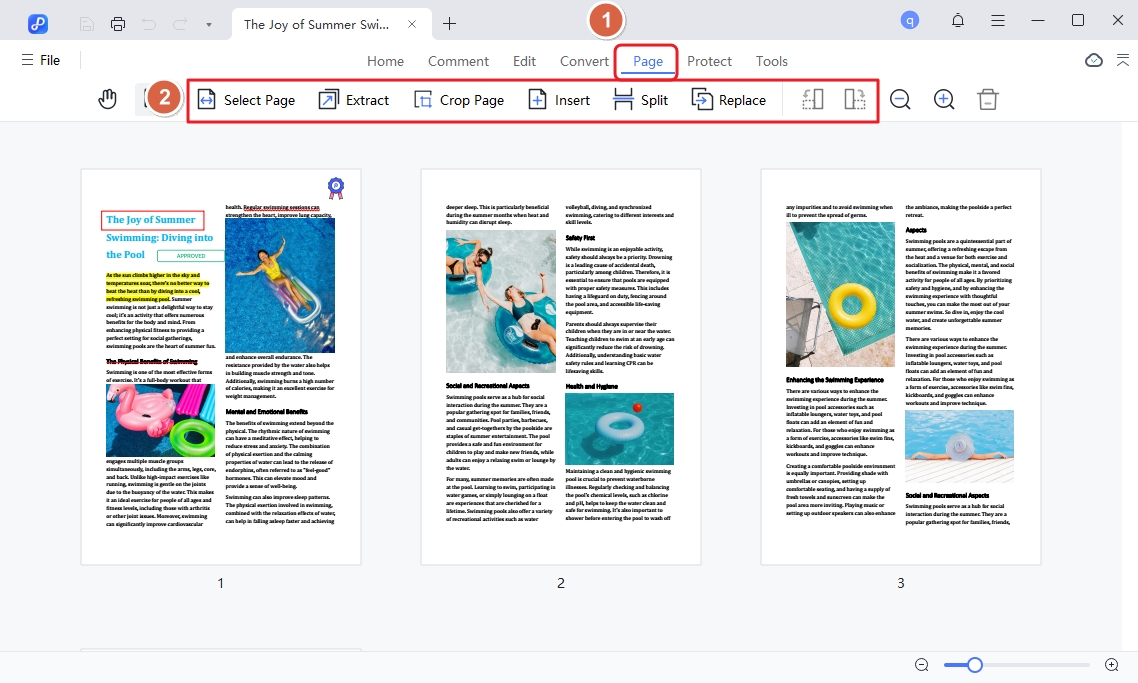
With PDNob PDF Editor, you have a wide range of options to organize your PDF document in various ways. To use this, open PDNob PDF Editor and click Open PDF to open the PDF file you want to organize. Then, click on the Page button in the main toolbar and you will see various options including Select Page, Extract Page, Crop Page, Insert, and Split.
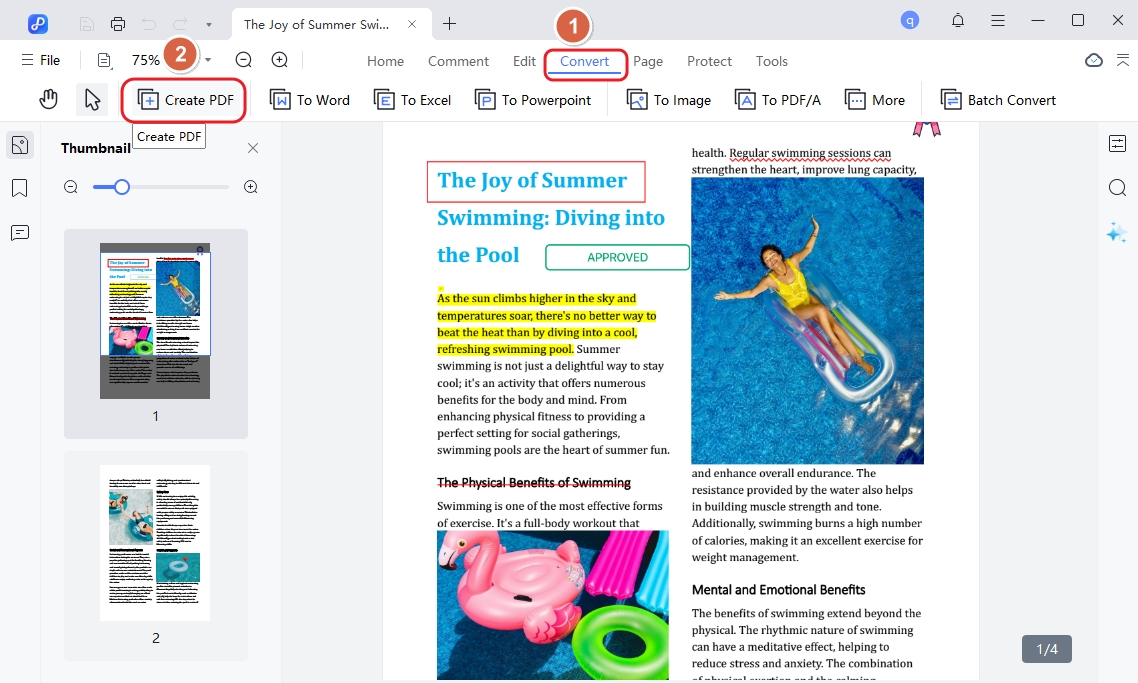
Create PDF
Click on the Convert button in the main toolbar after importing a PDF file and then select Create PDF. You can then browse for the file you’d like to convert to PDF. It will open in PDNob PDF Editor and you can save it as a PDF file.
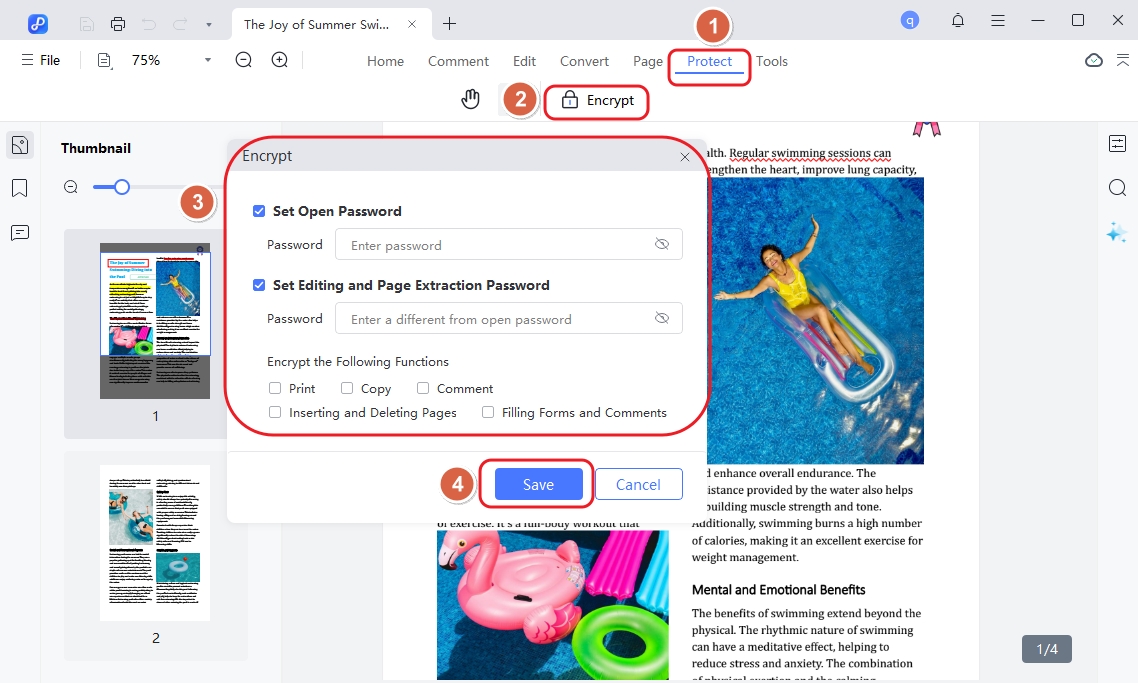
Protect PDF
Click on Protect in the main toolbar after importing your PDF file, then click Encrypt, and create an open password or editing and page extraction password for the document.
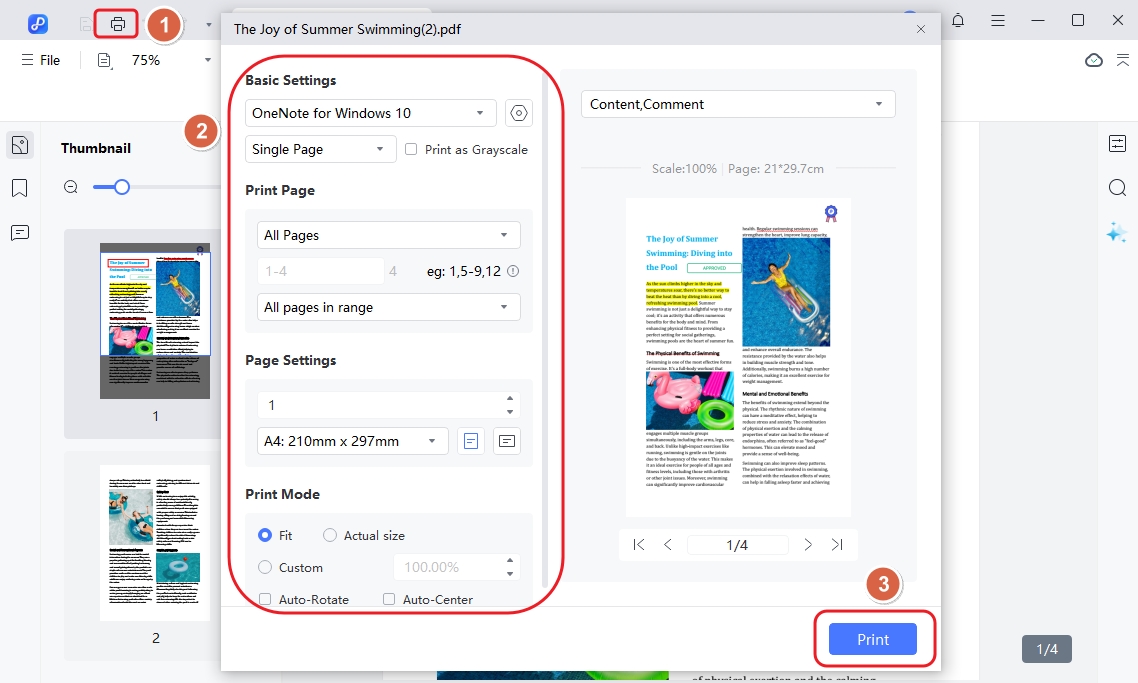
Print PDF
Click on the Print icon at the top left corner of the screen after adding your PDF file. In the dialogue box that appears, specify the print settings and click Print.
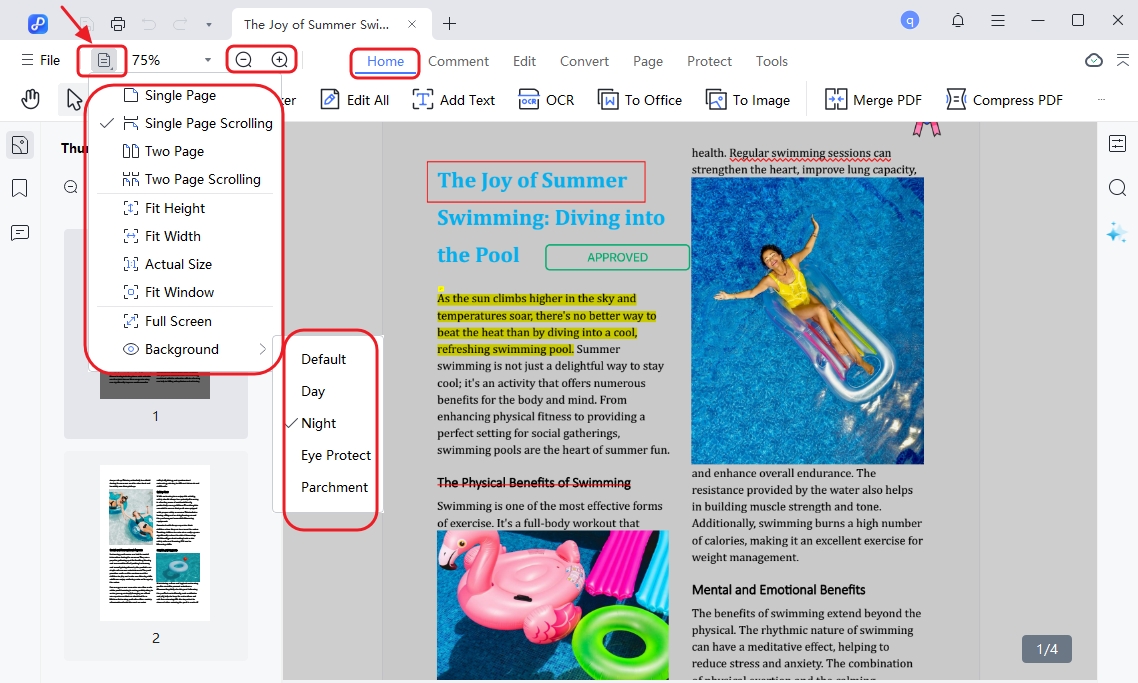
Read PDF
When you import a PDF document, it automatically enters the PDF reading mode in the home section. Click the Read Document icon in the upper left corner, you can select from various viewing modes such as Single Page, Single Page Scrolling, Two Page, and Two Page Scrolling. And adjust the zoom level using options like Fit Height, Fit Width, Actual Size, Fit Window, or Full Screen to enhance your reading experience. The thumbnail panel on the left side allows for quick navigation between pages, and you can easily add bookmarks to access specific sections later.
Properties Settings
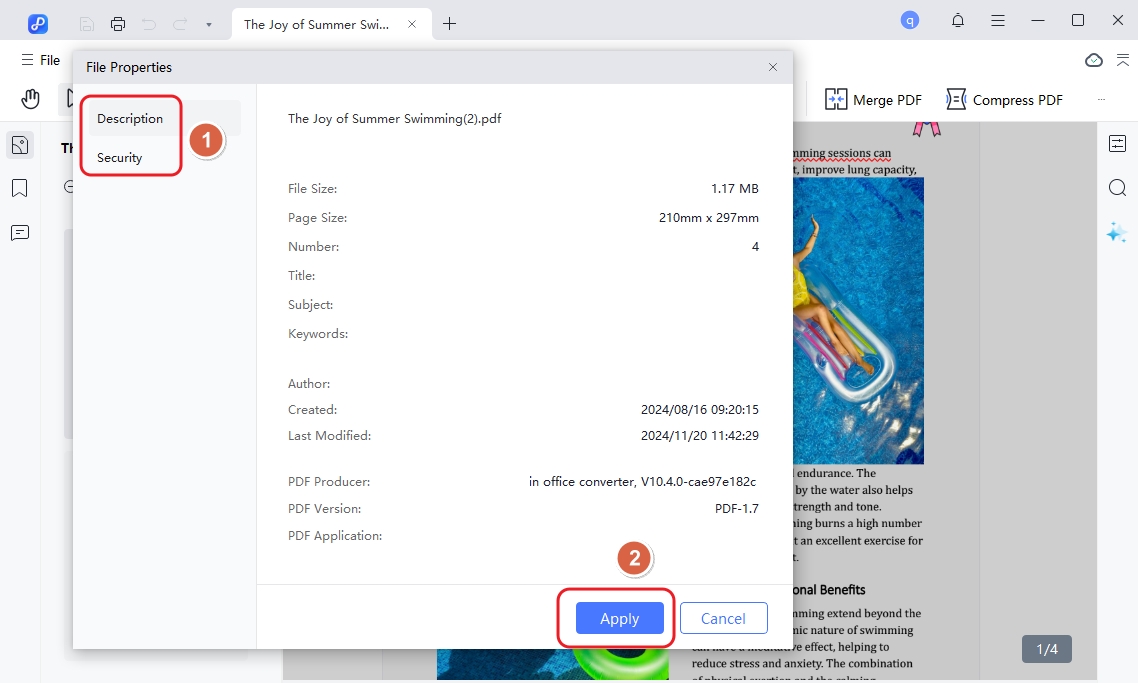
PDNob PDF Editor makes it easy to view and modify the properties of your PDF files, such as the title, author, keywords, and more. Here’s how to manage PDF properties:
Step 1. After opening your PDF file, click on File in the top toolbar, then choose Properties from the drop-down menu.

A window will appear displaying important information about the PDF, including:
In the properties window, you can modify fields such as Title, Author, Subject, and Keywords. Click in the text boxes to type or update the information.
Step 2. Once you've made your changes, click Apply to save the new properties.
Preferences Settings
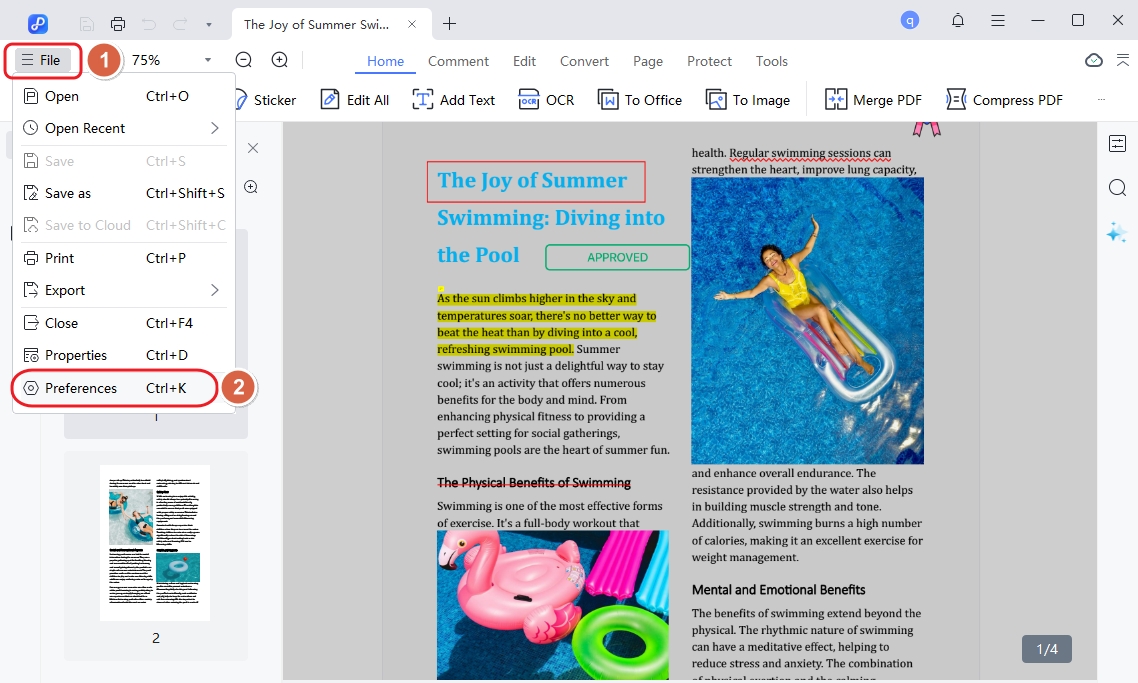
Step 1. Click on the File menu at the top of the screen, then select Preferences from the drop-down list.
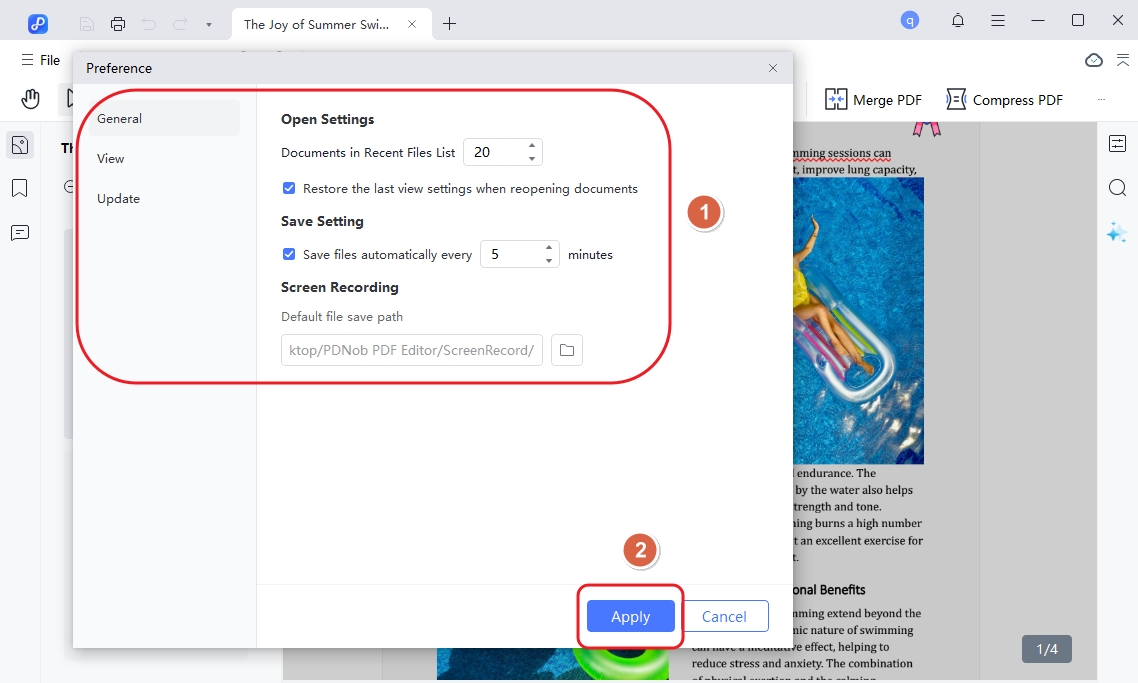
In the Preferences window, you’ll find several options to modify how PDNob PDF Editor behaves:
Step 2. Once you’ve customized the settings to your liking, click Apply to save the changes. PDNob PDF Editor will now operate based on your new preferences.
Is this page helpful?
Still Need Help?
Just contact our support team and we will reply to you within 24 hours on business days.
Contact Us