Part 1: Preparations (Must Do)
Preparation for TestFlight Users on iOS 14-16.7
If you downloaded the iAnyGo iOS app through TestFlight and your iOS version is 14-16.7, please complete the following 4 preparations in sequence before use; otherwise, location cannot be modified.
1st Preparation: One-Click VPN Configuration
(No need to actually configure a VPN connection, just simulate a WiFi signal by configuring a VPN.)
Connect to a stable WiFi network.

Open iAnyGo on your iPhone, single-tap any location on the map - select the bottom-right location modification button.
Tap the "One-click configuration" button to complete the configuration. Then select "Start."
2nd Preparation: Adding Trust Files
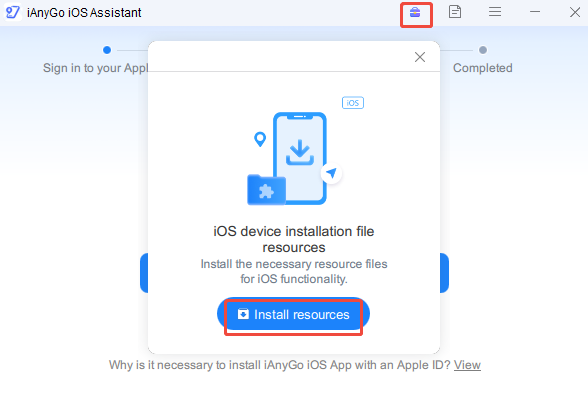
Please open the iAnyGo iOS Assistant on your computer to install the resource files. Click "Install resources."

3rd Preparation: Enabling Developer Mode (iOS 16 and above, excluding iOS 17)
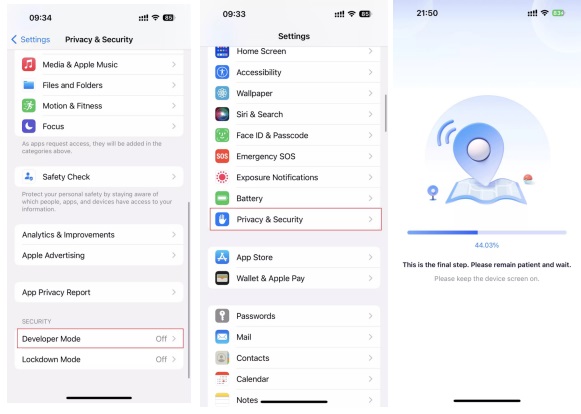
On your iPhone, go to “Settings - Privacy & Security.”
Scroll down to find the “Developer Mode” option and enable it.
4th Preparation: Waiting for iOS Components to Install
Open iAnyGo on your iPhone, wait for the components to download and install.
Preparation for TestFlight Users on iOS 17.2 or Later
If you downloaded the iAnyGo iOS app through TestFlight and your iOS version is 17.2 or later, please complete the following 3 preparations in sequence before use; otherwise, location cannot be modified. These 3 preparations takes about 5-10 minutes for Windows users and less than 5 minutes for Mac users.
1st Preparation: One-Click VPN Configuration
(No need to actually configure a VPN connection, just simulate a WiFi signal by configuring a VPN.)
Connect to a stable WiFi network.

Open iAnyGo on your iPhone, single-tap any location on the map - select the bottom-right location modification button.
Tap the "One-click configuration" button to complete the configuration. Then select "Start."
2nd Preparation: Adding Trust Files
Please open the iAnyGo iOS Assistant on your computer to install the resource files. Click "Install resources."

Some users may need to install drivers on their Windows devices. Just wait for its installation and follow the prompts to trust the device on your iOS device.
3rd Preparation: Waiting for iOS Components to Install
Open iAnyGo on your iPhone, wait for the components to download and install (you don't need to take any action).
Preparation for iAnyGo iOS Assistant Users (Universal)
iAnyGo iOS app support iOS 14 - iOS 26 or later (excluding iOS 17.0/iOS 17.1)
If you downloaded the iAnyGo iOS app through iAnyGo iOS Assistant, regardless of your iOS version, please complete the following steps in sequence before use; otherwise, the location cannot be modified.
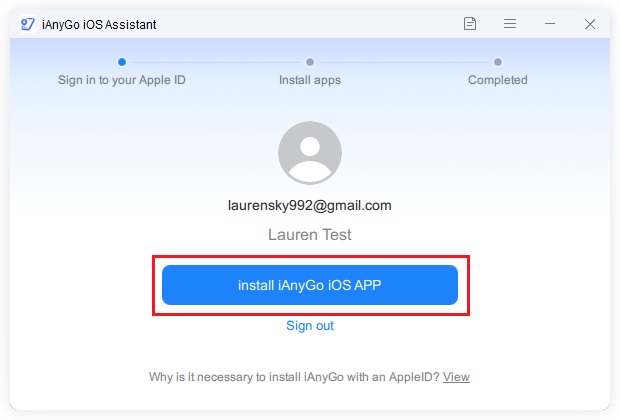
Step 1. Open the iAnyGo iOS app on your iPhone. As IPLocate App is installed by iAnyGo assistant. Please tap the location change button on iAnyGo iOS app. It will automatically switch to the IPLocate App.
Step 2. Tap "Allow" to add VPN configurations and enter your screen lock password. Tap "Configured" > "Open". Now, start to use the iAnyGo iOS app to change your location. Sometimes, you won't need to do anything, and the interface will switch back to the iAnyGo iOS app automatically.
Part 2: Reset iAnyGo iOS App Validity
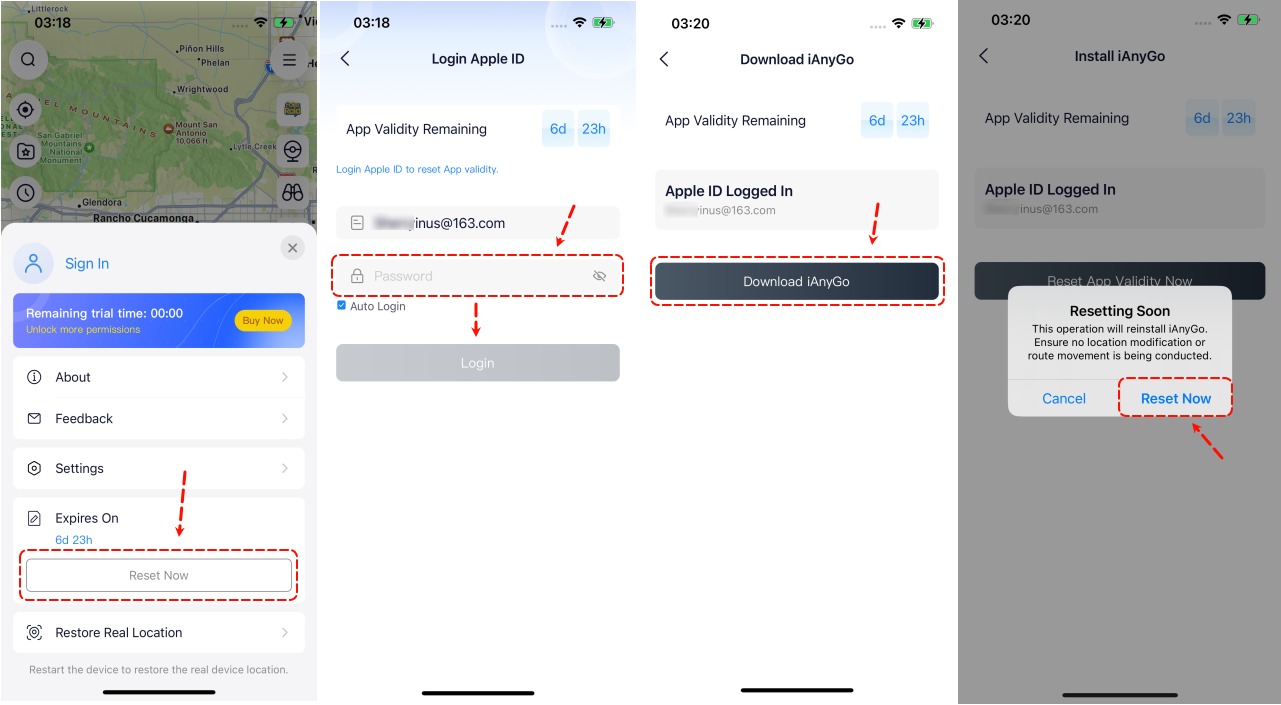
Once you’ve installed the iAnyGo iOS app, you can renew its validity every seven days directly in the app. Simply click "Reset Now," log in with your Apple ID, and the reset will be completed in just a few minutes.
Part 3: iAnyGo iOS App Control Panel
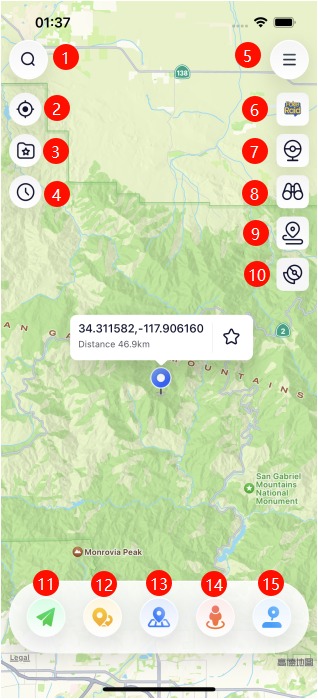
01: Location/Coordinate Search
02: Locate to Current Location
03: Map Collecting
04: History Records
05: Menu
06: Search for Pokemon and Raid
07: PokeStop Routes
08: Field Research
09: PoGo Routes
10: Pokemon Go Tools
11: Single-Spot Movement Button
12: Multi-Spot Movement Button
13: Location Change Button
14: Jump Teleport Button
15: Joystick Button
Part 4: Major functions of iAnyGo iOS App
Feature 1: Change GPS Location
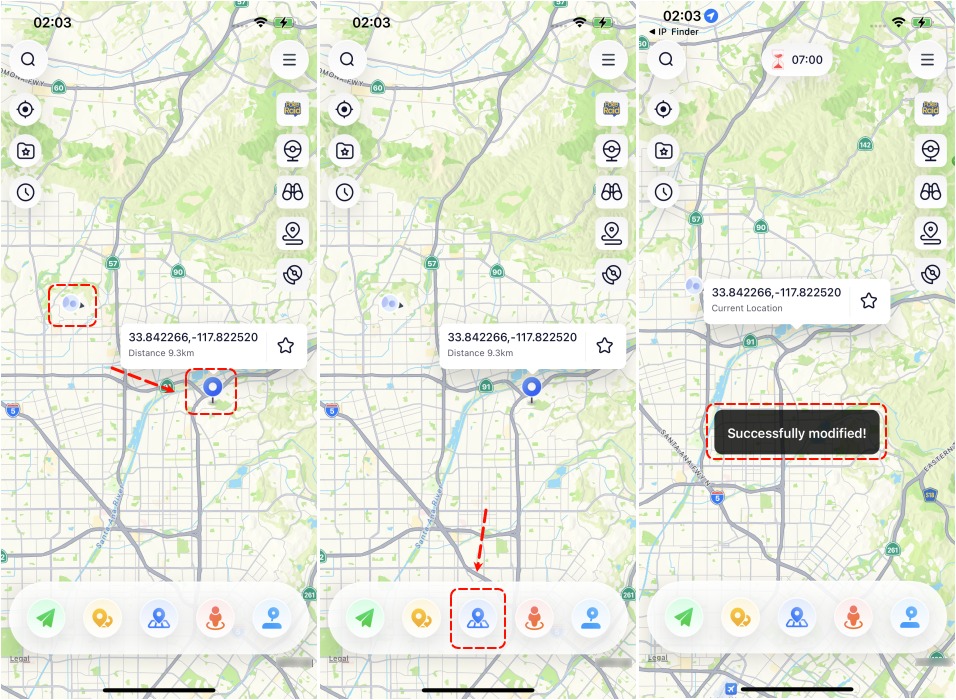
Open iAnyGo on your iPhone, and select a location on the map or use the search bar above to find the place/coordinates you want to go to. Tap on the first button at the bottom right - Change Location. Your location has been successfully modified.
Feature 2: Single - Spot Movement
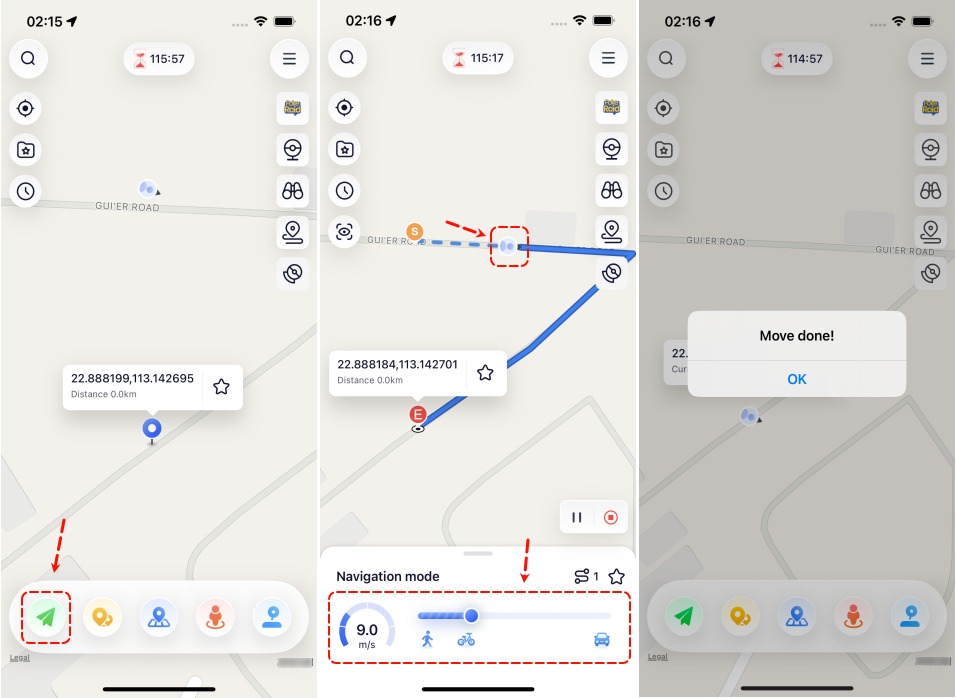
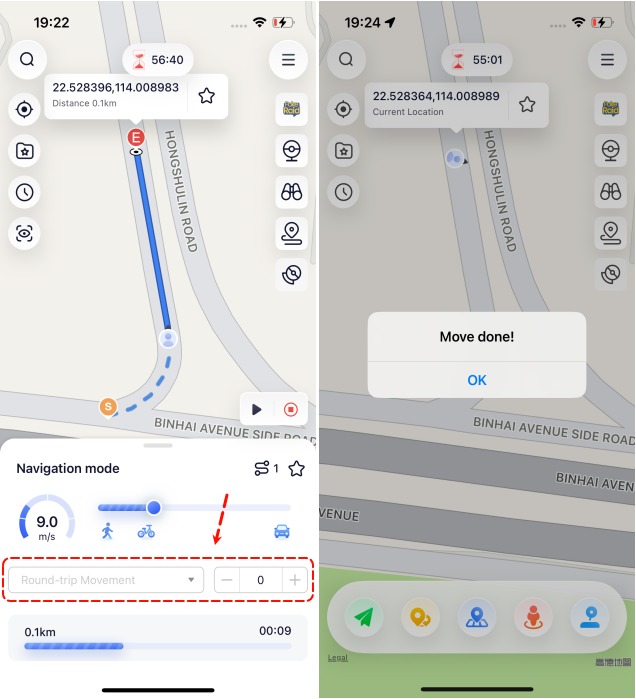
Choose your desired location on the map or use the search bar above to find the place/coordinates you want to go to.In the "Speed" section, set the virtual coordinate point's virtual movement speed (speed range: 1m/s~30m/s). Tap on the second single-spot movement button at the bottom right. The program will automatically plan a route along the road grid from the starting point to the destination coordinates, mark it on the map, and then start moving.

Tip: You can modify the movement speed, pause, or abort the movement process at any time during the movement. To avoid your Pokemon account from being soft banned, please keep your movement speed within 2.9 m/s.
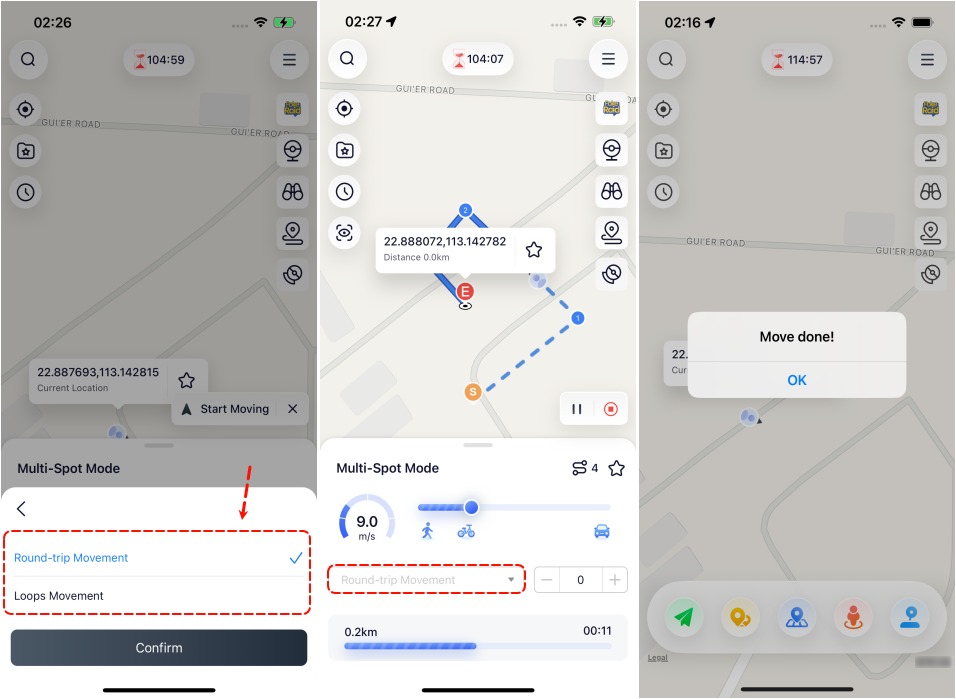
You can opt to repeat the movement along this route, choosing either a round trip or loop. The number of repetitions can be set freely.
Feature 3: Multi - Spot Movement
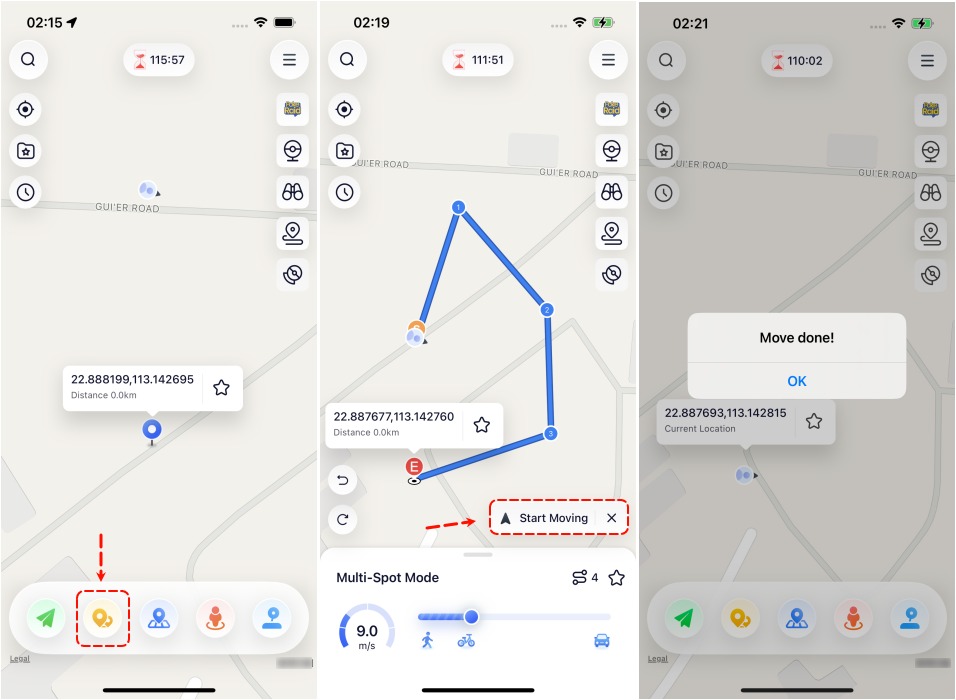
Tap on the third multi-spot movement button at the bottom right. Single tap on the map to select or search for coordinate points to define the route nodes for customizing the movement route. Tap the lower-left undo or reset function button to go back to the previous marked route node or clear all planned route nodes directly. In the "Speed" section, set the virtual coordinate point's virtual movement speed. Tap the "Start Moving" button. The program will automatically follow the planned route and begin moving at the set speed.

You can opt to repeat the movement along this route, choosing either a round trip or loop. The number of repetitions can be set freely.

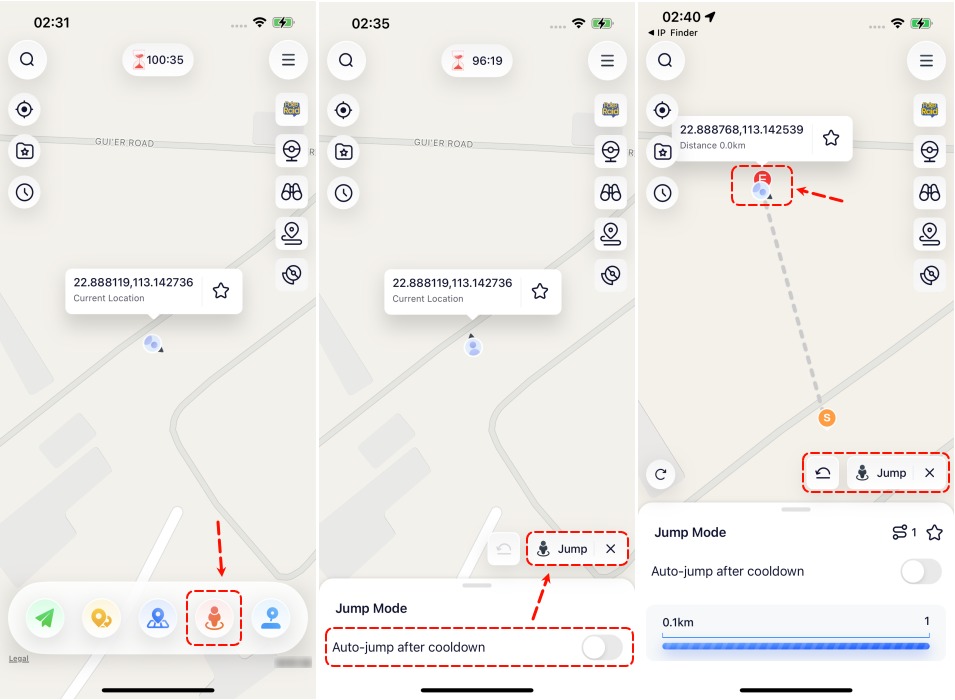
Feature 4: Jump Teleport Movement
click "Jump Teleport" and select any location on the map to create a custom route. Tap "Jump" to initiate or select an auto-jump mode after the cooldown period. To go back to the previous location, click the "Back" button.

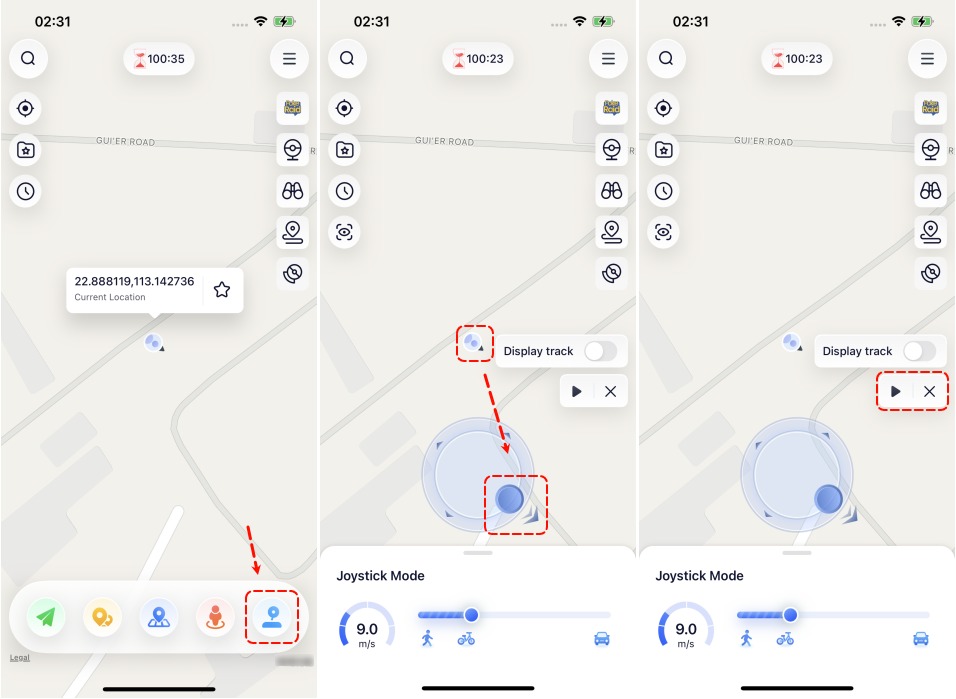
Feature 5: Joystick Movement
Tap on the fourth button at the bottom right - Joystick mode. Set The Movement Speed. Drag the slider to set the speed you would like to move. You can choose walking, cycling, or driving speed. Tap the triangle icon button to initiate movement. Use the button within the circle to freely tweak the direction in 360 degrees during the movement. You can also tap the exit button to exit joystick mode.

Part 5: Exclusive Features for Gamers
Feature 1: PokeStop Routes
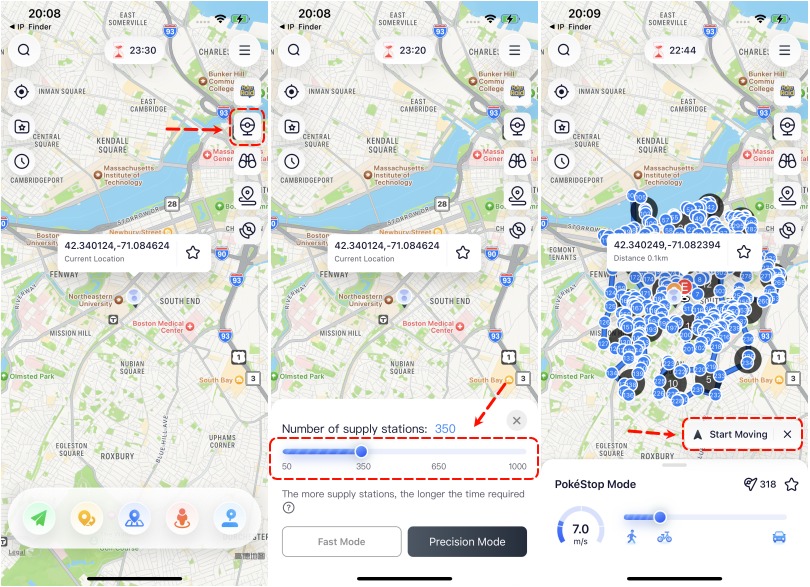
Using the new PokeStop Route function to find PokeStops near me. Open the iAnyGo iOS app and select "PokeStop Routes". Choose between Fast Mode or Full Mode. Nearby PokéStops will be automatically connected, generating an optimal route. You can adjust your speed and the number of PokéStops,then start moving to efficiently collect items and rewards.

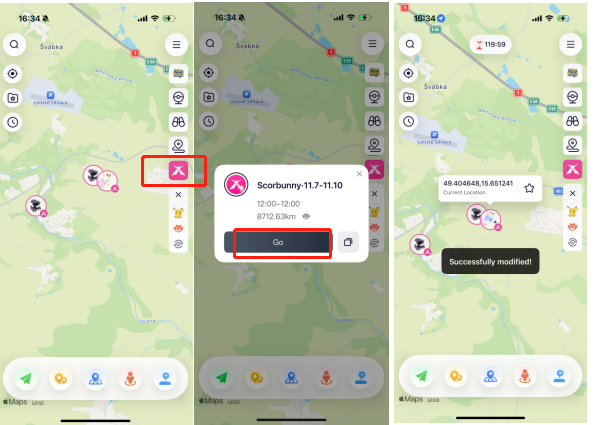
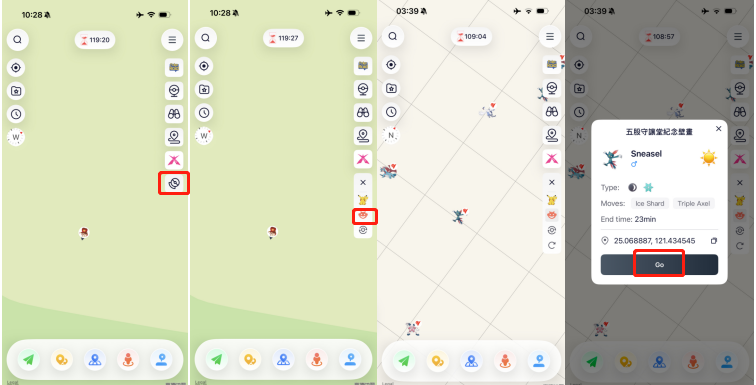
Open the iAnyGo iOS App and select the fifth button "D-Max Pokemon Mode" on the right to locate nearby Dynamax and Gigantamax Pokemon. Tap on a Pokemon icon to view this giant Pokemon.
By clicking the "Go" button, you can navigate to the location to catch Dynamax and Gigantamax Pokemon. You can also tap the "copy" button to copy the GPS coordinates and team up with friends to challenge Dynamax Pokemon together.
-
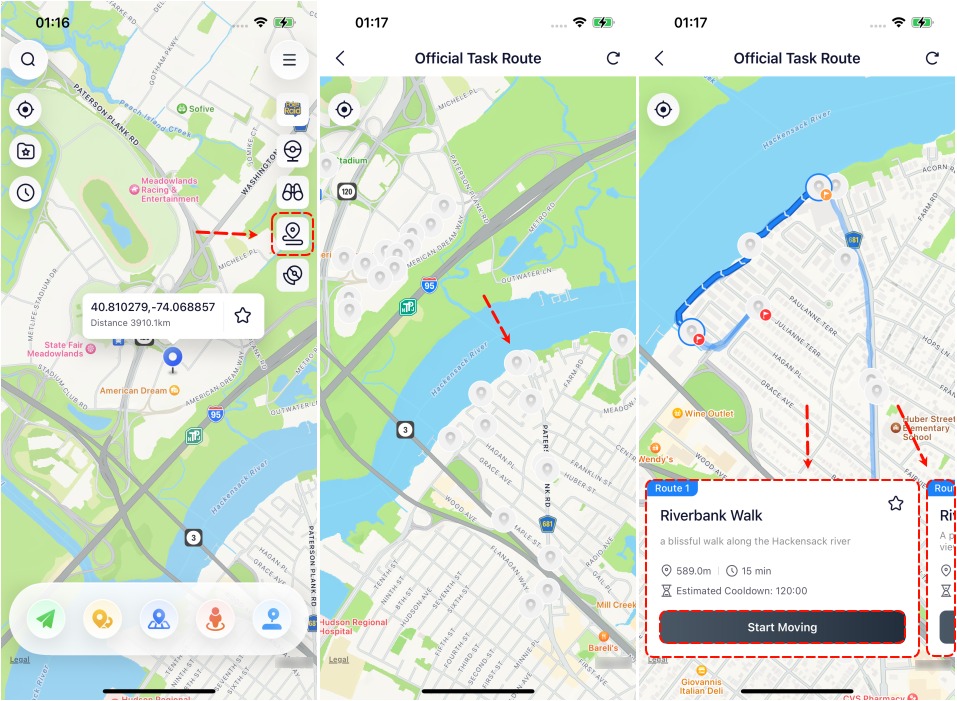
You can use the PoGo Routes feature to easily find nearby routes and collect Zygarde Cells along the way, which are used to upgrade special Pokemon.
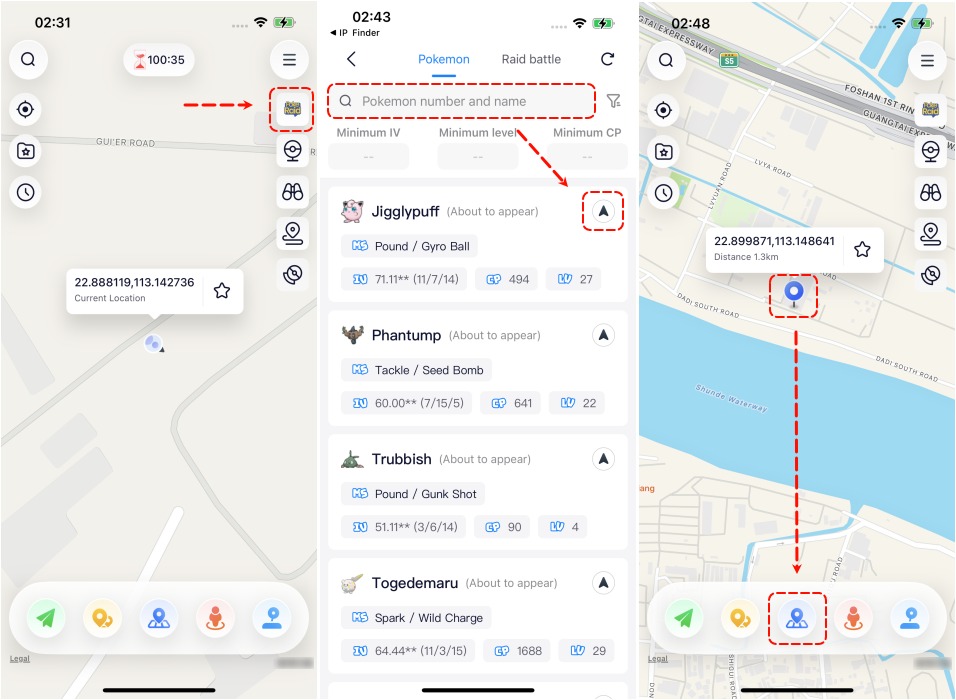
Select the "Poke Raid" option. Enter the Pokemon's name or number. Click on the Pokemon's details and then press the "Go" button. This will navigate you to the main interface of the iAnyGo iOS app. Tap the "Change Location" button to update your location and catch the Pokemon.
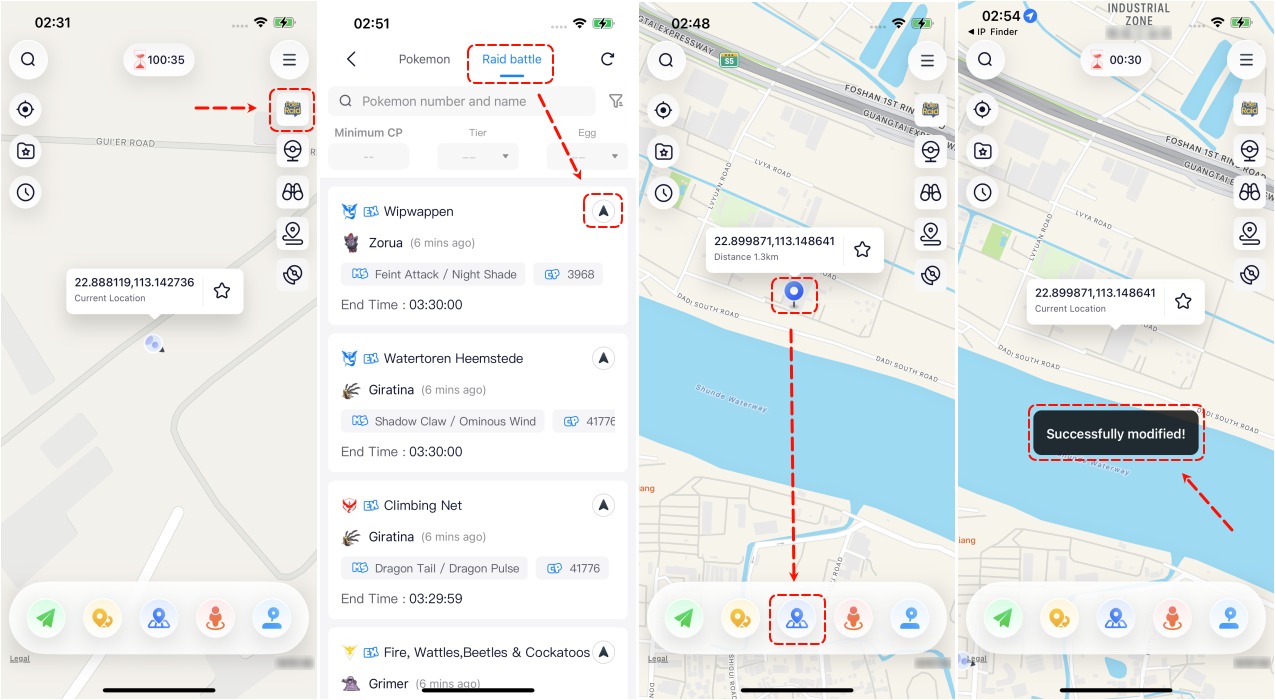
Select the "Poke Raid" option and then tap "Raid Battle." Pick any raid from the list to see its location. Use the "Change Location" feature to go to the specified location and join the raid.
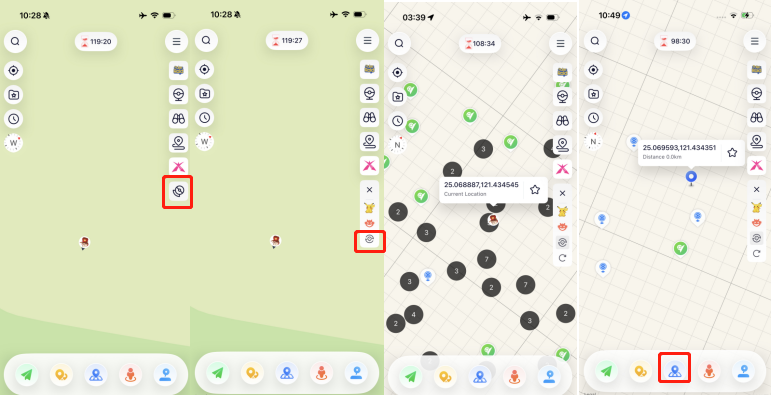
Open the Pokemon GO tool and select the "Get PokeStops and Gyms" mode. A map with all nearby PokeStops and Gyms will appear. Select the PokeStops and tap "Change Location" to access it.
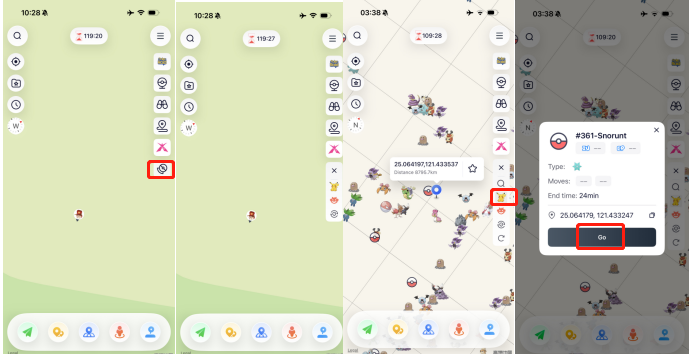
Open the Pokemon GO tool and switch to Pokemon mode. A map displaying all nearby Pokemon will appear. Tap on the Pokemon and hit "Go" to catch it.(This feature only supports displaying Pokemon on the Taiwan map.)
Open the Pokemon GO tool and choose Raid Battles mode. A map showing nearby active Raid Battles will be displayed. Select the Raid Battle icon and tap "Go" to participate.(This feature only supports displaying raids on the Taiwan map.)
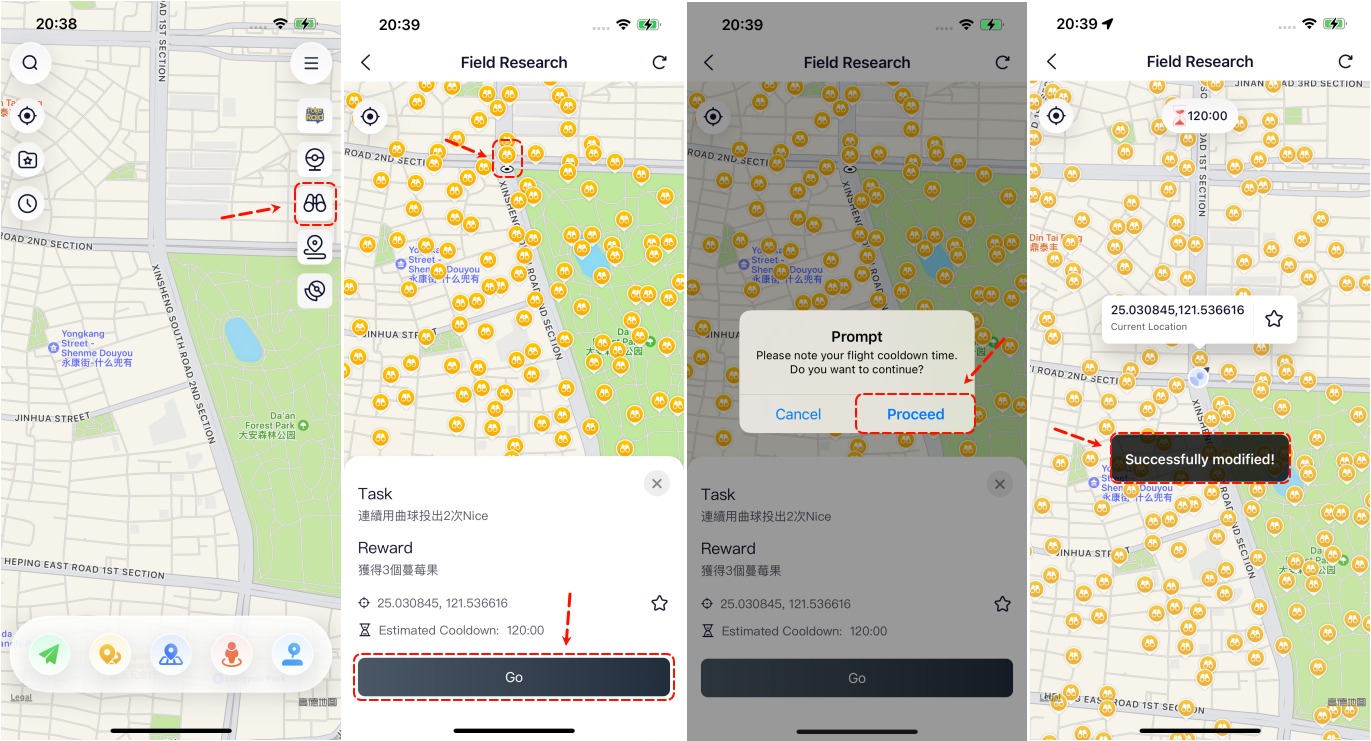
You can easily view all available Field Research tasks and rewards through the Field Research Task List feature, allowing you to instantly select the tasks you want to accept with just one tap. The Field Research feature's data is only from Taiwan.

Feature 2: D-Max Pokemon Mode
Feature 3: PoGo Routes
Feature 4: Quickly Search for Pokemon/Raids/PokeStops
Search for Specific Pokemon (Worldwide)
Search for Specific Raids (Worldwide)
Search for Nearby PokeStops and Gyms(Worldwide)
Search for Nearby Pokemon(Only display Pokemon on Taiwan map)
Search for Nearby Raid Battles(Only display Raids on Taiwan map)
Feature 5: Field Research Task List
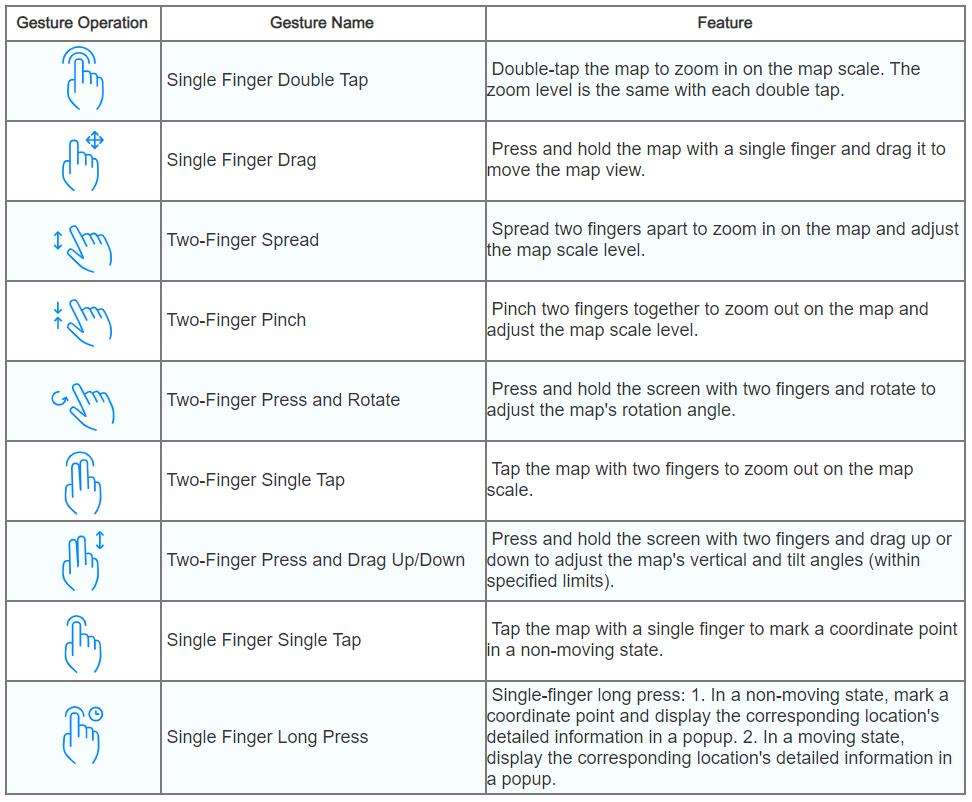
Part 6: iAnyGo Map Gestures
Part 7: Flight Cooldown Time Feature in iAnyGo (v2.0 and above)
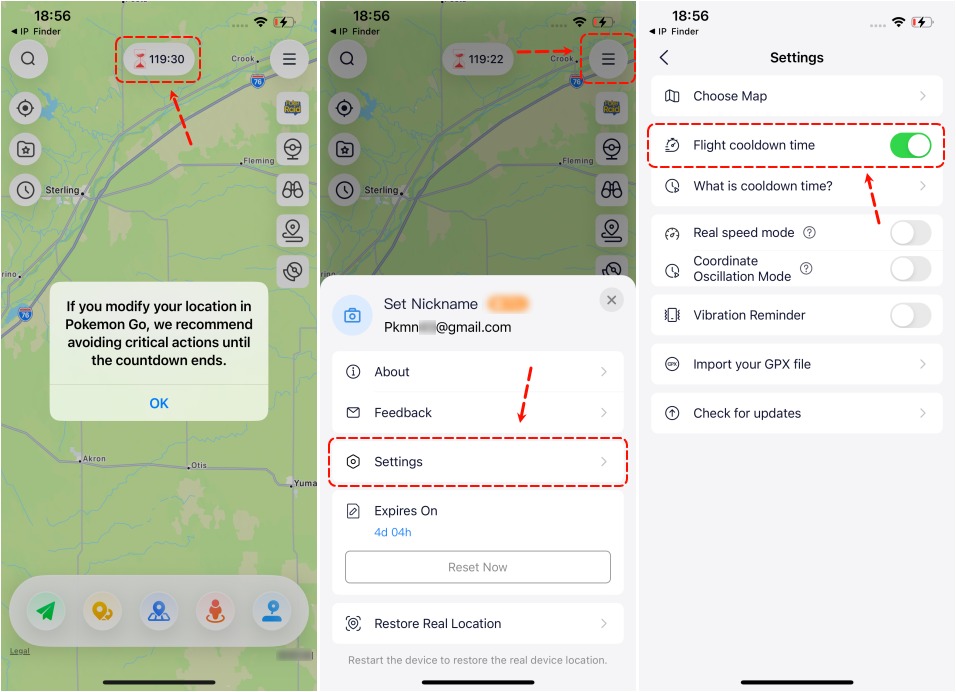
This section is dedicated to Pokémon Go players regarding the Flight Cooldown Time feature of the iAnyGo iOS app. iAnyGo has implemented a flight cooldown time feature specifically for Pokémon players with the aim of reducing the risk of Pokémon player accounts being banned.
If you are not a Pokémon Go player or think that the "Flight Cooldown Time" feature does not have a significant impact on you, you can disable this feature through the program menu's "Settings icon - Turn off Flight Cooldown Time" button on the floating overlay to open the "Flight Cooldown Time" settings popup and deactivate the feature.
1. Pokémon Cooldown Rules
Performing the following actions without a cooldown (CD: cooldown time) will trigger a new cooldown in the game:
- Catching a wild Pokemon
- Feeding a wild Pokemon with a berry (also applicable to raids)
- Gym battles
- Placing a Pokemon in one of the gyms
- Feeding a gym defender within screen radar
- Spinning a Pokestop (even hit the spin limit)
- Use of Gotcha device to spin and catch
- Accidental drop of a ball on encounter screen (also applicable to raids)
- Fleeing Pokemon (due to catch limit)
The following actions do not trigger a cooldown and have no cooldown requirements:
- Teleporting (but do not perform the actions mentioned above)
- Encountering a wild Pokemon. Enter the capture screen, and then leave the capture screen (without taking any action)
- Hatching eggs
- Evolving a Pokemon
- Using items (healing items, evolution items, TMs) on a Pokemon
- Catching a reward Pokemon from request
- Trading a Pokemon
- Exchanging and opening gifts
- Remote Berry feeding of gym defender (from long distance)
- Switching to the official game to reset PokéCoins
Firstly, in Pokémon Go, certain actions trigger in-game cooldown.
After performing any of the actions listed in 1-9 above, if any of these 9 actions are repeated in the game, the game will calculate whether the user can physically reach that location based on the time and distance between the two actions. If the game determines that the user cannot reach the location within that time frame, it will trigger corresponding penalties:
- Capturing Pokémon will result in a guaranteed failure.
- Battling at Gyms will result in the system kicking the player out of the Gym with a countdown of 0, wasting a Raid Pass.
- PokéStops won't respond, and items won't be obtained.
- Pokémon cannot be placed to defend Gyms.
- Pokémon defending Gyms cannot be attacked, and so on. These are collectively referred to as "Soft Bans" (SoftBan).
- Repeatedly triggering CD warnings may lead to an account ban.
In a completely CD-free state, it means that within a continuous 2-hour period, you haven't performed any of the actions listed as 1-9. In this state, you can freely modify your location to anywhere and perform actions. However, if you perform any of the actions listed as 1-9 while in a CD-free state, you will re-enter a cooldown state.
If you cannot understand or do not wish to read the following content, the most conservative approach is to go offline for 2 hours after each location modification before coming back online to play Pokémon Go.
In a CD state, if you change your location to another place and find that you cannot perform any of the 1-9 actions, you can either change back to your original location to continue catching Pokémon or idling, or you can wait for the cooldown to finish before performing the 1-9 actions.
Furthermore, there is only one CD location at a time. For example, if you catch a Pokémon in New York at 1:00 and then accidentally throw a Poké Ball in Japan at 2:00, the CD time will still be calculated based on the New York time at 1:00 and will not reset because of the new action in Japan.
To prevent such situations from occurring, iAnyGo provides users with the "Flight Cooldown Time" feature.
2. How to avoid Pokemon Go Ban while using iAnyGo? - Flight Cooldown Time Guide
After each location modification, iAnyGo will provide corresponding countdown prompts on the interface. You can perform actions 1-9 after the countdown ends, which helps to effectively navigate around Pokémon Go's cooldown mechanism and avoid SoftBans or account bans.
Before you make a location change, if you have selected a destination, the proram will help estimate the safest cooldown time to wait for before changing the location to reach that destination. After selecting the coordinates on the map, long-press on the coordinates, then release. A details popup will appear, and it will display the estimated cooldown time - Estimated CD.
Part 8: Other Features
Map Collection
For some useful routes, we might want to bookmark them. iAnyGo iOS App provides a feature for collecting these routes. Here you can edit the routes or tap the arrow to directly access the favorited route.

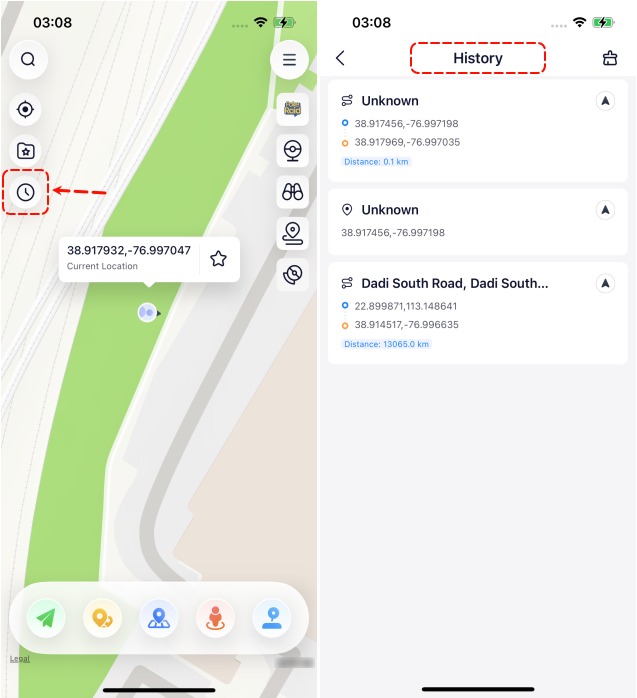
Historical records
When you want to revisit a path you've taken before, simply tap on this button in the history records to view it. You can also tap the arrow to instantly return to the historical location you've visited before.
Part 9: How to Restore Real Location
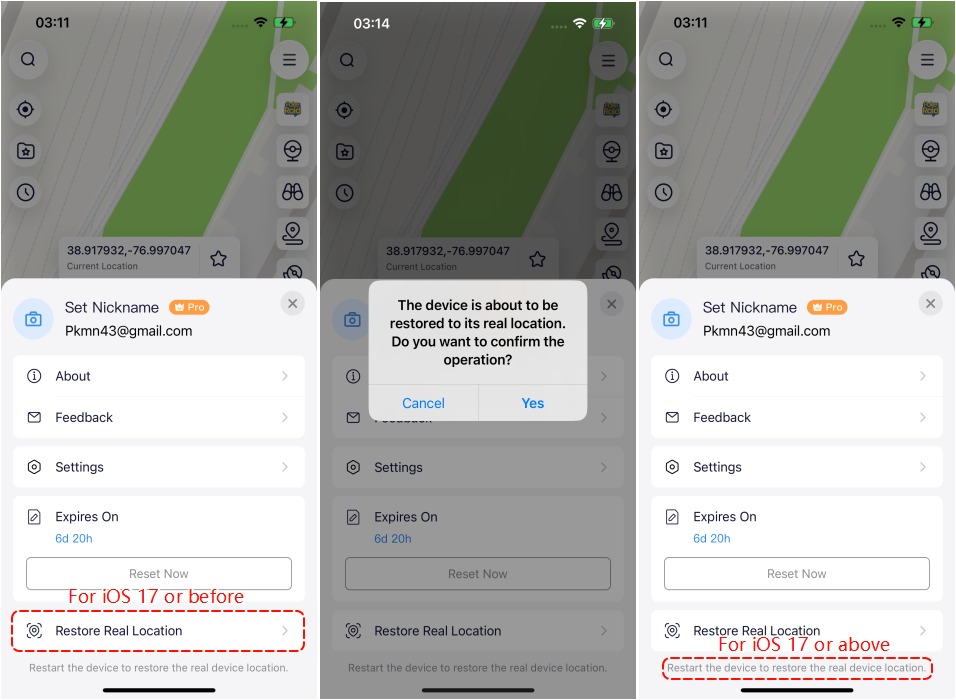
For iOS 17 users, restart the device to restore the real location. For iOS 17 and earlier versions, click the "Restore Real Location" button to revert to the real location.
Still need help? Contact Tenorshare Support Team

