How to Transfer Photos from Computer to iPhone [7 Simplest Methods]
“I'm trying to transfer photos from my computer to my iPhone, but I'm not sure how to do it. Can anyone guide me on how to transfer photos from PC to iPhone without using iTunes? Any tips for both methods would be greatly appreciated. Thank you!”
-From Reddit
Transferring photos from a computer to an iPhone can be a challenging task since iTunes may or may not support various file types you are trying to transfer. Whether you prefer using iTunes for a more traditional approach or exploring alternative ways without iTunes, understanding the process is essential for seamless transfer of photos from your computer to iPhone.
This guide will discuss how to transfer photos from computer to iPhone using both methods, ensuring that your precious memories are easily accessible on your iPhone. Whether you're a tech-savvy user or new to the Apple ecosystem, these steps will help you transfer your photos effortlessly.
- Part 1. How to Transfer Photos from Computer to iPhone Without iTunes [Simple & Fast]
- Part 2. How to Transfer Photos from PC to iPhone with USB- iTunes
- Part 3. How to Transfer Pictures from Computer to iPhone Wirelessly
- Part 4. Which Is the Best Way to Transfer Photos from Computer to iPhone
- Part 5. FAQs About Transfer Photos from PC to iPhone
Part 1. How to Transfer Photos from Computer to iPhone Without iTunes [Simple & Fast]
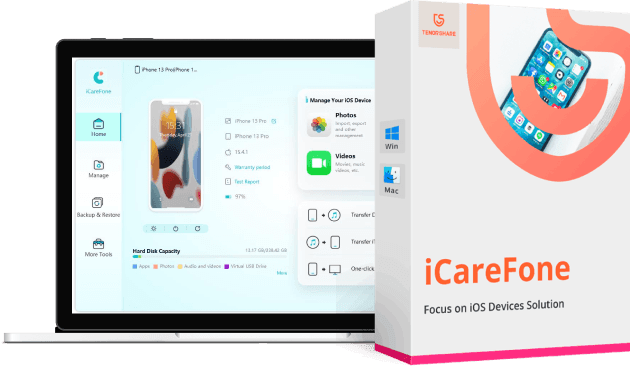
Transferring photos from computer to iPhone without losing quality is a straightforward process with the right tools. One highly recommended tool for this task is Tenorshare iCareFone. This versatile software provides a quick and easy way to transfer photos, along with other types of data, between your computer and iPhone. The tool also allows you to convert the file types within the software to make it accessible between the different device types.
Key Features of Tenorshare iCareFone
- Selectively import photos from computer to iPhone
- Maintain original photo quality
- Manage and transfer over 20 file types, including photos, contacts, messages, music, etc.
- No need for iTunes or iCloud
- Fast and user-friendly interface
How to Transfer Photos from Computer to iPhone Without iTunes
- Download and install iCareFone on your computer. Run the software and connect your iPhone to it via a USB cable.
-
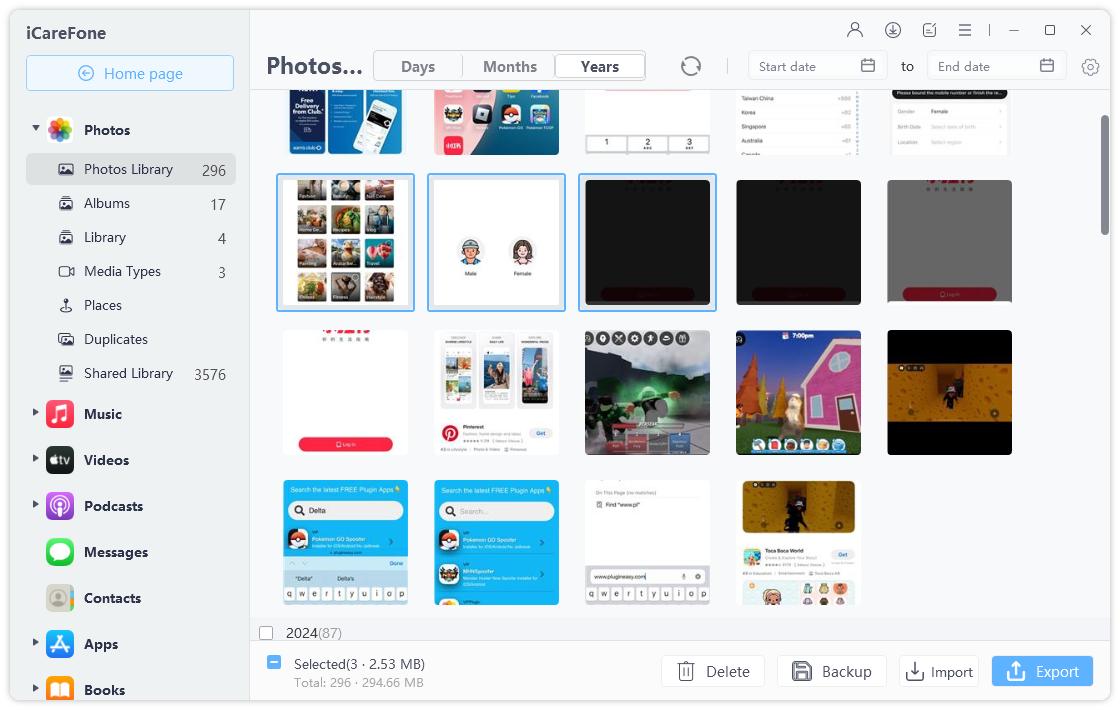
Click “Manage” on the main interface.

-
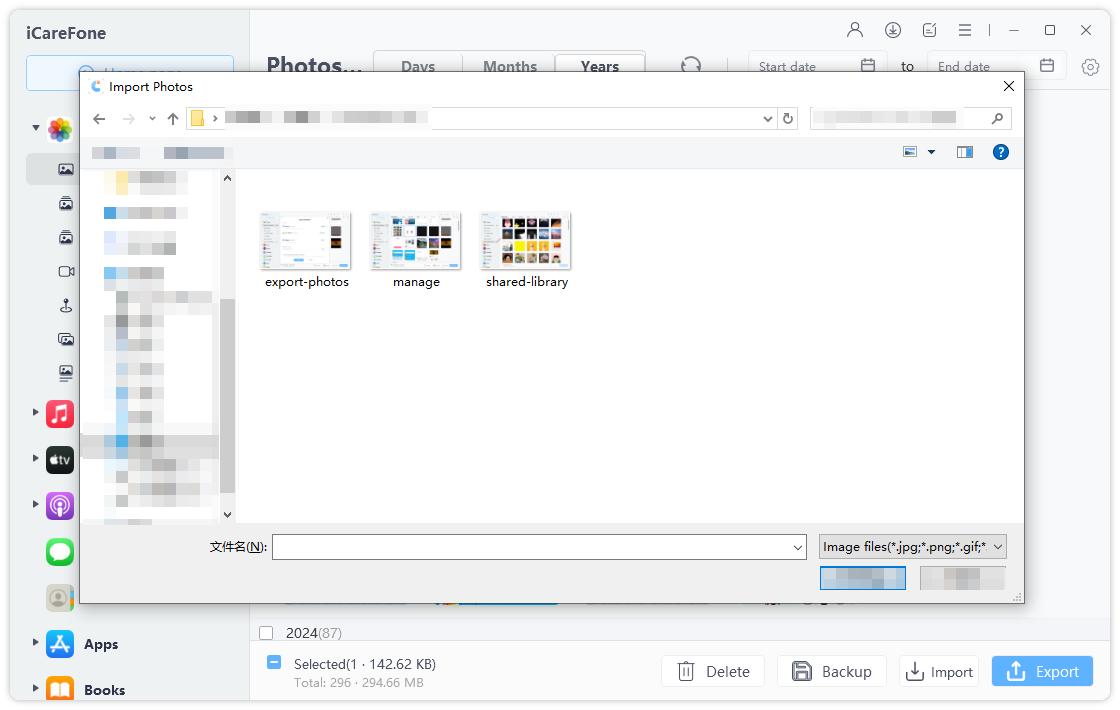
Next, select the photos you want to transfer to your iPhone and click "Import" to select the photos.

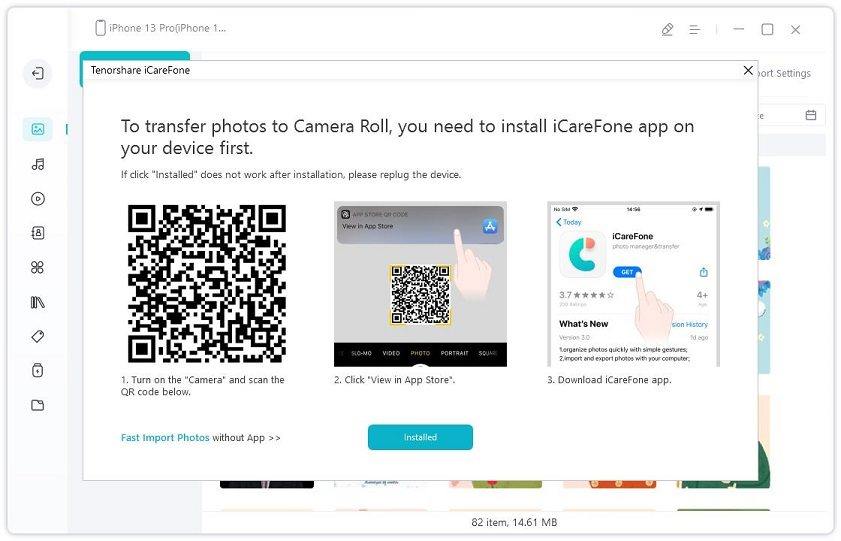
Next, you should download iCareFone on your iPhone, and use Camera to scan the QR code and your photos will be transferred to your iPhone.

Part 2. How to Transfer Photos from PC to iPhone with USB - iTunes
If you’re looking for alternate options instead of going with Tenorshare, syncing your device with iTunes and connecting it to a PC via USB is another great option to transfer photos to a PC. Transferring photos from a PC to an iPhone using a USB cable and iTunes involves several steps.
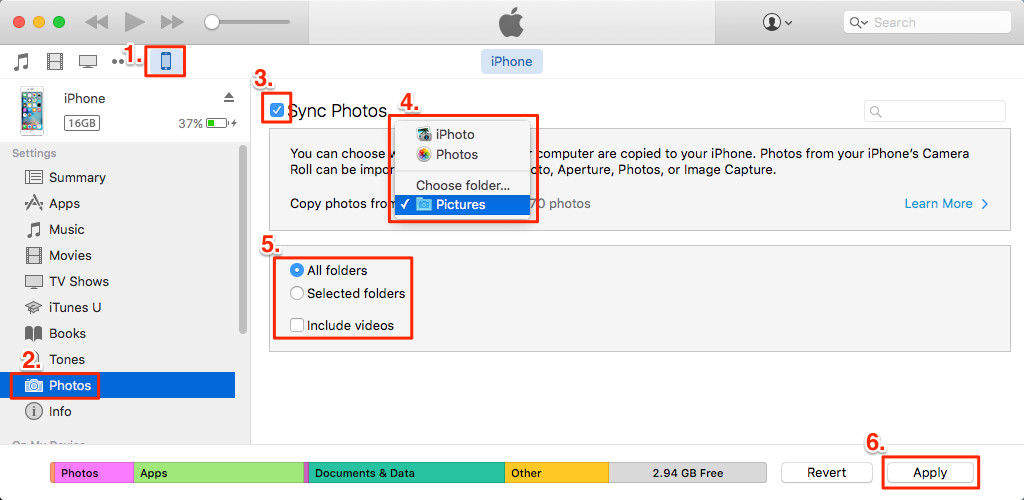
- Connect your iPhone to your PC using a USB cable.
- Open the iTunes app on your PC and click on the device icon.
- Select photos and choose the Sync photos option. You can set your preferences on the resolution of images, or selecting the entire folder.
- Once the syncing process is completed, you will see the photos saved to your iPhone on iTunes.

![]() Note:
Note:
Part 3. How to Transfer Pictures from Computer to iPhone Wirelessly
Transferring pictures from a computer to an iPhone wirelessly can be done in several ways. Lets understand each method one by one with their advantages, disadvantages and detailed steps.
1. Email
Using email to transfer photos from your computer to your iPhone is a simple and convenient method that requires no additional software or tools. This method works well for transferring a small number of photos quickly.
Advantages:
- Easy and straightforward.
- No need for additional software or tools.
- Accessible from any device with internet access.
Disadvantages:
- Limited by email attachment size restrictions.
- Can be time-consuming for large numbers of photos.
- Requires an internet connection.
Steps:
- Open your preferred email client or webmail service on your computer (e.g., Gmail, Outlook, Yahoo Mail).
- Compose the email. Attach all the photos to the attachments, and put the receiver email address. Make sure this email is opened on your PC.
- Add a subject line if desired, and click send.
- Open the email received on your PC and download the files.
2. iCloud Photos
Using iCloud Photos allows for seamless synchronization of photos between your computer and iPhone. However, for this method to work, both of your devices must have an account with iCloud and both must be able to sync data.
Advantages:
- Automatic and continuous sync.
- Accessible from any device with iCloud.
- No need for cables.
Disadvantages:
- Limited free storage (5 GB).
- Requires an internet connection.
- Additional iCloud storage costs money.
Steps:
- On your phone, go to Settings > [Your Name] > iCloud > Photos and toggle on iCloud Photos.
- Open a web browser on your PC and go to iCloud.com. Sign in with your Apple ID.
- Click on Photos and then click the upload button (cloud icon with an arrow) and select the photos you want to upload to your PC.
- Once the photos are uploaded, they will automatically sync to your PCs Photos app.
See More: How to Access iCloud Photos on iPhone
3. Dropbox
Dropbox is a cloud storage service that allows you to upload photos from your iPhone and access them on your computer. This method is another great option for the transfer of files but it offers limited data with the free version. If you have a larger number of files, you will have to upgrade the package.
Advantages:
- Easy access across multiple devices.
- No need for cables.
- Can store various file types.
Disadvantages:
- Limited free storage (2 GB).
- Additional storage costs money.
Steps:
- Download and install the Dropbox app on your iPhone from the App Store.
- Open a web browser on your PC and go to Dropbox.com. Sign in with your account.
- Click on Upload files and select the photos you want to upload from your PC.
- Open the Dropbox app on your iPhone, and you will see the photos you uploaded.
- Download the photos to your iPhone by selecting them and tapping the download button.
4. OneDrive
OneDrive is another cloud storage service by Microsoft that lets you upload photos from your computer to iPhone. While OneDrive requires an internet connection for both uploading and downloading photos, which may be a limitation in areas with poor connectivity. Also, while OneDrive offers 5GB of free storage, you may need to purchase additional space if you have a large photo collection.
Advantages:
- Integration with Microsoft products.
- Easy access across multiple devices.
- Generous free storage (5 GB).
Disadvantages:
- Requires an internet connection.
- Additional storage costs money.
Steps:
- Download and install the OneDrive app on your iPhone from the App Store.
- Open a web browser on your PC and go to OneDrive.com. Sign in with your Microsoft account.
- Click on Upload and select the photos you want to upload from your PC.
- Open the OneDrive app on your iPhone, and you will see the photos you uploaded.
- Download the photos to your iPhone by selecting them and tapping the download button.
5. File Explorer
Using File Explorer to transfer pictures from your computer to your iPhone wirelessly offers a straightforward and built-in solution for Windows users. It doesn't require any additional software installations or account setups, making it accessible to most users. Furthermore, it allows for quick transfers of large files or multiple pictures at once.
Advantages:
- No internet connection required.
- Fast transfer speed.
- No storage limits.
Disadvantages:
- Requires a USB cable and the entire transfer process is manual.
Steps:
- Connect your iPhone to your PC using a USB cable.
- Unlock your iPhone and, if prompted, tap Trust This Computer.
- Open File Explorer on your PC and locate your iPhone under This PC or Devices and drives.
- Open the DCIM folder to access your iPhone’s photo storage.
- Copy the photos from your PC and paste them into the appropriate folder in the DCIM folder on your iPhone.
- Once the transfer is complete, safely eject your iPhone from the PC.
Part 4. Which Is the Best Way to Transfer Photos from Computer to iPhone?
The best way to transfer photos from your computer to your iPhone depends on your specific needs and circumstances. Here’s a comparison of the methods discussed, to help you decide:
| Method | Premise | Advantages | Disadvantages |
|---|---|---|---|
| Tenorshare iCareFone | A versatile software to sync, transfer, backup and manage photos. | Fast and selective transfers, file type conversions, free backup features, supports iOS 17. | Requires installation, some features may require a purchase. |
| iTunes | Requires an Apple subscription for syncing. | Syncs automatically, easy to set up. | Requires subscription, only supports a few file types. |
| Share photos via email attachments. | Wireless, convenient for few files. | Slow for large files, a complete hassle for large numbers of files as the entire process is manual. | |
| iCloud | Sync photos using iCloud on both the device types. | Direct syncing, wireless, selective syncing. | Requires active connection to iCloud on both devices. |
| Dropbox | Transfers photos using cloud storage. | Good for transferring photos between the device types with the free account. | Requires a premium package for larger files. No syncing option. |
| OneDrive | Transfers photos using Microsoft cloud storage. | Auto syncing. Helps transfer different file types. | Premium package required for files above 5GB. Syncing delays. Dependency on Microsoft account. |
| File Explorer | Photo transfer using USB cables. | Good for large transfers. No internet required. Fast transfers. | Requires USB connection. The entire process is manual. |
Part 5. FAQs About Transfer Photos from PC to iPhone
Q1: How do I transfer a large number of photos from PC to iPhone?
Transferring a large number of photos from your PC to your iPhone can be efficiently done using methods like iCloud Photos, Dropbox, OneDrive, or using the File Explorer method with a USB cable.
Q2: What's the fastest way to transfer photos from PC to iPhone?
The fastest way to transfer photos from your PC to your iPhone is through Tenorshare iCareFone. When using this software, you can transfer your files with just a few clicks.
Q3: Can I transfer photos to iPhone without losing existing photos?
Yes, you can transfer photos to your iPhone without losing existing photos. Methods like Tenorshare iCareFone, iCloud Photos, Dropbox, and OneDrive allow you to add new photos without affecting the photos already stored on your iPhone.
Q4: Will transferring photos from PC to iPhone reduce their quality?
No, transferring photos from your PC to your iPhone will not reduce their quality. The quality of the photos remains the same as long as they are transferred in their original format and resolution. Ensure you use methods that support high-quality transfers, such as iCloud Photos or direct USB transfer via File Explorer.
Conclusion
Transferring photos from your computer to iPhone is essential for backup, organization, and freeing up storage on your device. By utilizing methods such as iCloud, iTunes, Dropbox, or third-party software like Tenorshare iCareFone, you can streamline this process based on your preferences for simplicity, speed, and accessibility.
If you are looking for a comprehensive solution that offers ease of use and robust features beyond photo transfer, Tenorshare iCareFone stands out. It not only facilitates seamless photo transfers but also provides tools for managing and optimizing your iPhone’s performance, ensuring your device remains efficient and clutter-free.


- Free backup everything you need on iPhone/iPad/iPod
- Transfer music, photos, videos, contacts, SMS without limitation
- Selectively restore files without erasing current data
- 1-Click to transfer photos from iPhone to PC/Mac
- Sopport the latest iOS 26 and iPhone 16
- Free backup everything you need on iPhone/iPad/iPod
- Transfer music, photos, videos, contacts, SMS without limitation
- Selectively restore files without erasing current data
- 1-Click to transfer photos from iPhone to PC/Mac
- Sopport the latest iOS 26 and iPhone 16
Speak Your Mind
Leave a Comment
Create your review for Tenorshare articles

Tenorshare iCareFone
Best Free iPhone Transfer & iOS Backup Tool
Easily, without iTunes


