Good Tips on How to Transfer Photos from Computer to iPhone
For a lot of iOS device users, iTunes is great tool when it comes to photo transfer from computer to iPhone, and in most instances, photos on iOS devices will be synced to iTunes automatically unless you disabled it. But what if there is something wrong with iTunes, how could you copy pictures to iPhone without syncing? Actually, you have more options now than ever before to help you transfer photo to iPhone 11/11Pro/XS/XR/X/8/8 Plus/7/7 Plus/6s/6s Plus/6/6 Plus/5s, read on and get the answer from this post.
Part 1: Transfer Photos to iPhone without Syncing Using Tenorshare iCareFone
The easiest and best way to transfer photos from PC to iPhone without iTunes, in my experience, is the Tenorshare iCareFone. It's essentially an alternative to iTunes. With Tenorshare iCareFone, you can selectively import pictures from PC and Mac to iPhone Camera Roll and Photo library even without syncing whilst keep your data safe. Below is how it works:


To get started, please download and install Tenorshare iCareFone to your computer.
Step 1: Launch Tenorshare iCareFone, and then connect your iPhone to computer. After that, choose File Manager from the main interface, then click on Photos among 9 files types to proceed.

Step 2: Next, tick the target photos and click on Import button to transfer the photos saved on your computer to iPhone.

Step 3: After transferred, you can unlock your iPhone and go to Photos app << Albums on your device. All transferred pictures are stored there.
Part 2: Copy Pictures from Mac to iPhone without Sycning
If you are a Mac users that your Mac supports AirDrop, then you can wirelessly copy picture from computer to iPhone without syncing.
But before using Airdrop, there are some basic requirements you need to know so that check your device whether can use Airdrop.
- A lightning connector must be included in your iOS device.
- Supports device installed iOS 7or later only.
- Mac needs to be a 2012 or later model with OS X Yosemite installed
- Bluetooth and WIFI on both your Mac and iOS device turned on.
If all the requirement above are fulfilled, then you can get started with transferring photos using Airdrop.
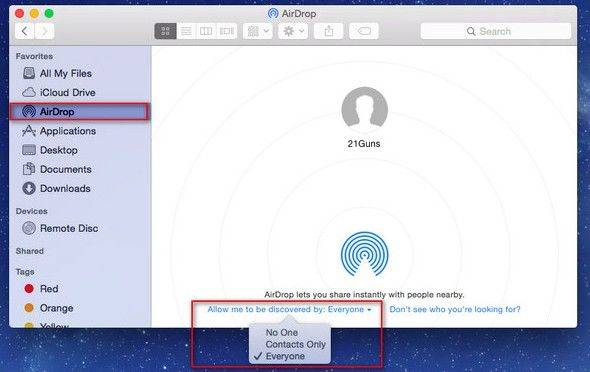
First off, make sure the AirDrop on your iOS Device has been turned on.
Then open a Finder window and click on AirDrop. In the Finder window, select option “Allow me to be discovered by-Everyone”.

Next, drag and drop the image onto the iPhone icon, then hit Send button.
After sent, you will see the word Sent appear under the device icon
Swipe up on Control Centre on your iPhone. When the Mac user shares the photo, you should see an alert asking for your approval of the transfer before it copies over, just tap on accept and the file will start transferring.
When it’s finished uploading you can see your photos at the destination in Camera Roll.
Compared to these two methods mentioned above, obviously, the method 1 is far easier than the method 2. Besides, the method 1 can work well on both Windows PC and Mac, while the method 2 is only useful for Mac user. Hence, we highly suggest you try the Tenorshare iCareFone directly for time saving.
If you think there are more methods to move photos from computer to iOS devices that hasn’t been covered here, please let me know in the comment, I will definitely put it up and give you attribution.


Speak Your Mind
Leave a Comment
Create your review for Tenorshare articles

Tenorshare iCareFone
Best Free iPhone Transfer & iOS Backup Tool
Easily, without iTunes


