How to Transfer Photos from iPhone to External Hard Drive [One Click]
"How can I transfer photos from iPhone to external hard drive without using iCloud? I have a lot of pictures, and my iPhone storage is almost full. Any simple steps or apps to help with this?
This question reflects a common need among iPhone users seeking efficient methods to protect their photo libraries. In this digital world where photos capturing are our most cherished memories, at the same time ensuring their safety and accessibility is also paramount.
Many iPhone users find themselves in situations where they need to transfer photos from iPhone to external hard drive for better storage options or backup. In this article, we will explore how to import iPhone pictures to external hard drive, ensuring that you have the best options at your fingertips.
To determine the best method for transferring photos from your iPhone to an external hard drive, we can compare the different methods discussed:
| Feature | Tenorshare iCareFone | USB Cable (Direct Transfer) | Photos App (Windows) | Image Capture (Mac) | iCloud |
|---|---|---|---|---|---|
| Ease of Use | Very Easy | Easy | Moderate | Moderate | Moderate |
| Transfer Speed | Fast | Moderate | Moderate | Moderate | Slow |
| Cost | Free (with premium options) | Free | Free | Free | Free (limited storage) |
| Multi-Device Compatibility | Yes | No | No | No | Yes |
| Backup Options | Comprehensive | Limited | Limited | Limited | Limited |
| Selective Transfer | Yes | No | No | No | No |
| Data Types Supported | Photos, videos, contacts, messages, etc. | Photos only | Photos only | Photos only | Photos only |
| Internet Dependency | No | No | No | No | Yes |
| Recommends | ⭐⭐⭐⭐⭐ | ⭐⭐⭐⭐ | ⭐⭐⭐ | ⭐⭐⭐ | ⭐⭐ |
Part 1. How to Transfer Photos from iPhone to External Hard Drive - Simple & Fast
Who's It For: Users who want a quick and efficient method to transfer their photos without complicated procedures.
If you're looking for the simplest and most effective way to transfer photos from iPhone to external hard drive, Tenorshare iCareFone is the best option. This software provides a seamless experience for users, allowing them to back up their entire iPhone data—including photos, videos, contacts, and more to their PC or Mac and then to an external drive. It give very smooth and efficient experience to its users.
Advantages of Tenorshare iCareFone
- Transfer contacts, music, videos, messages between iPhone/iPad and PC/Mac.
- Supports multiple data types: photos, contacts, messages, and more.
- Allows for data transfer via USB or WiFi, providing flexibility.
- Fast transfer speeds ensure minimal downtime.
- User-friendly interface suitable for beginners.
- Works with iOS 18 and iPhone 16.
How to Export Photos from iPhone to External Hard Drive
- Download, install and then launch Tenorshare iCareFone on your laptop.
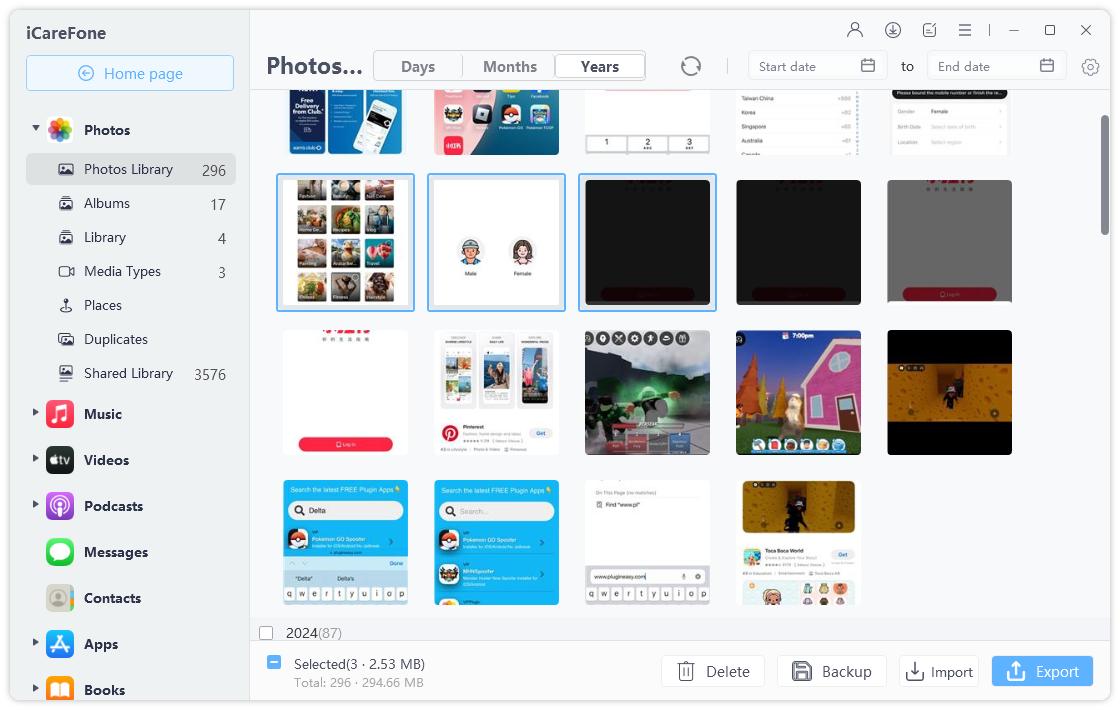
Connect your iPhone to your laptop with the help of a USB cable. Click on "File Manager" and then on "Photos".

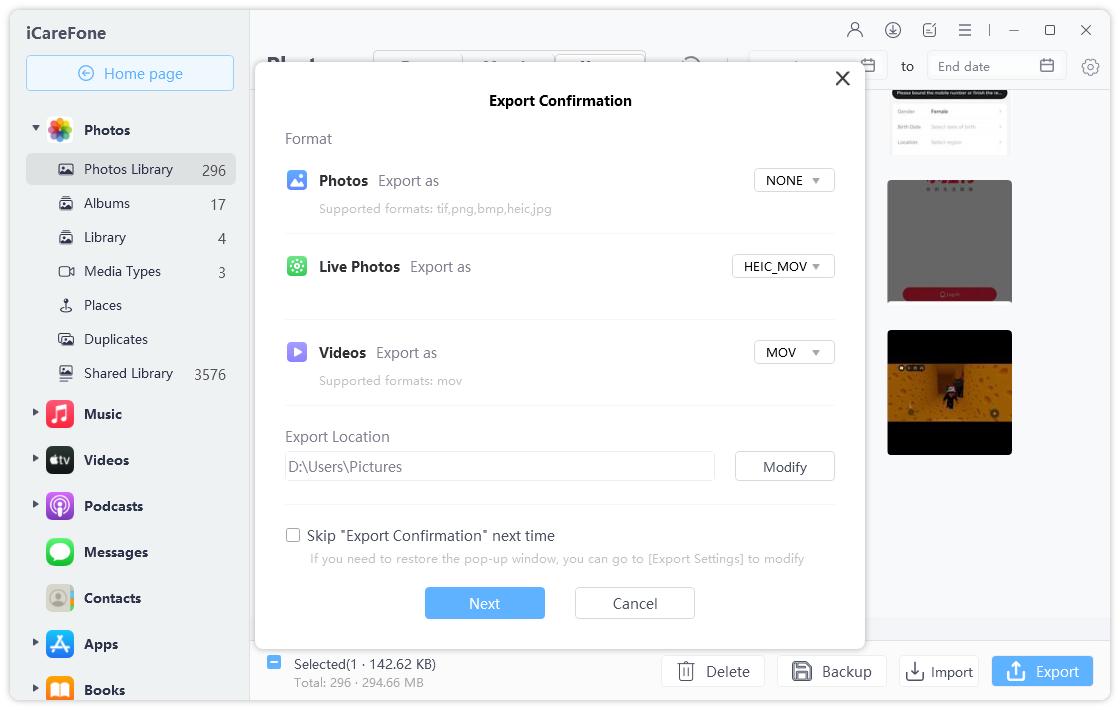
rowse the photos which have been stacked categorically and pick the pictures which you wish to export to the external hard drive. Click on the "Export" button and choose the external hard drive from the available options and then click on "OK".

This way all the iPhone photos which you have selected will be transferred to the external hard drive.
Video Tutorial
Part 2. How to Transfer iPhone Photos to External Hard Drive Without Computer - USB Cable
Who's It For: Users who prefer not to use a computer for transferring photos.
Transferring photos directly from your iPhone to an external hard drive without a computer is possible using a USB cable and compatible external storage. This method is convenient for those who want to transfer their media quickly. However, this method can have limitations regarding compatibility and speed.
Not all external hard drives are compatible with iPhones, requiring specific adapters or cables. Some external hard drives may not support all file formats, leading to potential transfer issues. If the transfer process is interrupted, it can lead to data loss or corruption of files.
Steps
- Connect your external hard drive to iPhone > Access the iPhone "Files" app > Access the "References" section to ensure that your external hard drive is connected successfully.
- Open iPhone Photo App > Select photos or all photos you want to transfer > Tap Share button > Choose Save to File.
- Then tap On My iPhone and select the external hard drive.
- By following these steps, you’ll be able to suitably transfer photos from iPhone to hard drive without computer.
Related read: Transfer Photos from iPhone to Computer without USB
Pros:
- Streamlines the process by eliminating the need for intermediary devices like computers.
- Quick transfer process.
- Users don’t need to install any software.
Cons:
- Users might face limitations based on the storage capacity and compatibility of their external hard drives.
- Users may need to invest in additional adapters (like Lightning to USB) to facilitate the connection.
- This method does not provide a backup of photos on a secondary device.
- Requires manual file management.
Part 3. How to Import iPhone Pictures to External Hard Drive on Windows - Photos App
Who's It For: Windows users who want a straightforward method using built-in software.
For Windows users, the Photos app provides an easy way to import photos from your iPhone to an external hard drive. This method leverages the built-in functionalities of Windows, allowing for an efficient transfer process.
The Photos app allows users to import photos directly from their connected devices. By selecting the destination as the external hard drive, users say can I save my iphone pictures to drive without the need for additional software.
Steps
- Plug your iPhone and external hard drive into your Windows PC using USB cables. Ensure both devices are recognized.
- Unlock your iPhone and tap "Trust" when prompted to allow access.
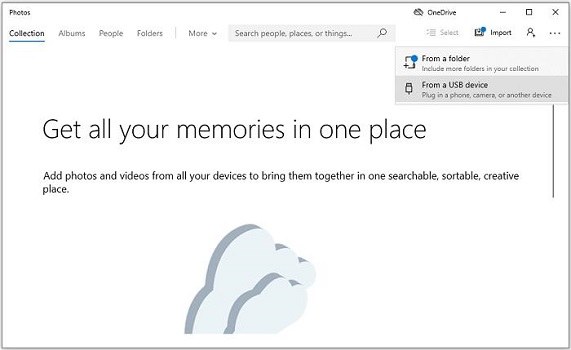
- Launch the Photos app from the Start menu.
- Click on the "Import" button in the top right corner and select "From a USB device."
- Choose your iPhone from the list of connected devices.
- The app will display thumbnails of your photos. Select the ones you want to transfer.
- Click on "Import settings," then "Change the import destination" to select your external hard drive.
- Click "Import Selected" to begin transferring the photos to your external hard drive.
Related read: Transfer Photos from iPhone to PC Windows 10/11
Pros:
- The Photos app is easy for anyone to use.
- No need to download third-party apps since it's built into Windows.
- Works smoothly with the Windows system.
Cons:
- Lacks advanced features found in dedicated transfer tools.
- Slower with large photo libraries, causing delays.
- Import issues may lead to data loss or file corruption.
- You can't select specific photos to import, limiting control.
Part 4. How to Import iPhone Pictures to External Hard Drive on Mac - Image Capture
Who's It For: Mac users who prefer using built-in software for transferring photos.
For Mac users, the Image Capture application provides a simple and efficient way to transfer photos from an iPhone to an external hard drive. This built-in utility is often overlooked but offers a straightforward solution for photo management.
Image Capture allows users to import photos from their iPhone directly to any designated folder, including an external hard drive, how to transfer photos from iphone to external hard drive making it a flexible choice for photo management.
Steps
- Connect your iPhone to your Mac using a cable.
- Launch the app (application > image capture).
- In the left sidebar, click "Device" and select the name of your iPhone (your name will be different from mine).
- If you have a different iPhone connected to your computer, you may see multiple iPhones. Click the name of the currently connected iPhone.
- On the right screen, all still images (HEICs) and video (MOV) files stored on the device are displayed.
- The 12 columns display various technical information and thumbnails for each image. Press Control and click the column header to show/hide the column.
- At the bottom of the screen, switch between list and thumbnail display with two icons in the lower left, and adjust thumbnail size with the right slider.
- The curved arrow just above the thumbnail icon rotates the image counterclockwise.
- To capture a single image, drag it from the image capture window to the desktop. (or save to any folder).
- To import multiple images, first select the image and then drag it.
- By clicking on the Import Destination menu, you can specify and import custom folders in addition to the various locations for importing files.
- To import all images from iPhone to Mac, click Import All.
![]() Note:
Note:
You will be asked to unlock your iPhone at startup. This app cannot transfer files from iPhone without login permission.
![]() Important:
Important:
This button is invalid for videos and images taken natively on iPhone.
Import Images
There are two ways to import images: drag or automation. For example, for drag:

Related read: How to Transfer Photos from iPhone to Mac
Pros:
- Image Capture is pre-installed on Mac, so no need for extra apps.
- The transfer process is quick and simple with a few clicks.
- You can directly save photos to an external hard drive.
Cons:
- No cloud service integration for backups.
- Photo editing requires other software.
- A stable USB connection is needed, which can be a hassle without the right cable.
Part 5. How to Export Photos from iPhone to External Hard Drive on PC/Mac- iCloud
Who's It For: Users who prefer cloud solutions for photo storage and transfer.
iCloud offers a convenient way to store and transfer photos, allowing users to sync their images across multiple devices. This method is ideal for those who already utilize iCloud for their storage needs. By enabling iCloud Photos, users can automatically upload their images to iCloud. From there, they can backup iCloud photos to external hard drive using a computer.
Steps
- On your iPhone, go to Settings > [your name] > iCloud > Photos and turn on iCloud Photos.
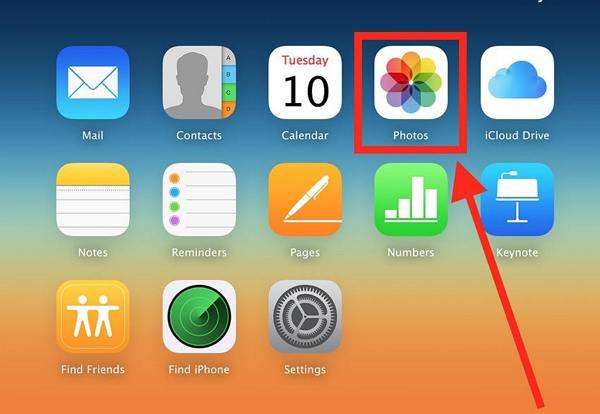
- On your computer, go to www.icloud.com and sign in with your Apple ID.
- Open the Photos section in iCloud, select the photos you want to download (hold Shift for multiple selections), and click the Download icon.
- When prompted, select your external hard drive as the destination for the downloaded photos.
- Click Save to transfer the selected photos to your external hard drive.

Pros:
- iCloud automatically backs up your photos, keeping them secure and updated.
- Access photos from any Apple device or the web, perfect for multi-device users.
- Syncs easily with other Apple services.
Cons:
- Requires a stable internet connection for uploads and downloads.
- Free storage is limited to 5 GB, so a paid plan may be needed for larger libraries.
- Uploading large files can be slow, causing delays.
- Managing iCloud settings across devices can be tricky.
Part 6. FAQs of Saving iPhone Pictures to Drive
Q1: How do I copy my entire iPhoto library to an external hard drive?
You can use Tenorshare iCareFone to easily copy your entire iPhoto library to an external hard drive. It allows for a seamless transfer of your entire media collection, including photos, videos, and more, directly to your external drive with just a few clicks.
Q2: Can I connect my iPhone directly to an external hard drive?
Yes, you can connect your iPhone directly to an external hard drive using the appropriate adapter or cable.
Conclusion
Most users say how to transfer photos from iphone to external hard drive, for those users Tenorshare iCareFone stands out as the best solution due to its speed, ease of use, and comprehensive capabilities.
However, for those who prefer a no-cost and straightforward method, using the built-in Photos app or Image Capture will also serve well. Ultimately, the right choice depends on your specific needs and preferences, but these methods ensure that your photos are safe and accessible whenever you need them.
- Free backup everything you need on iPhone/iPad/iPod
- Transfer music, photos, videos, contacts, SMS without limitation
- Selectively restore files without erasing current data
- 1-Click to transfer photos from iPhone to PC/Mac
- Sopport the latest iOS 18 and iPhone 16
Speak Your Mind
Leave a Comment
Create your review for Tenorshare articles

Tenorshare iCareFone
Best Free iPhone Transfer & iOS Backup Tool
Easily, without iTunes


