How to Transfer Photos from iPhone to Laptop without iTunes
Uh, my honeymoon pictures have used up all the memory in my iPhone . I need to save these pictures to my laptop to free up more storage in my iPhone. However, I have no idea on how to do that without using iTunes. Somebody help?"
It is not uncommon to get the "Storage Almost full" alert on your iPhone when trying to take more photos. Therefore, it makes sense for users to know a number of methods to transfer photos from iPhone to PC without iTunes free. This article explains how.
Part 1: Why Not Use iTunes to Transfer Photos from iPhone to Computer
iPhone users can transfer photos from iPhone to computer using iTunes. But there are some disadvantages. They include:
- iTunes doesn't allow selective transfer of photos.
- All photos organized in albums on your iPhone are not downloaded in those albums in iTunes.
- All photos are not readable after syncing with iTunes.
- If your iPhone is synced to iTunes on a different computer, all your books, TV shows, music, and other data will be deleted.
With those reasons, it is only prudent for users to use alternative methods.
Part 2: Possible Ways to Transfer Photos from iPhone to Laptop without iTunes
The most efficient way to transfer photos from iPhone without iTunes is by using an iTunes alternative. Other ways include, using the Photos App, Windows File Explorer, iCloud, and AirDrop. Below are details.
Way 1: Transfer iPhone Photos with Tenorshare iCareFone on Win/Mac
Tenorshare iCareFone is a user-friendly and beautifully designed software that allows users to easily transfer photos from their iPhone to computer. Advantages of using Tenorshare iCareFone include, selective high-speed transfer of photos, bulk transfer of photos, photo compression without loss in quality, and easy organization of photos as well as locating them in Photo Library and Camera Roll.
To transfer photos using Tenorshare iCareFone, follow the procedure below.
- Download, install and launch Tenorshare iCareFone on your PC or Mac.
- Connect your iPhone to your computer using a USB cable.
-
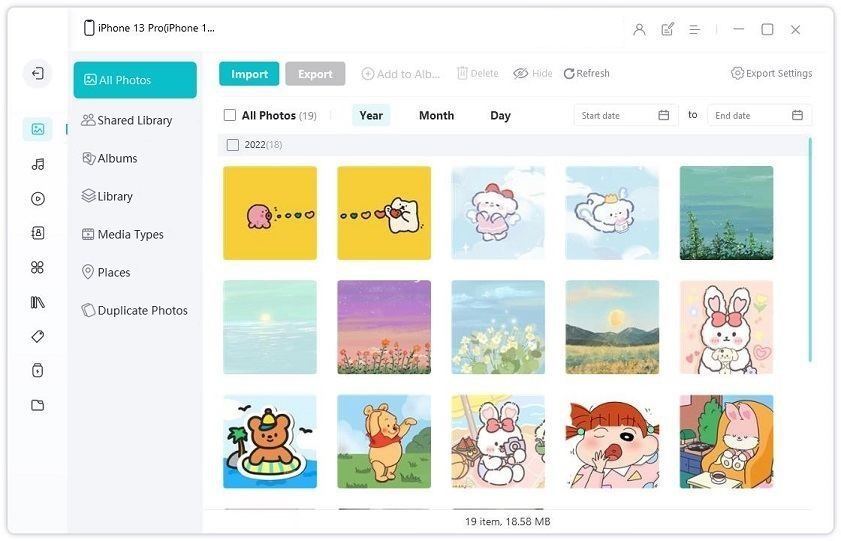
The Files Manager tab on Windows is iCareFone's default interface. Click the File Manager tab if it's not selected then click Photos.

-
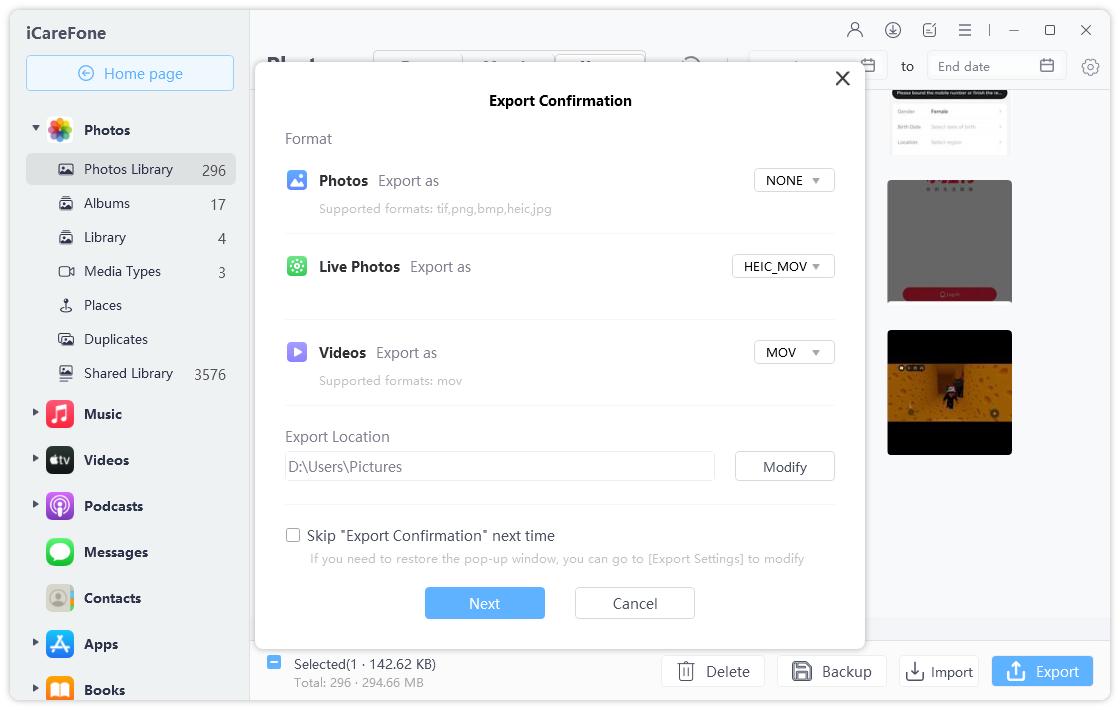
Tenorshare iCareFone will automatically detect all photos and categorize each according to the folder. Browse then choose the photos you wish to transfer, click the Export button and select a file location to save the photos. (The default location is the desktop.)

Tenorshare iCareFone now fully supports with the newest device and iOS 12. If you need to transfer photos from iPhone Xs/Xs Max/XR to PC/Mac, don't hesitate to give it a try!
A video guide for you:
Way 2: Transfer Photos from iPhone to Computer using iCloud
Transfer photos from iPhone to computer by backing them up on iCloud on your iPhone and downloading them to your Mac or PC.
-
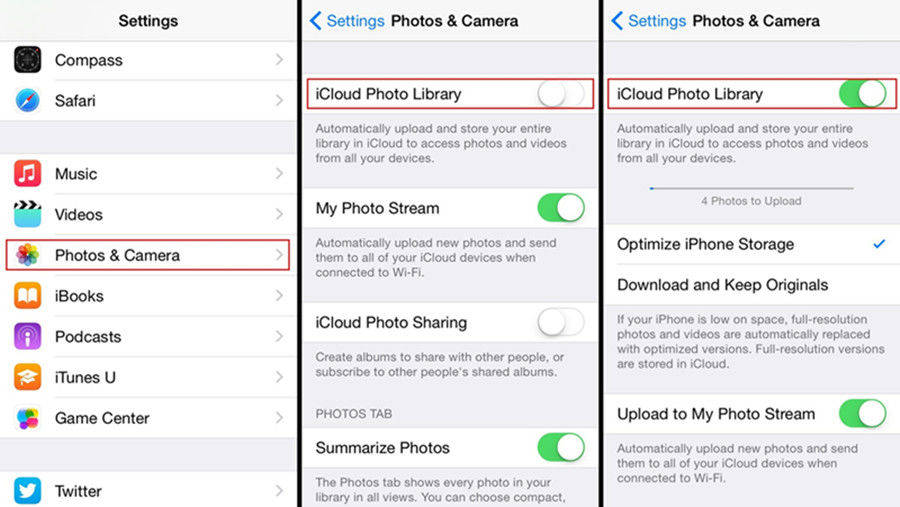
Enable iCloud Photo Library on your iPhone by navigating to Settings > Photos & Camera and toggling on the iCloud Photo Library button.

- Download iCloud for Windows install and run it by following the prompts. Mac users can directly open iCloud.
- Sign in to iCloud using the same Apple ID credentials you used to set up iCloud on your iPhone.
-
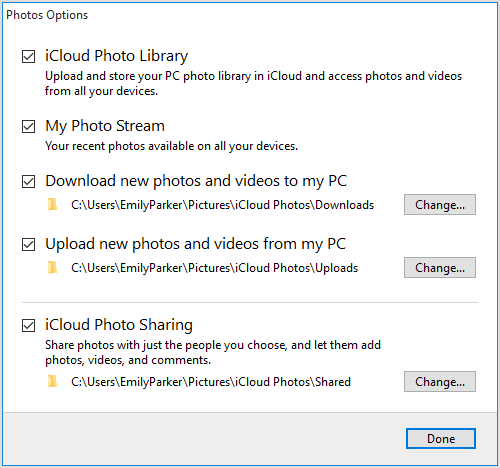
Click Options next to Photos.

-
Check the iCloud Photo Library checkbox and any other options such as My Photo Stream, iCloud Photo Sharing etc. and click Done. All your photos will be synced to your computer.

Your synced iCloud photos are located in iCloud Photo under favorites which is accessed using File Explorer. On the Mac, they are located in the Photos App.
Way 3: Import Pictures from iPhone by Windows Files Explorer
iPhone users can easily transfer photos to their Windows computers by using Windows File Explorer. This method only works if iTunes has been installed. Follow the procedure below.
- Connect your iPhone to your computer using a USB cable.
- Press Windows + E button to open File Explorer.
-
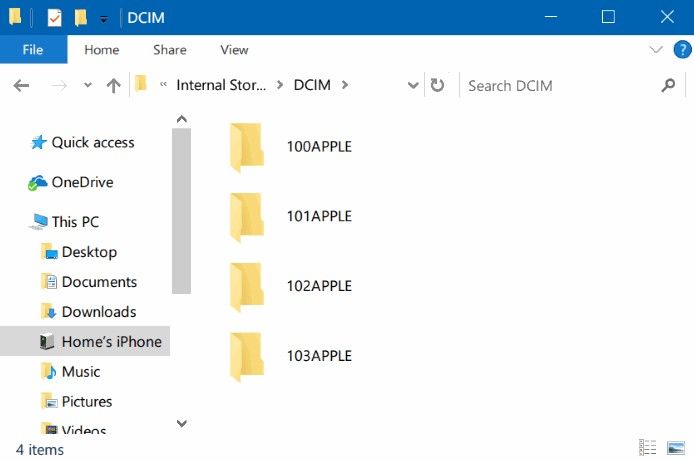
Under This PC, click iPhone > Internal Storage > DCIM.

-
Copy the photos you would like to transfer and paste them in another file location or simply copy paste it to another file location.
(Alternatively, navigate to your iPhone under This PC/ Computer, right-click it and select import pictures and videos.) 
Way 4: How to Airdrop Photos from iPhone to Mac
Airdrop allows you to send videos, photos and other types of data from between Apple devices. To transfer photos from iPhone to Mac, follow the procedure below.
-
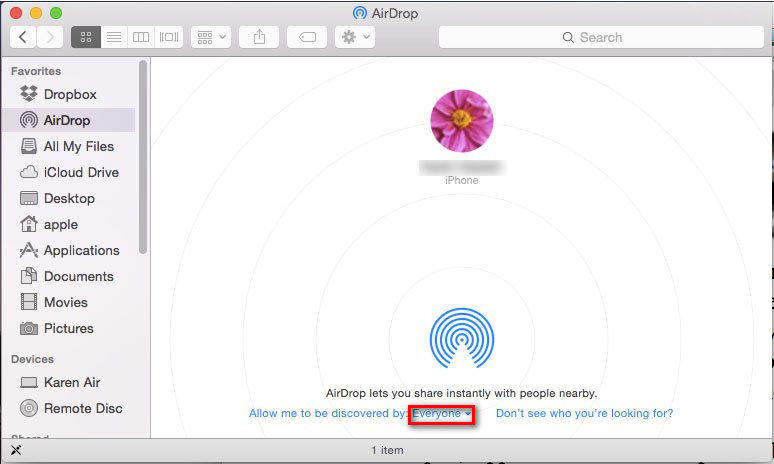
Enable AirDrop on your Mac by launching Finder then clicking Go > AirDrop and turning on Bluetooth and Wi-Fi on your Mac by tapping the respective icons on the Menu bar. Click Allow me to be detected by Everyone or Contacts Only option.

-
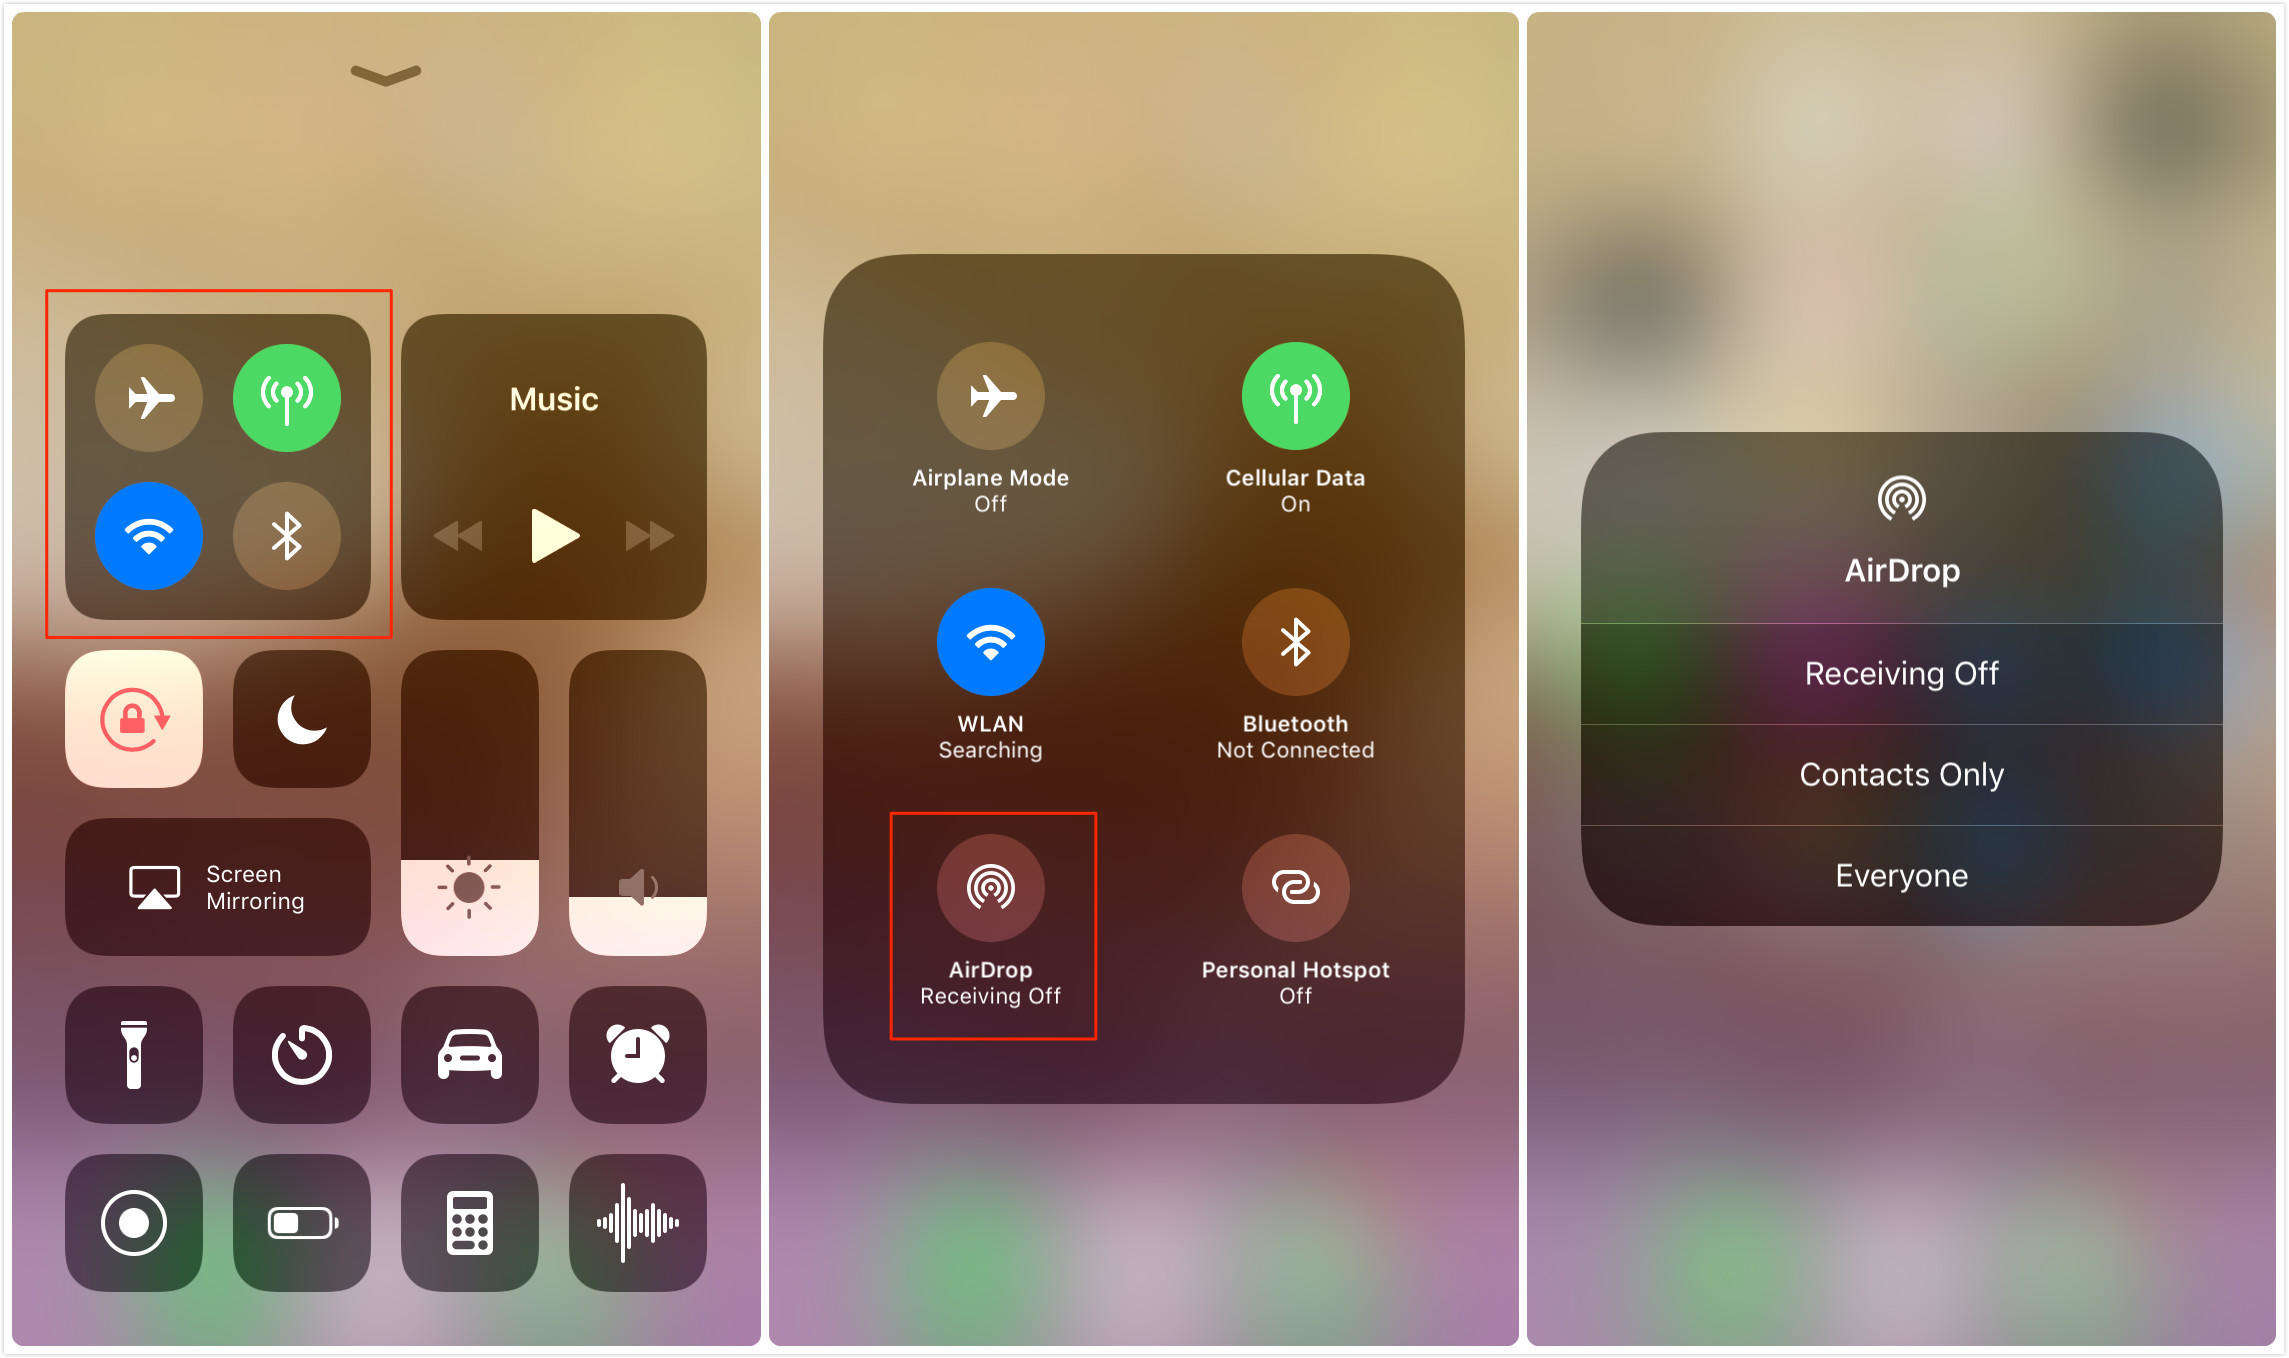
Turn on AirDrop on iPhone by turning on Wi-Fi and Bluetooth. Then swipe up from the bottom of your screen to display Control Center and tap AirDrop. Select Contacts Only.

- Launch the Photos app on your iPhone.
-
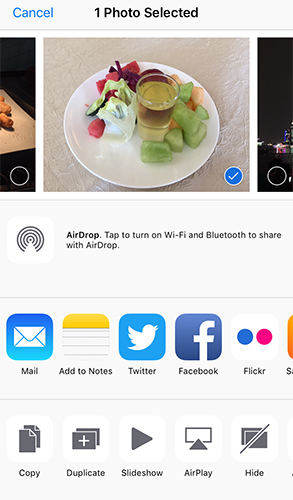
Select the photos you would like to share and tap the Share button. Select the Mac you want to transfer the photo to in the AirDrop list that appears.

- Tap Accept on the pop-up window that appears on your Mac.
The time taken to transfer photos depends on the number of photos you are transferring and their cumulative size.
Way 5: Upload iPhone Photos to Mac Laptop with Photos App
The Photos App is a native Mac OS software that allows users to easily store and manage photos on the Mac and other iOS devices. Using the Photos App, users can also edit and share their photos. To transfer photos using the Photos app ensure you are running the latest version of iTunes or at least iTunes 12.5.1 or later then follow the procedure below.
- Plug in your iPhone cable to your Mac using a USB. (You may need to unlock your device by entering your passcode and tap Trust when prompted to do so.)
- The Photos App should launch automatically. Launch it if it doesn't.
- Click Import at the top of the Photos app tab if the import screen doesn't automatically appear.
Select the ones you wish to import and click Import Selected.

Conclusion
The methods listed above allow you to transfer photos from iPhone X/8/8 Plus/7/7 Plus/6/6s/6 Plus/ 6S Plus/5S/SE to computer without iTunes for free. We recommend using Tenorshare iCareFone since it allows selective preview and transfer of photos, bulk transfer or photos and simple photo organization.
Speak Your Mind
Leave a Comment
Create your review for Tenorshare articles

Tenorshare iCareFone
Best Free iPhone Transfer & iOS Backup Tool
Easily, without iTunes


