iPhone 11 Won't Backup to iCloud/iTunes, Fix It Now
There are many reasons why your iPhone 11 will not backup to iCloud or iTunes. There could be many items lingering around on your machine causing your latest iPhone not to backup to your machine. This guide focuses on the solutions on how you can fix this issue and successfully backup your iPhone to your iCloud account and with iTunes.
You will learn the reasons why your iPhone 11 won't to backup to iCloud and iTunes and how you can fix those issues on your device and your computer. You will then also learn about a free way that helps backup iPhone 11 without iCloud or iTunes.
- Part 1. How to Fix iPhone 11 Won't Backup to iCloud
- Part 2. How to Fix iPhone 11 Won't Backup in iTunes
- Part 3. The Best Way to Backup iPhone 11/11 Pro (Max) Free
Part 1. How to Fix iPhone 11 Won't Backup to iCloud
This section lists out some of the error messages that you see when your iPhone 11 cannot be backed up to iCloud.
1. The Common iCloud Backup Errors on iPhone 11/11 Pro (Max)
- The last backup could not be completed.
- Not Enough Storage. This iPhone cannot be backed up because there is not enough iCloud storage available.
- iCloud Backup Failed. There was a problem enabling iCloud Backup.
2. Possible Fixes to iPhone 11 Won't Backup to iCloud
You can apply the following fixes to fix the issue where your iPhone 11 will not backup to iCloud.
Fix 1. Check your Wi-Fi signal & connection
Make sure your iPhone is connected to a working and strong WiFi network. Otherwise, this can cause your iPhone not to successfully backup to iCloud.
Fix 2. Toggle off and on iCloud Backup
Ensure the iCloud Backup option is properly turned on on your iPhone. You can check it as follows. Head to Settings > [your-name] > iCloud > iCloud Backup.
Enable the option that says iCloud Backup.
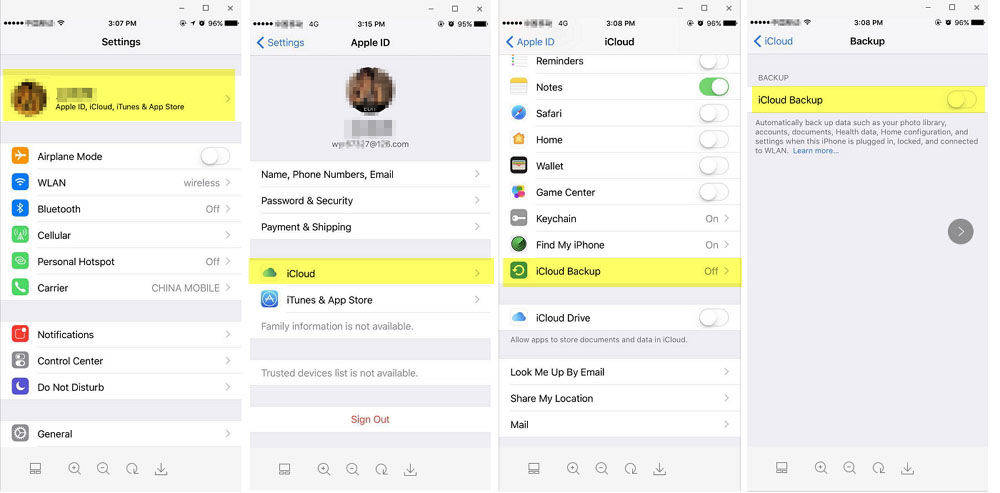
Your backup issue should now be resolved.
Fix 3. Make enough free space on iCloud
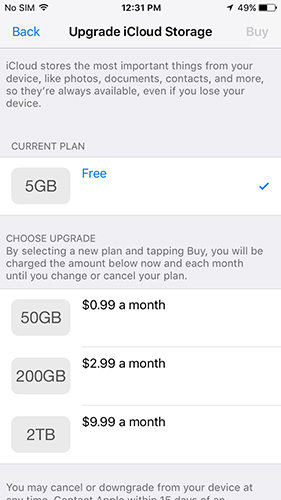
If the error says you do not have enough space, head over to the iCloud website and log-in to your account. Then, find the files that you do not need and delete them. This will free-up memory space in your account. Or you can upgrade your iCloud Storage.
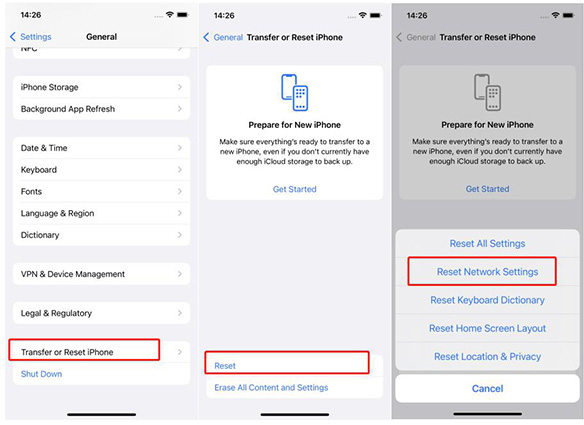
Fix 4. Reset Network Settings
Your network settings can cause your iPhone not to create iCloud backups. Resetting these settings should fix the issue for you.
- On your iPhone, head to Settings > General > Reset.
Tap on the Reset Network Settings option.

Your network settings should now be reset.
Fix 5. Sign Out and In Your iCloud Account
Toggling the iCloud sign-in option is a good idea to fix the backup issue on your iPhone 11.
- Open the Settings app and tap on your name banner at the top.
Scroll down and tap on the Sign Out option.

- Sign back into your iCloud account on your iPhone.
Your iPhone 11 should now backup to iCloud without issues.
Part 2. How to Fix iPhone 11 Won't Backup in iTunes
If you are wondering why wont iPhone 11 pair with my iTunes backup, this section has all the answers that you have been looking for so far.
1. The Common iPhone 11/11 Pro (Max) Backup Errors in iTunes
The following are the common error messages you can come across while trying to backup your iPhone 11 with iTunes.
- iTunes could not backup the iPhone because an error occurred.
- iTunes could not back up the iPhone because the iPhone disconnected.
- iTunes could not backup iPhone because not enough free space available on computer.
- iTunes could not backup iPhone because could not be saved on computer.
2. Possible Fixes to iPhone 11 Won't Backup in iTunes
The following are some of the solutions for the issue you are facing.
Fix 1. Update iTunes
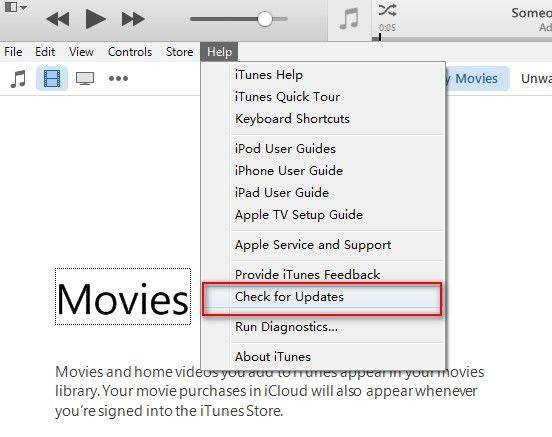
An easy way to fix issues with iTunes is to update the version of iTunes on your computer.
- Open iTunes.
- Click "Help" from the menu bar at the top-right of the window.
Click "Check for updates".

Fix 2. Delete corrupted backups
If you have corrupt backups saved on your computer, they may be causing issues with your newer backups.
- Launch iTunes, click on Edit, and select Preferences.
Go to the Devices tab, select your backup, and click on Delete Backup.

Your chosen corrupted backups will be deleted.
Fix 3. Use Apple matched USB cable or lighting port
Make sure you are using an Apple certified USB cable and charging port. You should not use any third-party cables for making backups of your iOS devices.
Fix 4. Rename backup files
One workaround that could fix the issue for you is to rename your backup files.
- Press Windows + R, type "%appdata%" into the box, and press Enter.
Go to the following directory: Apple Computer > MobileSync > Backup

- Right-click on your backup file and choose Rename. Enter a new name for your backup.
Your iPhone 11 should now backup to iTunes.
Fix 5. Check Space on Disk
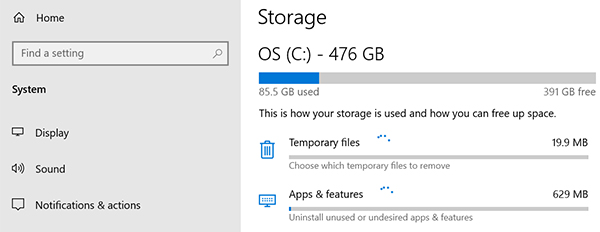
Make sure there is enough disk space on your computer to store iPhone backups.
- Go to Settings > System > Storage on your PC.
You will see the hard drive space on your right-hand side pane.

Part 3. The Best Way to Backup iPhone 11/11 Pro (Max) Free
If you did not have luck with any of the above methods, it may be best to use an alternative way to backup your iPhone 11/11 Pro.
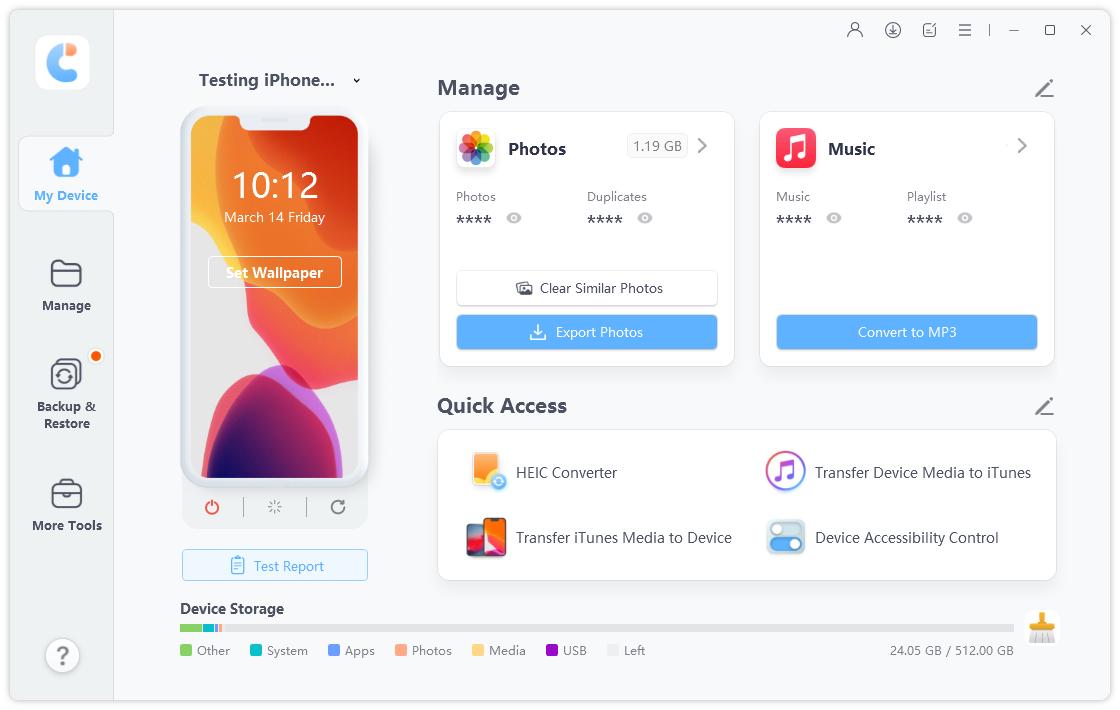
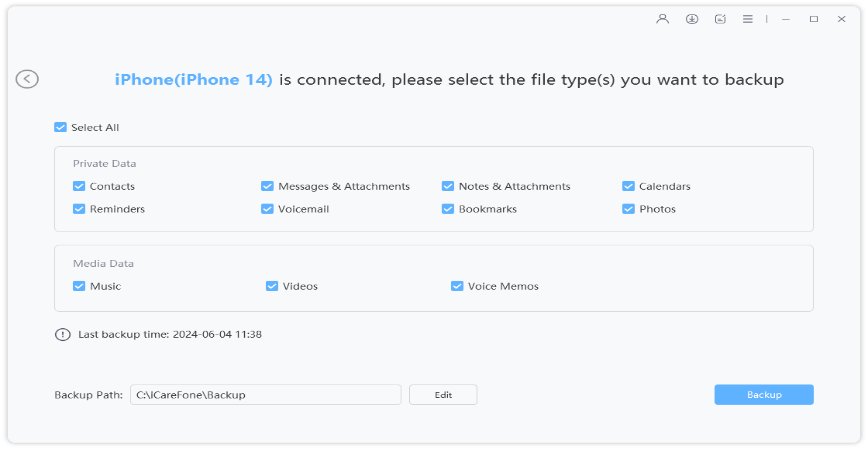
Here we recommend Tenorshare iCareFone, which lets you backup your iOS devices including your iPhone 11/11 Pro (Max) without using iCloud and iTunes. With it, you can selectively backup the data you wanted and preview before backup. Now follows steps below to backup iPhone 11 without iCloud or iTunes.
- Install the latest version of the software on your computer.
Connect your iPhone 11 to your computer and select Backup & Restore in the software.

Select the files you want to backup and click on Backup at the bottom.

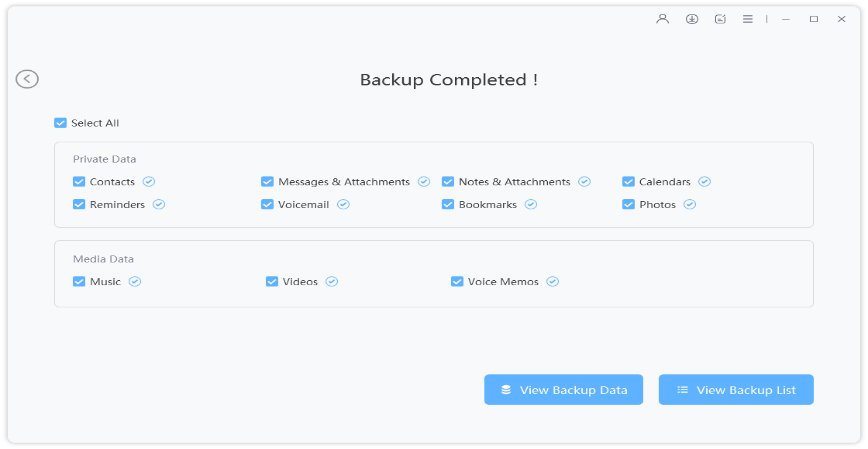
It will let you know when your backup is created.

That is how you create an iPhone backup without iTunes and iCloud. You can restore iPhone 11 from backup file you created anytime you need.
Summary
If your iPhone 11 will not backup no matter what you do, the above methods will help resolve the issue on your device. In case nothing works, you can use Tenorshare iCareFone as shown in the above guide to make a backup of your iPhone 11.
Speak Your Mind
Leave a Comment
Create your review for Tenorshare articles

Tenorshare iCareFone
Best Free iPhone Transfer & iOS Backup Tool
Easily, without iTunes
