How to Fix iPhone 13/14/15 Sync Problems Step by Step
Recently, many iPhone users have reported about iPhone not syncing problems, including iTunes is repeatedly syncing old podcasts to my phone (13.5.1), sync session failed to start, iPhone, iPhone sync error, iTunes cannot read contents of the iPhone, and more. If you are also one of those users facing the same problem, then you have come to the right place. There are several methods that can solve the issue with ease. Whatever the reason is, in this guide, we will show you what tips you can use to resolve iPhone won't sync with iTunes issue.
- Tip 1: Use Free TunesCare to Repair iPhone Not Syncing Problem
- Tip 2: Update to the newest iTunes
- Tip 3: Quit & Relaunch iTunes, and perform a Manual Sync
- Tip 4: Re-authorize iTunes
- Tip 5: Restart Computer
- Tip 6: Reboot your iOS Device
- Tip 7: Try the Opposite Syncing Method: USB or Wi-Fi
- Tip 8: Try a Different USB port & USB Cable
- Tip 9: Turn off Apple Music Features
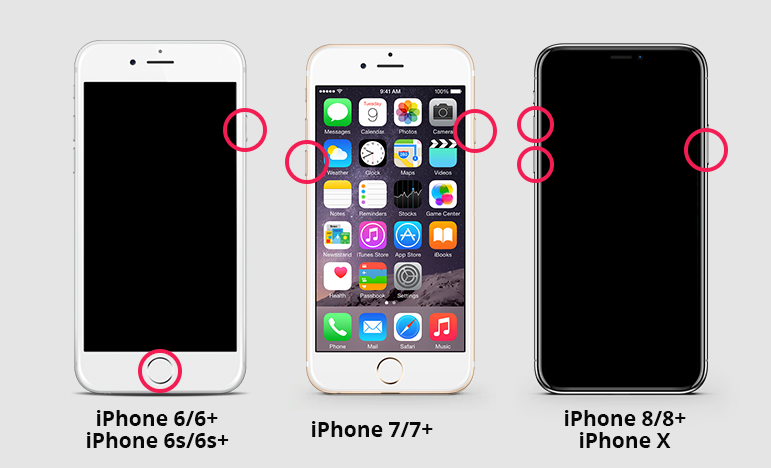
- Tip 10: Hard Reset your iOS Device
- Tip 11: Repair iPhone System Without Data Loss
- Tip 12: Reset your Device (Data Loss)
Tip 1: Use Free TunesCare to Repair iPhone Not Syncing Problem
The first and most powerful tool to fix iTunes sync problem for free is using iTunes repair tool -Tenorshare TunesCare. The software is designed especially for users who face iTunes sync error (like iPhone error 14, iTunes sync error 54, etc.). It is professional iTunes repair software that can fix all iTunes issues and sync problems with few clicks of a button.


Guide on how to fix iTunes sync problems using TunesCare:
Step 1: Download and install the Tenorshare TunesCare from its official site on your computer. Then, connect your iPhone to the computer using a digital cable and select "Fix iTunes Sync Problems" option.
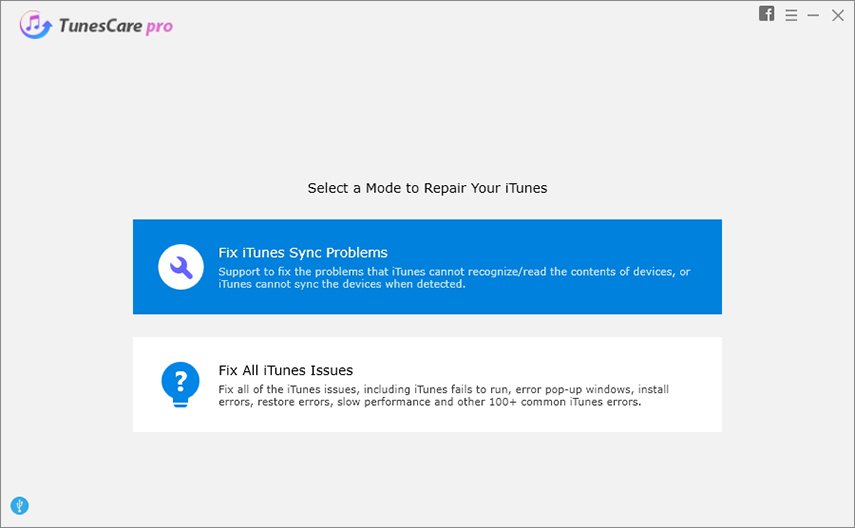
Step 2: Next, the software will begin to repair your iTunes library. Wait for a few minutes until the repair process is not completed. Once it is done, you can run your iTunes and sync your device to iTunes.
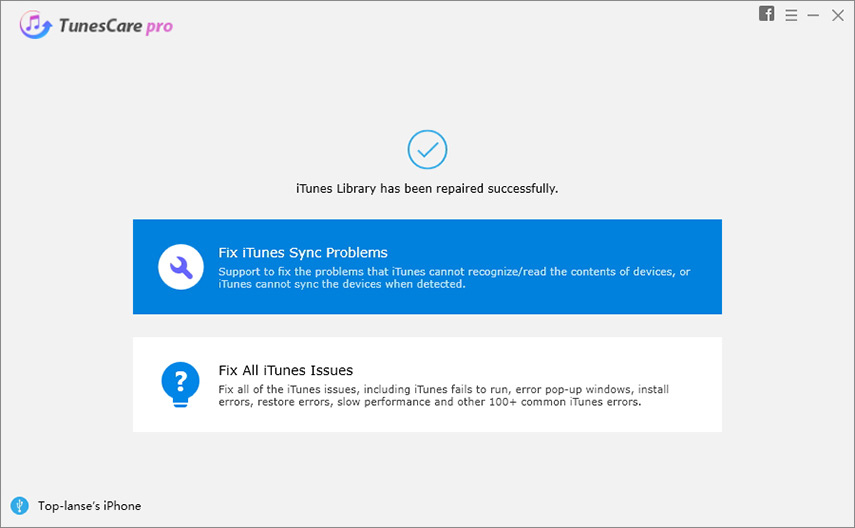
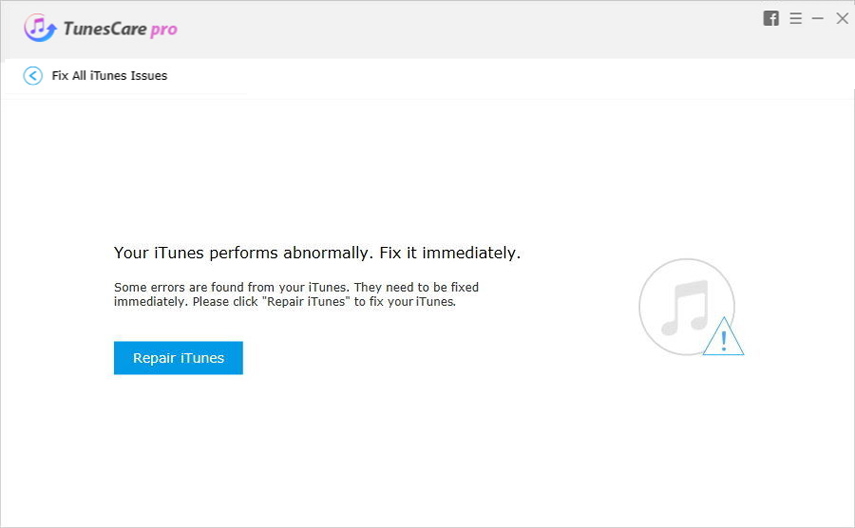
That is it. With simple two clicks, most of the iPhone sync problems can be fixed. If the problem persists, you can use the advanced feature "Fix All iTunes Issues" to give iTunes a fresh install and diagnose.
Tip 2: Update to the newest iTunes
Make sure that you have updated your iTunes to the latest version. Generally, users face iTunes error due to its older version. Moreover, if you have a new iPhone model, then it might not be work with iTunes older version. By simply updating iTunes to the newest version, the problems get solved.
To check and update iTunes to the new version, follow the below steps:
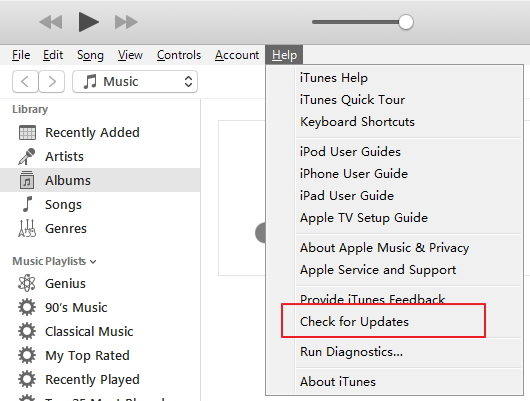
Step 1: To begin the process, run the iTunes on your computer and go to the "Help" tab. If you don't find Help tab, then go to "iTunes" tab.
Step 2: Then, here, click on "Check for updates" and if updates are available, then download and install it to fix the problem.
Tip 3: Quit & Relaunch iTunes, and perform a Manual Sync
Another tip that you can try to fix iPhone sync problems is simply quitting and re-launching iTunes and then, again tries to sync your iPhone to iTunes manually. Sometimes, this method works to come out of iTunes sync error.
Tip 4: Re-authorize iTunes
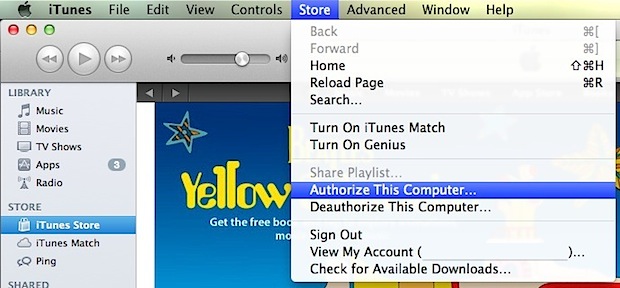
If iTunes syncing fails, and the sync button is not accessible at all, then simply re-authorize your computer with iTunes. To do this, follow the below steps:
Step 1: Open iTunes and connect your iPhone to the computer using a digital cable.
Step 2: Then, move to the "Stores" tab and then, tap on "Authorize this Computer".
Tip 5: Restart Computer
If iTunes sync issues do not get resolved after updating iTunes, the easiest thing you can do to fix it is by simply restarting your computer. When you restart your computer, all recent changes are implemented and this might also fix the issue you are facing now.
Tip 6: Reboot your iOS Device
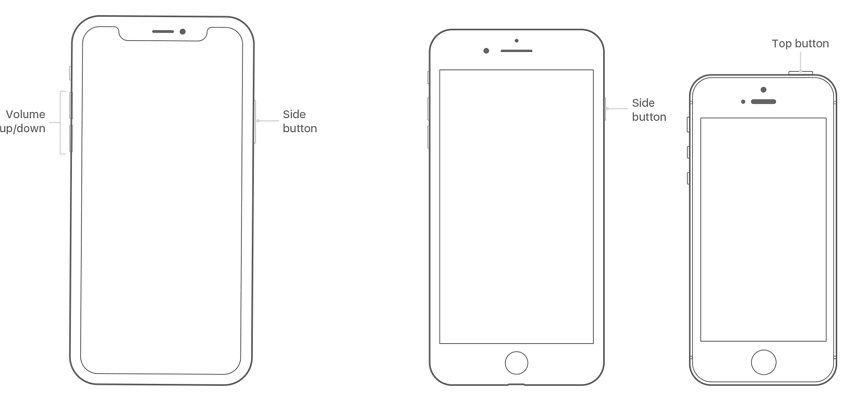
Maybe there is a problem in your iOS device. In this case, you must try to reboot your iPhone to come out of the problem. If there is a software problem in your device that causes iTunes not syncing with iPhone problem, the simply restarting your device will fix the issue.
On iPhone 8 or later:
Press and hold the volume down/up and side button together until you don't see the power-off slider. Next, drag the slider to turn off the device. Again, press and hold the side button to turn it back on.
On iPhone 7 or earlier:
Press and hold the side or top button until you don't see the power-off slider. Next, drag the slider to turn off the device. Again, press and hold the side or top button to turn it back on.
Tip 7: Try the Opposite Syncing Method: USB or Wi-Fi
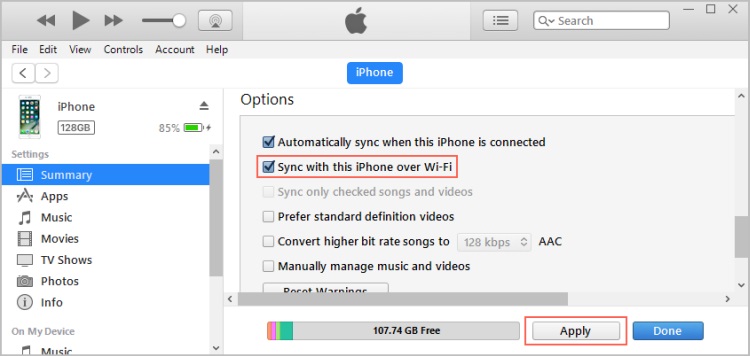
If the issue is not resolved, then try to change the syncing method. If the USB sync method is not working for you, then use Wi-Fi sync option. Similarly, if Wi-Fi sync is not working, then go for USB sync. Here are the steps on how you can change the sync method.
Step 1: Run the iTunes on your system and then, move to the "Summary" tab of your phone.
Step 2: After that, check the option "Sync with this iPhone over Wi-Fi" of Wi-Fi sync.
Tip 8: Try a Different USB port & USB Cable
Still, if your iPhone not syncing with iTunes, then try a different USB port and cable. As it might be possible that USB port or cable you are using for syncing is damaged.
Tip 9: Turn off Apple Music Features
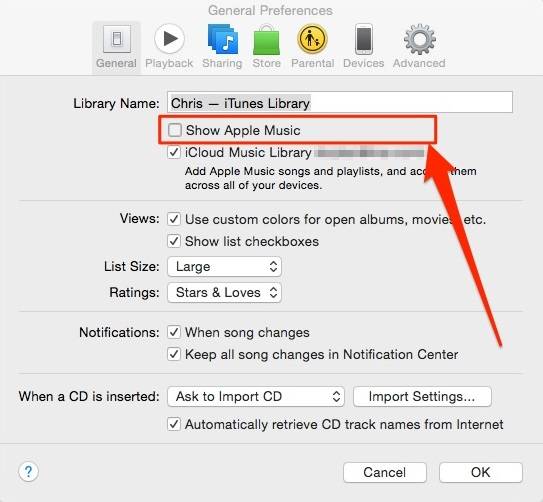
Sometimes, iPhone won't sync to iTunes because Apple music feature on your system is enabled. If you are unable to sync Apple music with iTunes to iPhone, then it may be the case that Apple music feature is blocking the process. Thus, in this case, it is better to turn it off.
To do this on iPhone, move to your iPhone settings app and then, disable Apple Music feature. On iTunes, move to General Preferences and here, uncheck the box "Show Apple Music".
Tip 10: Hard Reset your iOS Device
Sometimes, iTunes won't sync to iPhone problem get resolved by simply performing a hard reset on your iOS device.
- On iPhone 8 or later: Press and release the volume up button quickly and follow the same process with volume down button. Then, press and hold down the side button until the Apple logo does not appear.
- On iPhone 7 or 7 Plus: Press and hold down the volume down and side button until the Apple logo does not appear.
- On iPhone 6s or earlier: Press and hold down the power and home button until Apple logo does not appear.
Tip 11: Repair iPhone System Without Data Loss
Tried all the above tips, but fail to fix iPhone sync problems? The problem might not exist in iTunes, it is the iPhone system that has something wrong. If so, you can repair iPhone system with Tenorshare ReiBoot. It can help to recover iOS system without data loss to fix the iPhone does not sync with iTunes, and many other iOS system issues like iPhone black screen, iPhone won't turn on, iPhone recovery mode, etc.


Here is the guide on how to repair iOS system using ReiBoot:
Step 1: Visit ReiBoot official site and download the tool on your system. Then, install and run it. After that, connect your device to the system and select "Repair Operating System".
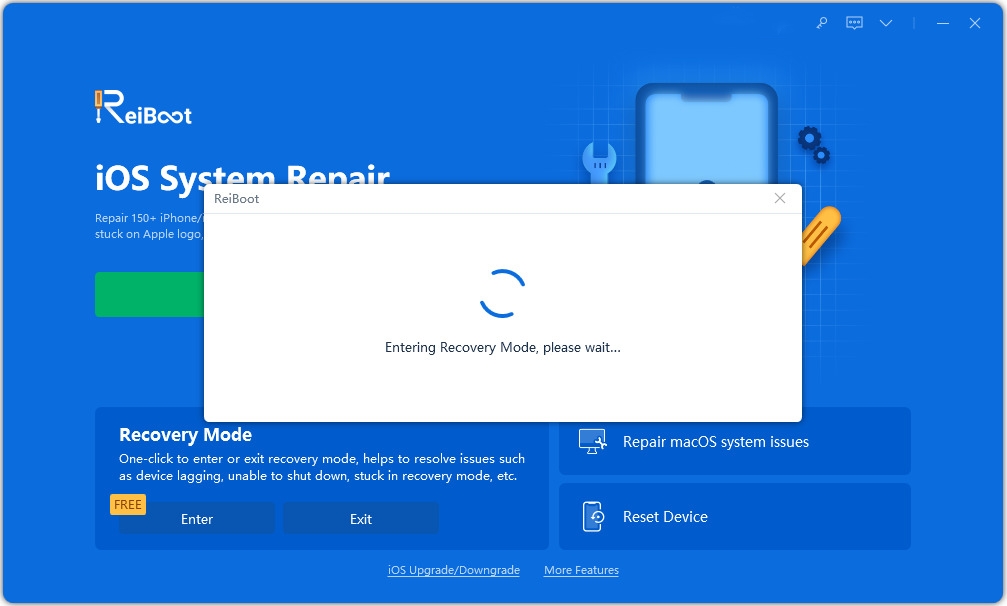
Step 2: Next, click on "Start Repair" and download the firmware package recommended by software to fix the problem.
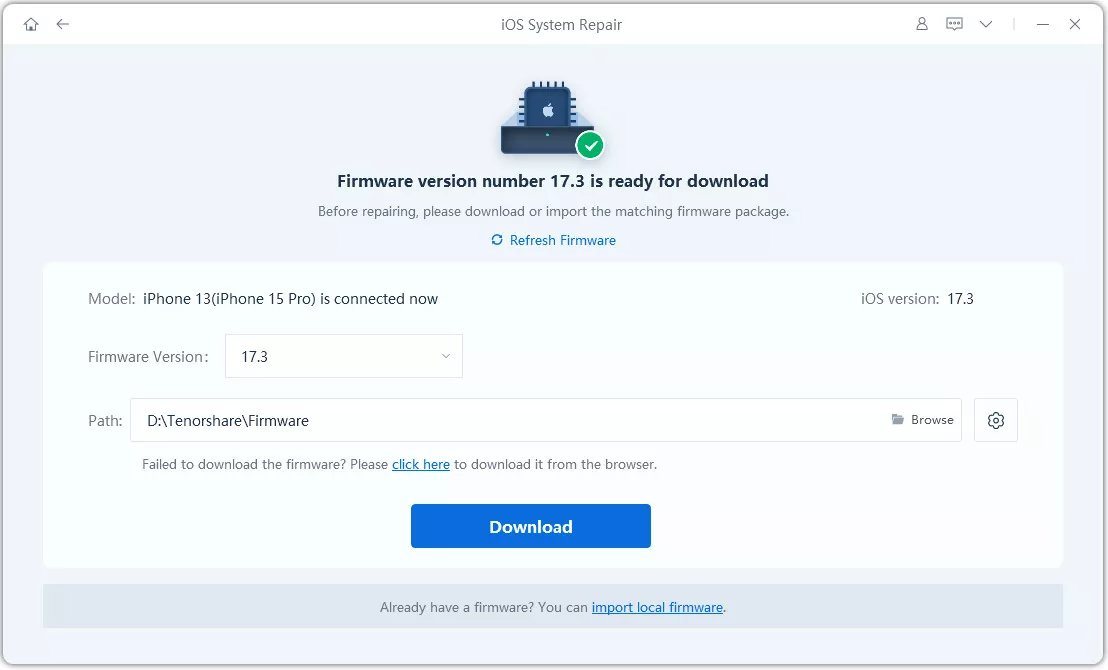
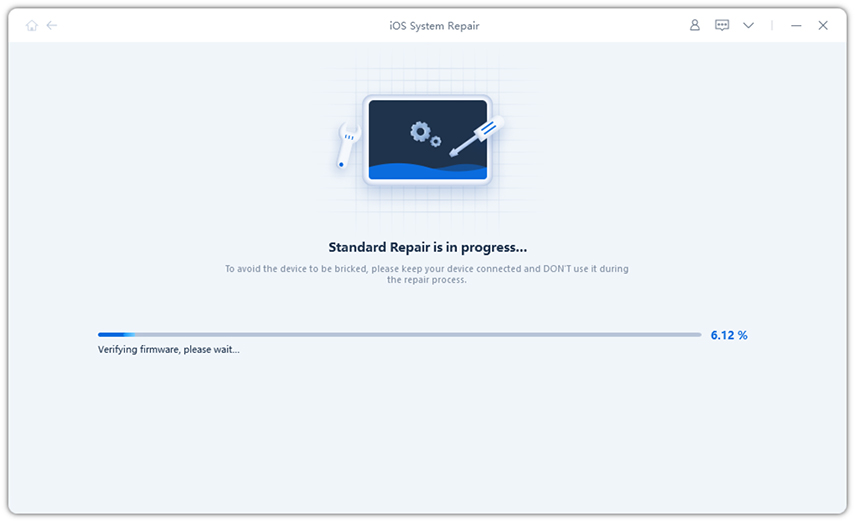
Step 3: Now, click on "Repair Now" button and wait until repair process is completed and your device is rebooted.
Tip 12: Reset your Device (Data Loss)
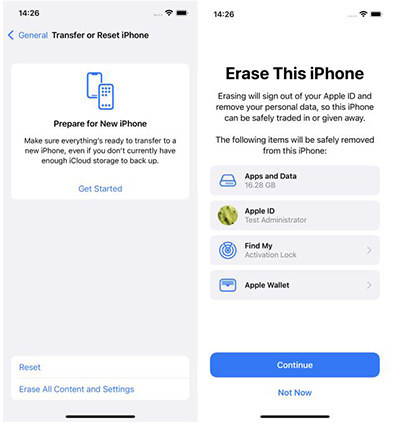
The last tip you can try to fix iPhone won't sync to iTunes issue is resetting your iPhone. Consider this method as last because it will wipe out your all device existing content and settings.
Step 1: Run the settings app and then, open the "General" section.
Step 2: Here, click on "Reset" and then, click on "Erase All Content and Settings".
Conclusion
That's all on how you can come out of iPhone sync problems. This guide is a complete solution to fix problems related to iPhone and iTunes sync. If common tips do not work for you, then must try Tenorshare TunesCare that will definitely help you to get rid of iTunes sync errors, and ReiBoot to help fix iOS system issues without data loss.


Speak Your Mind
Leave a Comment
Create your review for Tenorshare articles


