How to Clear Map History on iPhone/iPad? Full Guide Here
Some iOS users feedback that they can't clear map history after iOS update. Here we have listed some techniques about how to clear map history on iPhone iOS 13.4/13.3.
- How to Clear Map History on iPhone/iPad Manually
- Additional Tip: How to Recover Deleted Safari History from iPhone/iPad
How to Clear Map History on iPhone/iPad Manually
There are different methods to clear map history on iPhone and below we have listed some of the methods that you can use to clear map history on iPhone. Read on to find more on how to clear map history on iPhone 5/6/7/8/X/11.
1. Clear Apple Map Search History on iPhone
Apple is frequently commended for their protection rehearses, so you may have not by any means realized that the organization tracks you. This element is entirely somewhere down in your iPhone's protection settings. Your iPhone is covertly recording your most-visited puts and naming them as 'Critical locations.' It additionally observes the specific occasions you visited them and groups them by urban areas or regions.
Follow the below mentioned steps below to clear map history on iPhone, erase and turn off the location history.
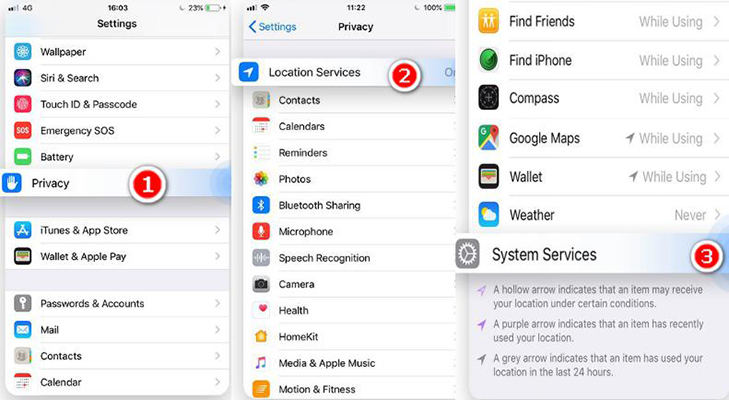
- Go to the Settings of your device and move down to the Privacy option.
- Now Click on the Location Services option. Here you’ll see the list of the applications that uses your location as well as when they have used it.
After that Scroll down. Now tap on the System Services option. This will display all the built-in services that are using your location to aid location-based ads or to set the time zone automatically. Change the settings according to your preference.

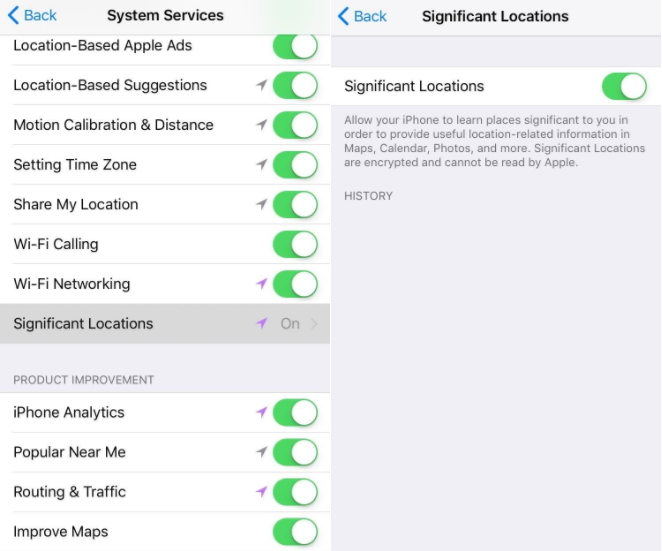
pic: go to system services - Then move to Significant Locations option. You’ll be asked to sign in using your Touch ID or by using your Apple ID.
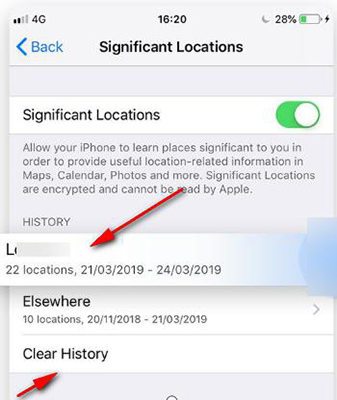
Here you could view the location history on the iPhone. You could either delete each location separately or delete all the history permanently by tap on the ‘Clear history’ option.

pic: clear history - To deactivate Significant Locations, swipe the bar to left. You could re-enable this whenever you want to. Significant Locations information is encoded and is stored on the phone making it unreachable to the Apple workers.
2. Clear Google Map History on iPhone
Your phone isn't the only one gathering the location history. In case that you use Google Maps, you’re most likely giving out your location to Google, as well – regardless of whether you removed your 'Critical Locations'. You could erase the location history on the Google Maps or just turn off default settings on your phone. To clear map history on iPhone follow the below mentioned steps.
- Open the Google Maps app and then tap on the Menu icon.
- Now Click on the gear sign for the Settings.
- Scroll down to the Personal content.
After that Scroll down to the Location Settings and then tap on ‘Delete all Location History’ to get rid of it permanently. No one can access the history again as soon as you delete it permanently.

pic: delete all location history - Now you’ll be asked to confirm. Agree and then tap on Delete option.
To restrict additional tracking, click on the Location Services option, which is set under the Location Settings. Click on the Location and then select Never.

pic: never all location access
3. Turn Off Location Services in Case of Privacy Leak
As a matter of course, your iPhone records and tracks the places that you every now and again visit so as to give better location-based data and suggestions. While this component could be useful, you might need to ensure your protection by disallowing the device to follow the locations you habitually visit. This element could be handily crippled through the Settings application of iPhone. Here are the steps:
- From Home Screen of the iPhone, open Settings app.
- Navigate to Privacy, after that to Location Services and then System Services. discover and choose Significant Locations.
Type your password, use Touch ID or Face ID for authentication.

pic: significant locations
After that switch Significant Locations to Off. The icon will turn gray, showing that the feature is turned off.
Additional Tip: How to Recover Deleted Safari History from iPhone/iPad
You have already read about some of the methods on how do you clear your map history on iPhone. Now read on to know how you recover your deleted safari history.
Quiet down, what you need is an iPhone data recovery tool such as Tenorshare UltData. This software could easily and simple restore as well as save the lost or erased images, including camera roll, App photos, photo stream, and different images on your iPhone. It additionally supports all Mac and windows platforms.
Features of UltData iPhone Data Recovery Software
Some of the amazing features of UltData iPhone Data Recovery are listed below. Read on to find about fantastic features of the software.
- Restore the lost images on iPhone without backup
- Preview lost data before recoveing them
- Easy to utilize interface
Below are step-by-step instruction.
First, connect your iPhone to the Mac or PC using a USB cable. After that launch the program on your PC. "Recover from iOS Device" is the default mode. The software will spot the device automatically if it’s connected as well as trusted.

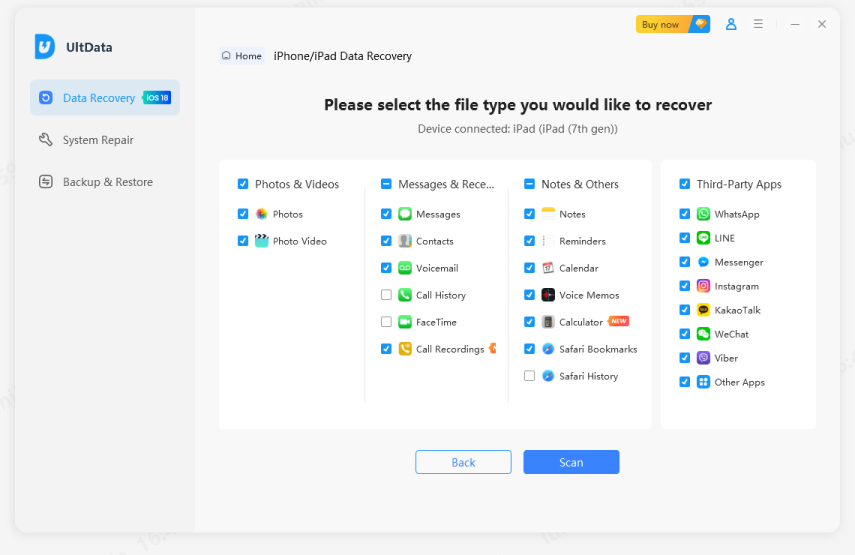
pic: connect to pc When the software detects the device, it’ll show you the user interface. You could check what you want to scan and recover, after that click on "Start Scan" option to proceed.

pic: start scan Now all the scanned files will be listed on the software. Check the history files that you need and after that click on "Recover".
pic: recover safari history
The Bottom Line
We hope that after reading you now know how to clear map history on iPhone and how you can even recover your deleted safari history with Tenorshare UltData. If you still have any questions of confusion regarding how to clear map history on iPhone then you can Leave a comment telling us and we will help your deal with your problem.
- Recover data directly from iOS devices, iTunes & iCloud backup;
- Support the scanning and reading of encrypted iTunes backup files;
- Support 35+ file types (WhatsApp, SMS, contacts, photos, etc.);
- Support WhatsApp, LINE, Kik, Viber, Wechat Backup & Restore(Mac Only);
- Compatible with latest iOS 18 and iPhone 16/Plus/Pro/Pro Max;
Speak Your Mind
Leave a Comment
Create your review for Tenorshare articles
