How to Authorize iTunes on Computer
When you want to authorize iTunes on your computer for various reasons and have no clue about how to authorize iTunes. You shouldn't lose heart at all. Like always, we are here to burst the trouble and help you learn how to authorize computer for iTunes.
In this article, we not only explain how can you authorize iTunes on your PC, but also de-authorizing it. And a bonus tip for tackling any emergency issues that arise.
What is an iTunes Authorization
Authorizing iTunes means allowing it permission to access your apps, music, books, movies etc. 5 computers can be authorized at once and let you play the content on each of them. A computer is authorized on that system only through iTunes. It is not possible to authorize a computer using iPhone, iPod Touch, or another computer. Once you learn how to authorize computer for iTunes, syncing and playing iTunes Store downloaded content becomes super easy.
How to Authorize a Computer
Here, we are going to explain how to authorize computer for iTunes Macand Windows computer. Ensure that you have installed the latest iTunes version on your computer.
Here is the guide –
- Launch iTunes and sign inn to your Apple ID.
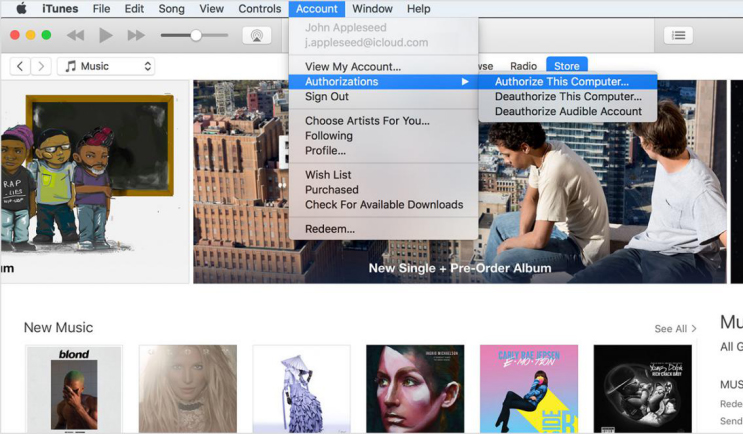
- How to authorize iTunes on Mac:
Click on 'Account' on the menu bar of your Mac system. Go to 'Authorization' and then 'Authorize This Computer'.
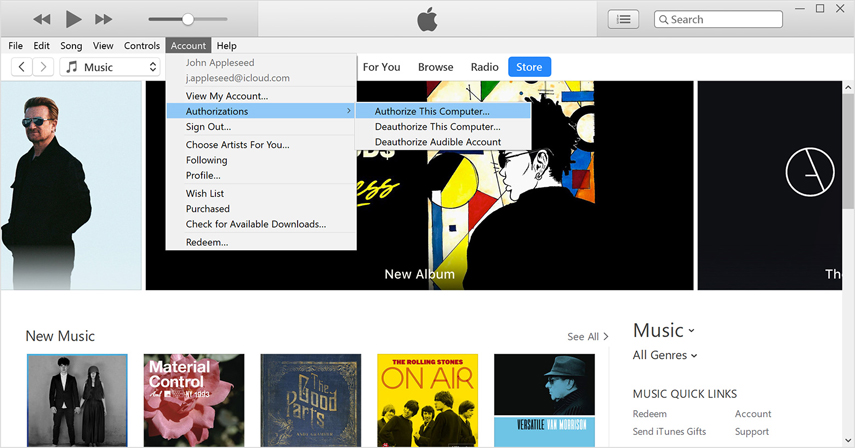
- How to authorize on Windows:
On the iTunes window's menu bar, click 'Account' and then 'Authorizations'. Hit 'Authorize This Computer' and you are done. Alternatively, press Ctrl + B in case menu bar is not visible.
- Now, key in your password and tap 'Return/Enter' key or press 'Authorize'.
Note: In case you are again prompted for authorizing your computer, you don't need a fresh authorization. The same authorization is valid for the computer.
How to Deauthorize Computer
Well there are situations when you might need to de-authorize your computer. And it's essential to know how to de-authorize iTunes, so that you can perform it without any glitch. Whether you want to give away your PC, sell it, upgrading the hardware, or sending it to the service centre. It is recommender to de-authorize it prior to that. de-authorizing will remove all the music, movies, apps, TV shows, and books /pought from App Store/iBooks Store/iTunes Store. This way you protect your content from being accessed by others.
- Launch iTunes on your computer. Look for the menu bar on top of the (Mac system) screen or iTunes window (Windows).
- Select 'Account' > 'Authorization' > 'Deauthorize This Computer'.
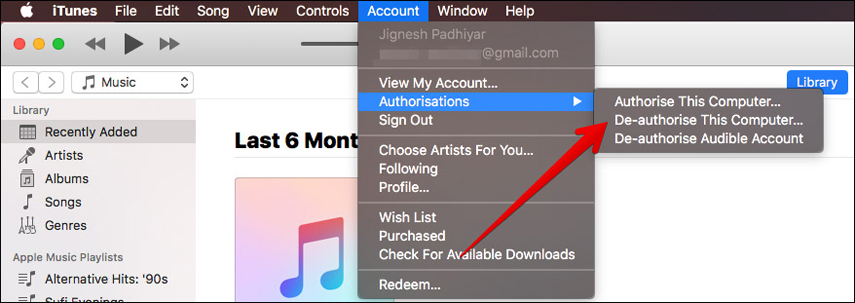
- Enter your Apple Account credentials when prompted and tap 'Deauthorize'.
Note: For Windows users, perform the steps 2 & 3 in order to deauthorise the iTunes on windows computer.
iTunes alternative – Tenorshare iCareFone
In case your Apple authorized computers or Windows PCs being iTunes authorized runs into rough waters and are unable to perform iTunes related operations. We know exactly where should you head. Tenorshare iCareFone will act as the knight in shining armor to fix all the day to day iTunes issues. It also helps you selectively restore and backup your iOS device within no time. Using this tool, you can effectively manage your iOS devices sans data loss. It improves your iTunes and iOS device performance as well as fixes regular iOS issues. You can transfer media files, SMS, contacts between computer and iPhone without any limit.
How to backup iOS device using Tenorshare iCareFone –
- Install and launch Tenorshare iCareFone on your computer. Connect your iPhone and allow 'Trust This Computer' on it. Now, tap the 'Backup & Restore' tab from the software window.

- Here, you can tick 'Select All' or choose desired file types only and then hit 'Backup' button.

- In a while the process gets over displaying 'Backup Completed' with the list of data backed up. You can click the 'View Backup List'/'View Backup Data' option for seeing the backup.
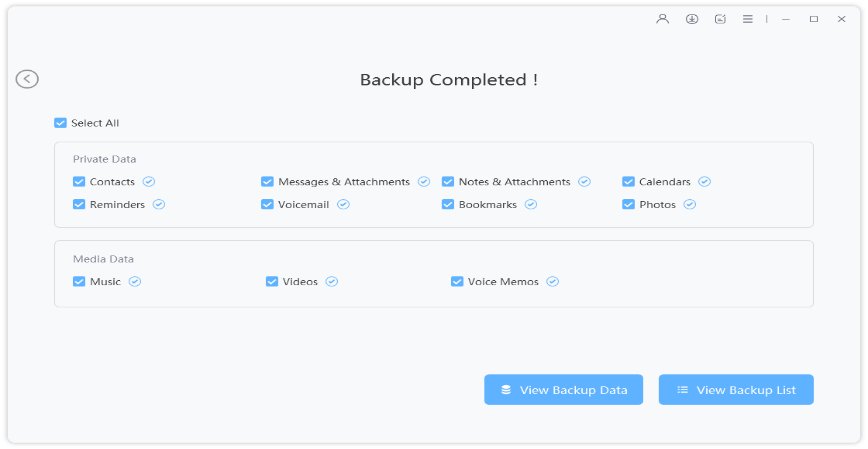
Now that the data has been backed up, let's restore it –
- Connect another iPhone to the same computer and launch iCareFone. Click the 'Backup & Restore' tab and then hit 'To view or restore previous backup files' found on the bottom-left part of the screen.
- From the list of iTunes or iCareFone backup files, choose a backup and click 'View'.

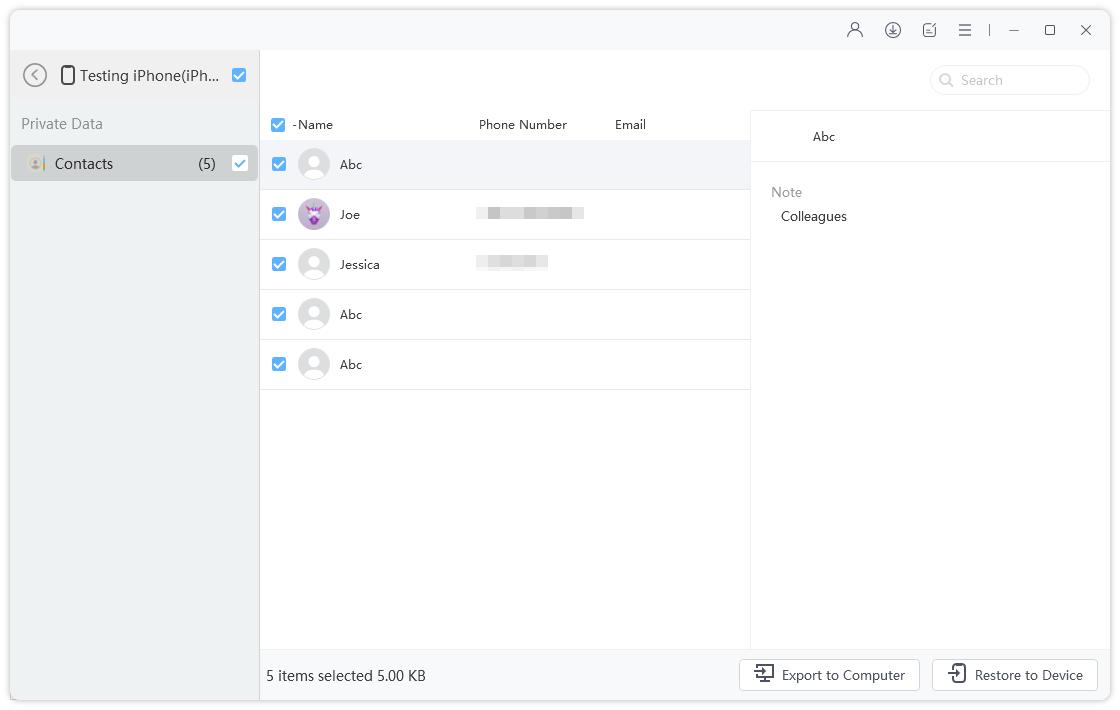
- Now, pick what you want to restore and then press the 'Restore to Device' or 'Export to computer'. The software can restore only media files, bookmarks and contacts to your iPhone directly.
Final Verdict
While learning about how to authorize iTunes, it is imperative to know the solutions to different iTunes issues. And, with iCareFone at hand every hurdle seems a stepping stone to efficiently resolve iOS issues and help the iTunes authorization process work smoothly.
Speak Your Mind
Leave a Comment
Create your review for Tenorshare articles

Tenorshare iCareFone
Best Free iPhone Transfer & iOS Backup Tool
Easily, without iTunes


