iTunes Not Detecting iPhone 16/17? Quick Troubleshooting Guide!
I plugged my iPhone 15 into my Windows 10 laptop, and it's charging, but iTunes isn't detecting my iPhone. I've tried reinstalling iTunes and restarting my computer, but nothing seems to work!
—Apple Community User
Having trouble with iTunes not detecting iPhone is very common. If you’ve experienced this, don’t worry. You're not alone! This issue has been a common frustration for many users, particularly those running on Windows 10.
Whether it's updating your iPhone to the latest model or plugging it into your computer, iTunes can sometimes fail to recognize your device. In this guide, we'll walk through the most common solutions to fix iTunes not recognizing iPhone 16/17.
- Part 1. Common Symptoms for iTunes Not Recognizing iPhone
- Part 2. Fix iTunes Not Detecting iPhone - Initial Tips
- Part 3. Fix iTunes Not Recognizing iPhone - Common Tips
- Part 4. Backup iPhone without iTunes if iPhone Not Showing up in iTunes
Part 1: Common Symptoms for iTunes Not Recognizing iPhone
Before diving into solutions, let’s first identify some symptoms that suggest iPhone not being recognized by iTunes.
- iPhone not showing up in iTunes when connected.
- Grayed-out or inaccessible options in the "Devices" menu within iTunes.
- The iPhone is charging, but iTunes doesn't recognize it.
These signs indicate a communication issue between your iPhone and iTunes, and it could stem from a range of hardware or software issues.
Part 2: Fix iTunes Not Detecting iPhone - Initial Tips
the issue of iTunes won't recognize iPhone after installing Apple devices app.
1. Check Connections
Begin by verifying that your USB cable is in good condition. Test a different cable if you have one available, as a faulty or damaged cable can disrupt the connection between your iPhone and computer.
For a more reliable connection, plug your iPhone directly into a USB port on your computer rather than using a hub or adapter. Hubs and adapters can sometimes cause iTunes won't recognize iPhone in recovery mode issues by introducing additional points of failure or interference.
2. Restart Devices
Restarting both your iPhone and computer can resolve many minor software issues like iTunes not finding iPhone. This simple step refreshes the system and can fix glitches that might be preventing iTunes from recognizing your iPhone.
3. Trust This Computer
When you connect your iPhone to a computer for the first time or after resetting your device, you should see a prompt asking if you want to "Trust This Computer". Ensure that you tap "Trust" to establish a secure connection and allow your computer to access your iPhone's data.
Part 3: Fix iTunes Not Recognizing iPhone - Common Tips
If the initial steps don’t work, you may need to try some more in-depth solutions. Here are some of the most common fixes:
1. Update iTunes
Using an older version of iTunes when a new version of iTunes is available can cause the problem of "iPhone not showing up on computer Windows".
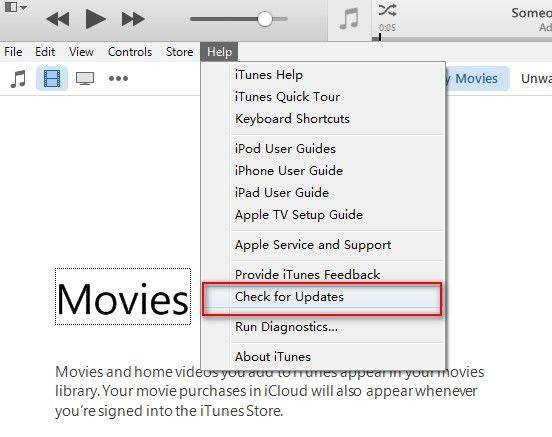
To update iTunes, access the main interface of iTunes. Launch iTunes, click the Help tab and select the Check Updates option from the extended list. After that, you will see a pop-up menu to install the latest version of iTunes. From there, you need to update to the new version by pressing the "Download iTunes" button.
2. Update Operating System
Apple frequently sends updates to iOS users, enhances security, improves performance, fixes bugs, and introduces new features, even minor ones. As Windows starts software updates to improve performance, everyone must install the update in order to eliminate the "Computer does not display iPhone" error. Check out the updates available on iPhone and Windows in the following steps to solve the issue where the iPhone is not detected.
Update Windows PC: Access the Settings app on your computer and select the Windows Update tab from the left panel. After that, tap the "Check Update" button and click "Download Now" if the update is available on your PC.

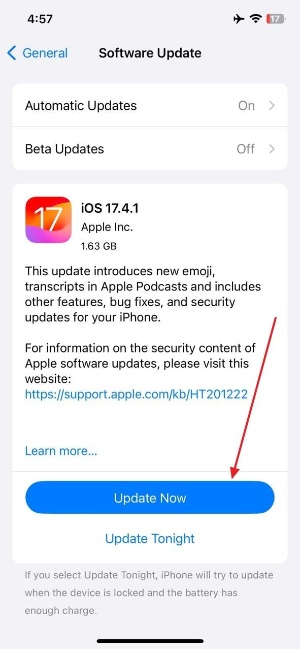
Update iPhone: Open the Settings app on your iPhone and tap the General option from the list. Next, press "Software Update," and if you have an iOS update, press the "Update Now" button.
3. Check Driver Issues for Windows
If you are a Windows 10/11 user, you can solve the "iPhone cannot connect to your computer" problem by step. In this step, you can confirm that the Apple mobile device support, service, and USB driver are installed and running.
- First, press the Windows logo and R key simultaneously from the keyboard to access the Run dialog box. Then, type "appwiz. cpl" in the text box and press the "OK" button to proceed to the next screen.
- From there, scroll down the program list to see if "Apple Mobile Device Support" is installed. If Yes, proceed to the next step, and if No, get the iTunes app and install it immediately.
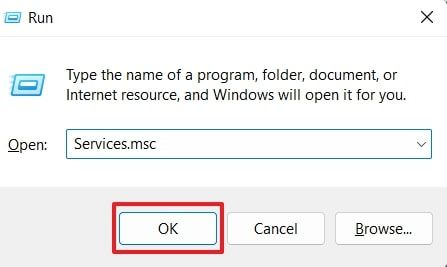
- Once Apple Mobile Device Support is installed, press "Windows Logo" and "R" again from your keyboard. Now enter the "Services. msc" command and press the "OK" button.
- Double-click "Apple Mobile Device Support" from the "Services" list to access the properties. Therefore, confirm that the "startup type" is set to "automatic" and the "service status" is displayed as "running".
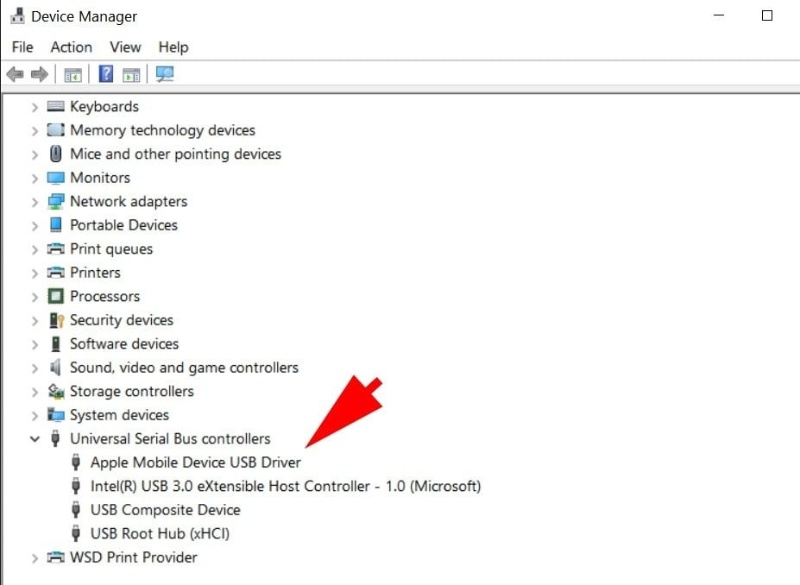
- Then right-click the "Windows" icon from the search bar or from the taskbar to open the system's Device Manager.
- Tap the "Forward" mark in front of the system device category to expand it and get a new list. Verify that the "Apple Mobile Device USB Driver" option is on the list.

4. Test USB Port and Cable
If the Lighting/USB-C cable is broken or fragile, it can lead to an error that says, "iPhone cannot connect to PC." Therefore, it is recommended to check if the iPhone is charged when the cable is connected to the computer. If it is not charged, it is clear that the cable is faulty, so you need to replace it with a new cable, preferably an Apple authentication cable.
5. Check for Conflicting Software
Sometimes, security software, third-party applications, or background processes can interfere with iTunes' ability to detect your iPhone. To troubleshoot, temporarily disable or uninstall any such software and observe if iTunes starts recognizing your device correctly.
6. Reset iTunes Preferences
Navigate to the iTunes preferences menu and reset all settings to their defaults. This process can often resolve issues caused by bugs or incorrect configurations that may be preventing iTunes from recognizing your iPhone properly.
7. Reinstall iTunes
If other steps haven’t resolved the issue, consider uninstalling iTunes completely from your computer and then reinstalling the latest version from the official website. Don’t forget to back up your iTunes library before performing this action to avoid losing any data.
Part 4. Backup iPhone without iTunes if iPhone Not Showing up in iTunes
If iTunes continues to fail in detecting your iPhone 16/17 and you need to perform a backup, you can use an effective alternative, Tenorshare iCareFone. It’s an all-in-one iOS management tool designed to simplify the process of backing up and restoring your iPhone data.
It can easily back up all your iPhone data for free, including photos, videos, contacts, and messages. Then you can restore backups to your original iPhone or a new device without needing iCloud or iTunes. Importantly, no existing device data will be overwritten during this process.
Advantages of Tenorshare iCareFone
- No iTunes or iCloud Required: You don’t need iTunes or iCloud to back up your iPhone.
- Faster Backup and Restore: iCareFone allows you to quickly back up and restore your iPhone without data loss.
- Supports the Latest iPhone 16: The tool is fully supported with the latest iPhone models, including iPhone 16.
- Data Safety: It ensures that none of your device data will be overwritten during the Backup or restore process.
- Multiple Backup Options: You can export the Backup to your computer or external hard drive for safe storage.
How to Backup iPhone to Computer without iTunes
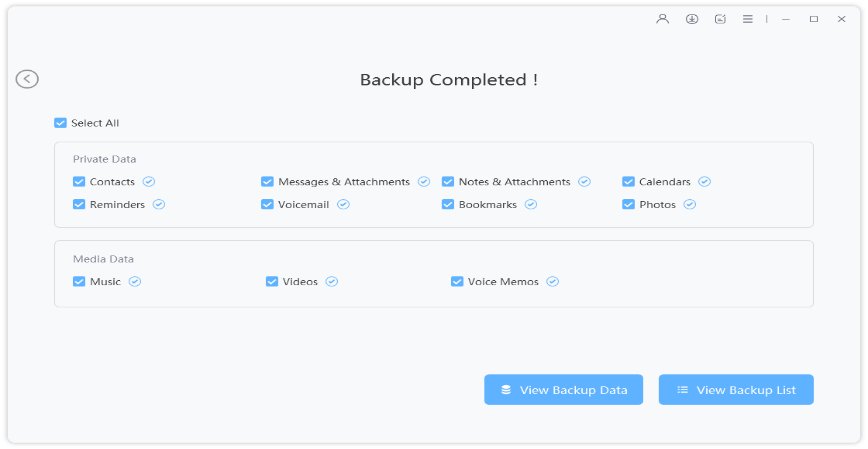
Connect your iPhone to the PC and run the Tenorshare iCareFone tool. After the iPhone is detected, choose "Backup & Restore" option from the menu situated at the top.

All the files will be selected by default. You can deselect and choose different files that you need to backup.

Once you have selected the files, click Backup and wait for the process to end to backup iPhone to PC computer.

Conclusion
When iTunes not recognizing iPhone, it can be frustrating, specifically if you depend on it to manage backups or syncing media. Hopefully, this guide has enabled you troubleshoot and resolve the problem. Remember to check your USB connections, restart your devices, and update both iTunes and your operating system for optimal performance.
If iTunes still fails to recognize your iPhone, consider using an alternative like Tenorshare iCareFone for backing up your device and ensuring your data is safe. With iCareFone, you won’t have to worry about iTunes-related issues anymore.
- Free backup everything you need on iPhone/iPad/iPod
- Transfer music, photos, videos, contacts, SMS without limitation
- Selectively restore files without erasing current data
- 1-Click to transfer photos from iPhone to PC/Mac
- Sopport the latest iOS 26 and iPhone 16
Speak Your Mind
Leave a Comment
Create your review for Tenorshare articles

Tenorshare iCareFone
Best Free iPhone Transfer & iOS Backup Tool
Easily, without iTunes


