Find the Best Wi-Fi Channel and Improve Wi-Fi Connection on Mac OS
by Jenefey Aaron Updated on 2020-03-14 / Update for Mac OS
Your Mac doesn't have good Wi-Fi connection? If you have OS X 10.9 Mavericks, you can use the Wireless Diagnostics utility on your Mac to improve WiFi connection.
What Interferes Your Wi-Fi Connection
Does this Wireless Diagnostics utility really work? To figure out this, you should first get some knowledge about what interferes your Wi-Fi connection.
More and more people are using wireless network these days, creating many wireless signals. If all the signals run on the same broadcast channels, your Wi-Fi connection will be interfered. For instance, when your wireless router runs on the same channel as your neighbors', you might find that you have slower internet access.
How to Find the Best Wi-Fi Channel with Wireless Diagnostics
To optimize your wireless network, one of the easiest and simplest solutions is to change your router's Wi-Fi channel, so you can take advantage of the high speed internet access you paid for and get more done when working at home.
You should first find the best channel Wi-Fi channel and then change your router's broadcast channel to this one, which will be described in Part 1 and Part 2.
Part 1: Find the best Wi-Fi channels
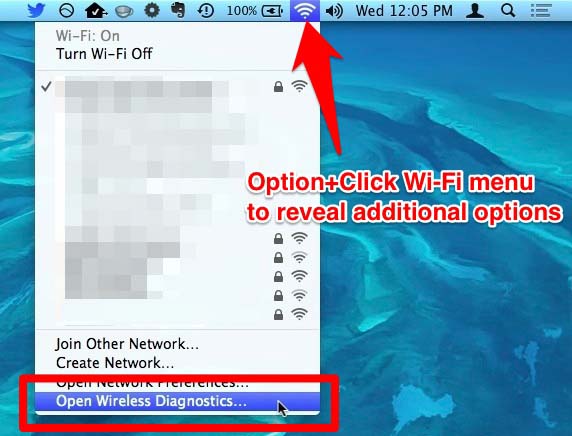
- 1. Press the OPTION key on your Mac and click the Wi-Fi icon in the menu bar. Select "Open Wireless Diagnostics" which is the last option.

- 2. Enter the admin password and completely ignore the splash screen that launches.
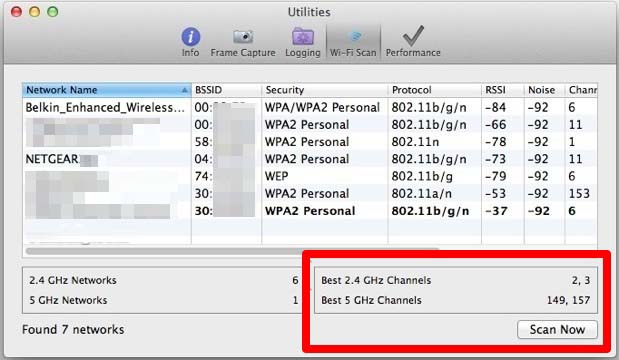
- 3. On the "Windows" pull-down menu choose "Utilities", and select Wi-Fi Scan > Scan Now.
- 4. Look at the bottom right for the best channels recommendations:
Best 2.4 GHz Channels (usually 802.11b/g)
Best 5 GHz Channels (usually 802.11a/n) - 5. Now log in to your Wi-Fi router (this is going to vary depending on the manufacturer) and make the channel changes as necessary – typically this means using a web browser to point at the local router IP (192.168.0.1, etc).

On the picture above, the best Wi-Fi channels are 2 and 3 for 2.4 GHz, and 149 and 157 for 5 GHz.
Part 2: Change your router's broadcast channel
Steps to change the router's broadcast channel varies for different brands of router and the IP address used. Just take my own router with an IP of 192.168.1.1 as an example.
- 1. Enter the IP address in any web browser.
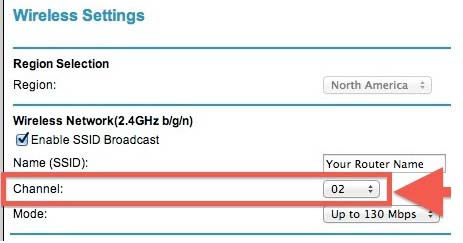
- 2. Log in using the router admin login (often admin/admin), and look for the "Channel" option, typically located within a "Wireless Settings" or "Broadcast Settings" preference region.
- 3. Change to the channels you prefer for each protocol and save settings.

Don't have access to the Wireless Diagnostics utility? Maybe you don't have OS X Mavericks yet? Supposing you want to recover data from Mac, Tenorshare Any Data Recovery for Mac is a good choice to proceed.
- Recover data deleted, formatted or lost on Mac;
- Restore files from hard drive and external storage devices;
- Recover data from failed/crashed/dead MacBook;
- Fully supported latest macOS 10.15 Catalina;


