Step-By-Step Guide on How to Format USB Drive on Mac
More often than not, you will need formatting your USB drive on your Mac. Whether you have used the USB drive with another computer, which might be carrying viruses or the USB drive got malfunctioned. For fixing the issues and getting the flash drive back on track, you got to work around reliable solutions. Unless you deploy the best method in this matter, there is no assurance about the safety of your Mac or USB. Rather than wreaking havoc for your system or flash drive with a wrong choice, you can always look for our quick solutions. You have got you covered!
- Part 1: How to Format USB Dive on Mac?
- Part 2: Format Choices for USB Flash Drive
- Part 3: UltData – Mac: The Best USB Drive Data Recovery Software
Part 1: How to Format USB Dive on Mac?
For formatting USB drive Mac you don't have to be a pro in technology. Remember that formatting wipes off all the drive data. The process is same for Firewire, USB and Thunderbolt
Here is the guide:
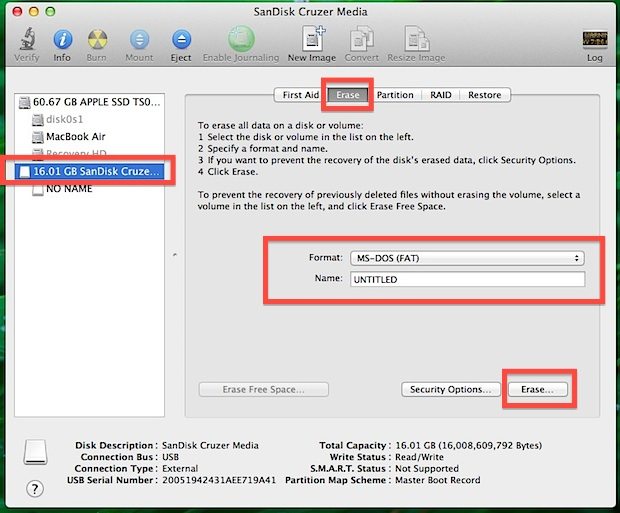
Step 1. Attach the USB to your Mac while launching 'Disk Utility'. Go to 'Applications' and then 'Utilities'.
Step 2. Search your USB drive name over the left panel of 'Disk Utility' and tap it.
Step 3. Press 'Erase' tab and then against the 'Format' option tap on the contextual menu.

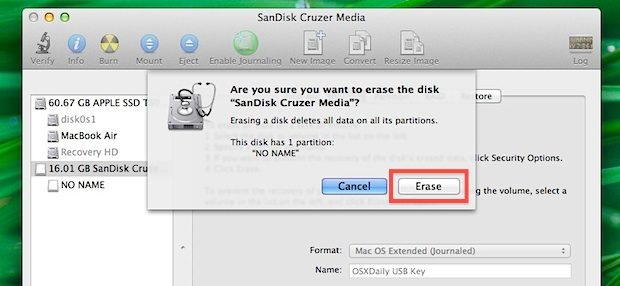
Step 4. Pick 'Mac OS Extended (Journaled)' and rename it if desired. Now, hit 'Erase' button for confirmation on the following screen. The time taken depends on the amount and size of the data in the drive.


Part 2: Format Choices for USB Flash Drive
Now that you know how to format USB on Mac, how about learning the various USB formats and their pros and cons. We have collated a list of the most popular formats.
APFS: This is the default Apple file system crafted to replace HFS+ with iOS 10.3 and MacOS 10.13. It has been developed keeping in mind SSDs, flash drives as well as encryption.
Advantages:
- Disk speed and directory/file duplication is faster.
- Crash protection and space sharing.
- Nanosecond timestamps supported.
- Copy-on-Write and Sparse file supported .
- Maximum number of files increased
- Doesn't support versions prior to MacOS 10.13.
- No AFP or Directory Hard links support.
- Doesn't support codepoints in Unicode 9.0 standard.
- Supports OS X Lion
- With the right file, setting up OS X startup drive is supported.
- There is no size limit with the 'Mac OS Extended (Journaled)' option.
- Maximum number of files increased
- Windows systems can read it but not write to it.
- You can't transfer files from Windows to Mac in this format.
- Usage less memory and runs faster.
- Scans disks quickly.
- More free space for data.
- Files larger than 4GB are not supported.
- Mac startup drive can't be created with this format.
- Doesn't support Mac OS X Lion version.
- You can read write files beyond 4GB size.
- Enhanced disk space management.
- You can create 32GB or larger partitions.
- Doesn't support older Mac versions before 10.6.5 or Windows XP SP2.
- Unsupported by camcoders, cameras, video game systems.
- Only supports computer systems.
Disadvantages:
Mac OS ExtendedIt is the default format for Mac OS.
Advantages:
Disadvantages:
MS-DOS (FAT): It is a popular Windows and DOS supported file format. You can't format flash drives above 32GB in this format. it doesn't mean you will wonder how to format USB to FAT32 on Mac. As it supports major OSs.
Advantages:
Disadvantage:
ExFAT: If you are up for larger partitions, then it might be a suitable option.
Advantages:
Disadvantage:
Part 3: UltData – Mac: The Best USB Drive Data Recovery Software
When you are wishing for the best way to format USB on Mac, why not give Tenorshare 4DDiG for Mac Data Recovery, a thought if data recovery is your concern. This wonderful tool from Tenorshare can even recover lost data for your Mac. 550 data types lost due to accidental deletion, software failure, virus attack or natural calamity can be retrieved back to your Mac computer with UltData – Mac. SSD, iMac, micro card, music and video player, camera or iPad data can also be retrieved. You get 100% assurance that your data remains protected while being recovered at high speed.


Here comes the quick guide for USB data recovery on Mac:
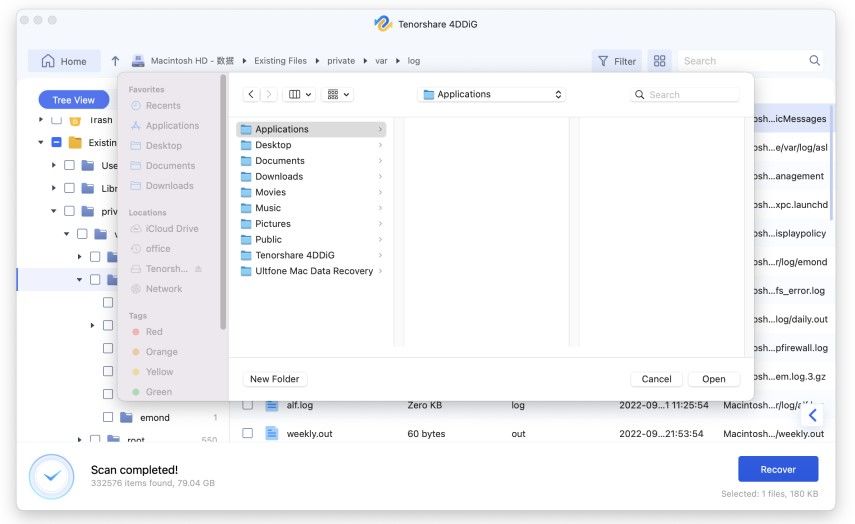
Step 1 Connect the USB with your Mac. After Installing Tenorshare UltData – Mac, run it on your Mac. Here you need to choose your USB flash drive as the location and then hit 'Scan'. It will find the lost, deleted or formatted files.

Step 2 Once the deleted files are scanned, you can preview them over the result section. All you need to do is tap on them.

Step 3 Press the 'Recover' button and select a target folder on Mac for saving the files. Keep in mind not to pick USB as the target as it might lead to permanent data loss.

Final Words
Whether you are formatting or reformatting USB on Mac. If you want to recover the accidentally lost data then there is nothing better than Tenorshare UltData – Mac for your rescue. It is 100 percent secure and fast. It supports over 550 data types, what else do you need to stay ahead of the game?


Speak Your Mind
Leave a Comment
Create your review for Tenorshare articles


