3 Different Methods on How to Save an Image on Mac Quickly
We are here to discuss how to save an image on Mac. Images that you want to save, copy, or link to are common while using Safari on a Mac. There are several different ways to save and copy photos from Safari depending on their intended usage.
- Part 1: The Most Common Method on How to Save an Image on Mac - Right Click
- Part 2: Use Copy-Paste on How to Save an Image on Mac
- Part 3: Save an Image on Mac through Drag-Drop
- Part 4: Take Screenshots to Save an Image on Mac
- Bonus Tip: How to Save Photos from iPhone to Mac
Part 1: The Most Common Method on How to Save an Image on Mac - Right Click
Let’s talk about how to save a picture from google on mac. This method is also the most common method, which can be used in almost every picture that you want to save.
- Search for a picture you want to copy or save on the internet.
- Right-click (or Control-click) the picture to bring up a contextual menu with all of your available options once it has loaded in the browser window.
Create a new folder for the image using the "Save Image As" pull-down menu. This is a convenient feature.

- Then choose a folder in which you want to save the picture.
The "Save Image As" option will also save a copy of the image to your Mac, much as "Save Image to Desktop." However, unlike the "Save Image to Desktop" option, it will ask you where you want to save the photo instead of just dumping it on your desktop. The "Save Image As" option makes it easy to organize your computer's hard disc and keep your desktop free of clutter. If you wondering how to save images from safari on MacBook air, the process is the same as this.
Part 2: Use Copy-Paste on How to Save an Image on Mac
At least when it comes to cutting and pasting photographs, Mac computers are pretty comparable to Windows PCs. For cutting, copying, and pasting, Macs employ the "Command" button and the "X," "C," and "V" keys.
It is possible to copy but not cut images from websites. In Word documents and the Finder, pictures may be cut or copied.
Below is the process of how to save pictures on MacBook using copy-paste:
- Maintain control of the computer by pressing and holding down the "Command" key. If you want to cut the picture, click "X". If you want to copy it, press "C." This is done by deleting the picture and copying it to the Mac RAM.
Place your cursor where you'd want the image to be pasted and click. Press and hold down the "Command" key to paste it while pressing the "V" key.

Part 3: Save an Image on Mac through Drag-Drop
It's also possible to drag and drop photographs from one application to another, or on the desktop, on a Mac. The partial screenshot, which allows focusing on a picture that is usually unavailable, such as images embedded in PDFs or images contained within other images, is not available on Windows. But be careful, it is not possible to store or download pictures from all web pages and to download images from the Instagram website.
Let’s talk about how to save image on MacBook by drag-drop.
- Begin by clicking on a photo you want to save to your MacBook by opening the message, document, or web page. If required, open the picture. For example, if you're looking at a Google search result, you'll first need to click on the picture to see it in full-screen mode.
Drag the image to your desktop by clicking and dragging it. Using your mouse pointer, click and hold the picture you want to move, then drag it off the border of your browser window until it floats over your desktop.
Note: When you move the picture away, you should see a translucent version of the image emerge.

- Unclick the button. Let go of your mouse click when you see the white + in a green circle over the photo thumbnail. If you want to save the image to your desktop, do this.
Part 4: Take Screenshots to Save an Image on Mac
After reading the article you’re wondering how to save google image on a Mac, we got you covered. You may easily save and share what you see on the screen by capturing a screenshot. This approach is simple to implement and is widely used. Just a few mouse clicks, and you'll have a copy of the image. Also, this will solve your question how to save image as jpeg on Mac.

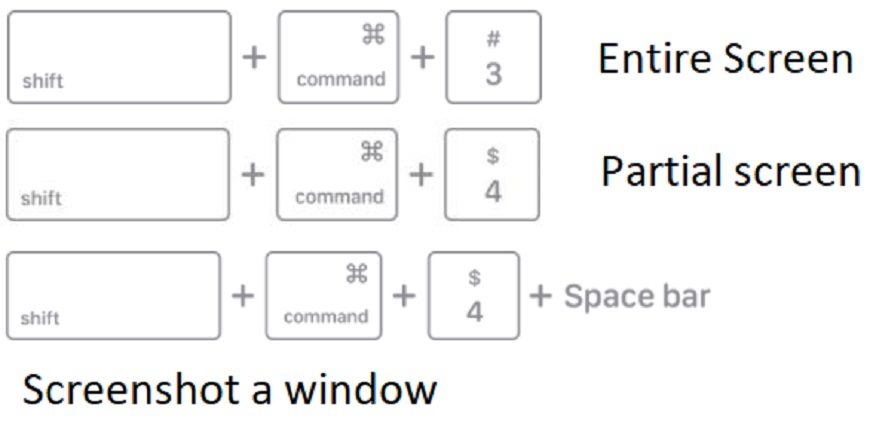
1. Grab Entire Screen
Using the screenshot toolbar's Capture Whole Screen button, hit Capture to capture a snapshot of the entire screen. If you want, you may use the shortcut Shift+Command+3 to snap a screenshot.
2. Partial Screenshot
For those times when you don't need to record the entire screen, you may snap a screenshot of only what you need. You may save time by cropping as you take the picture rather than editing later.
- Shift+Command+4 is the combination to use.
- There will be a crosshair displayed. Select the area you want to capture by dragging the crosshair.
- It is possible to move the selection by dragging and holding down the space bar simultaneously.
- Take a screenshot by releasing the button on your mouse or trackpad.
- Press Esc to cancel the screenshot.
3. Screenshot an Object
Alternatively, you may capture a screenshot of a single item, such as a window or the menu. Using this method, you won't have to worry about accidentally slicing off a bit of the screen while saving it.
- Take a screenshot of the window or menu you're interested in.
- Shift + Command + 4 + space bar is all you need to do.
- Click on the window or menu you wish to save as a picture when your cursor changes to a camera icon. Exclude shadows by holding down the Option key.
- Edit the screenshot by clicking the thumbnail in the corner of the screen.
- Keep in mind that some apps, such as the Apple TV app, do not allow screenshots.
Bonus Tip: How to Save Photos from iPhone to Mac
Gigabytes of storage capacity are now standard on iPhones. However, there may come a moment when you need to move images from your iPhone to your Mac. It's easy to send a few images as attachments to an email, but there is a more efficient way on how to save photos from iPhone to Mac.
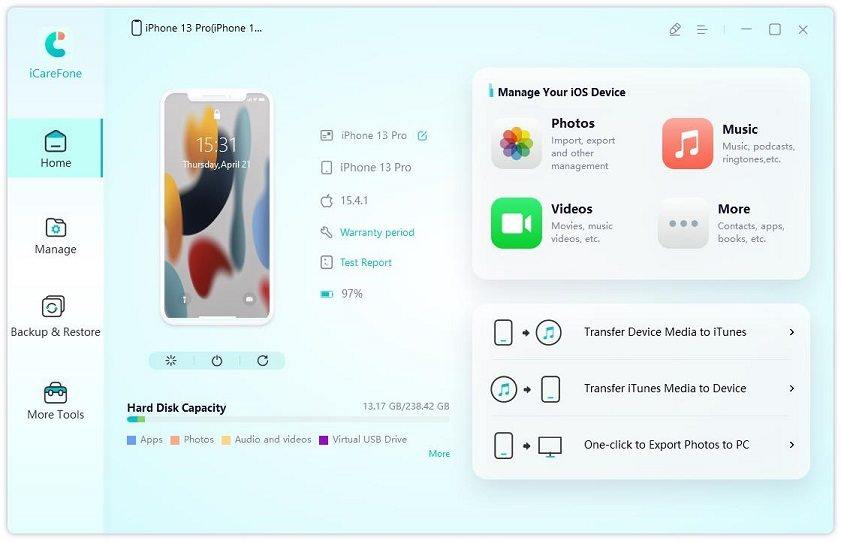
The Tenorshare iCareFone application makes it fast and straightforward to transfer photos from our iPhone, iPad, or iPod touch to our computer.
With iCareFone, you can transfer images from your phone to your PC or Mac in just one click. It's also possible to reorganize their programs, bookmarks and photographs, and videos and export or import their contact information. Still, you may quickly erase files and programs that you no longer use to free up a limited amount of storage space on your computer.
Many iPhone models, including iPadOS 15, iPhone 13 (mini), 13 Pro (max), iPhone SE (2nd Generation), and 12 Pro (max), are supported by Tenorshare iCareFone.
We must first connect our iPhone, iPad, or iPod touch to the computer once we have started the application. Because if we don't trust the computer, the device won't connect with the computer, and the program that we're going to utilize won't work.

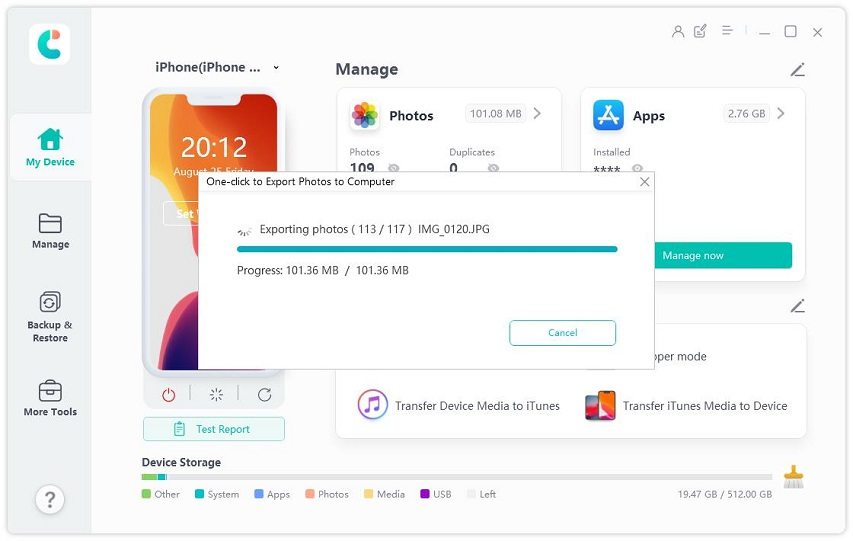
Select One-click export photographs to PC from the drop-down menu that appears. At this moment, we will not be able to pick which photographs we wish to export from our iPhone, iPad, or iPod touch because the software will export all of our images and videos.

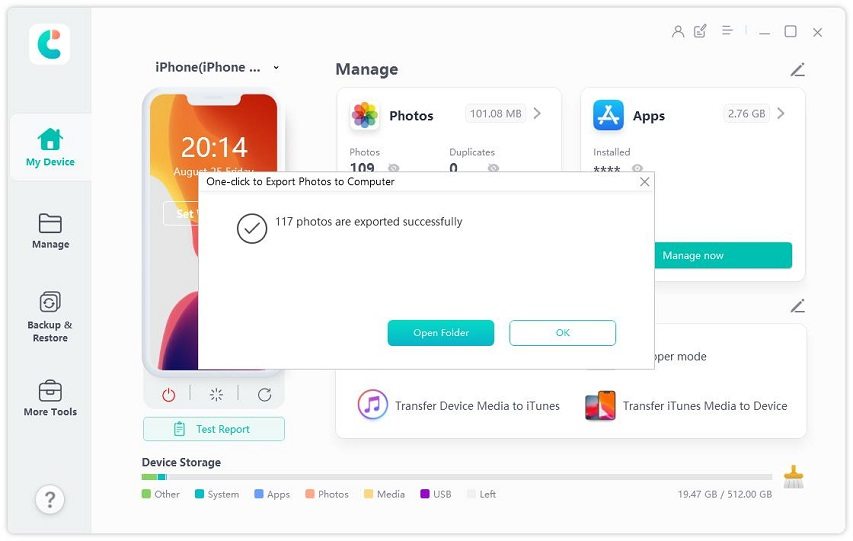
A new window will open when the procedure is complete, showing the folder where all of our extracted photographs are placed. After that, we may do whatever we want with them: send them to our friends, copy them to an external hard drive, etc.

Conclusion
But what’s the conclusion of that question, how to save an image on Mac, Let’s talk about that. Regardless of the technique you choose, Apple makes it simple to save photographs to Mac and to transfer photos from iPhone to Mac. In order to avoid overstuffing your hard drive, just move the photos you truly need to the new location.
Speak Your Mind
Leave a Comment
Create your review for Tenorshare articles

Tenorshare iCareFone
Best Free iPhone Transfer & iOS Backup Tool
Easily, without iTunes


