How to Remove Geotags from iPhone Photos
“How to remove Geotags in iPhone 6s photos? I don't want to post some of my iPhone photos on Facebook due to personal and security reason.”
-Amanda
When you take a photo with iPhone, it will automatically record the location of where you snapped this photo in the metadata of this image. You won’t see the location in the picture itself but some application such as FaceBook can read it and pinpoint exactly where you took the photo. Moreover, the location information, also known as a Geotag will be baked into the file when you upload photos to the web.
Why Need to Remove Geolocation Data from iPhone Data?
As we talked above iPhone camera app stores the exact GPS location with each photo that you take. If you happens upload a photos to your FaceBook, the geotag information that is embedded in the photo will also get posted on the site. This Geotags can help criminals know exactly where you are or where you take this photo and use the information to fraud, rob, or worse.
Disable photo geotagging on iPhone can easily prevent anyone from tracking the exact location where the picture was taken.
How to Remove Geotags from Photos on iPhone SE/6s/6s Plus/6/6 Plus/5s/5c/5?
Below is an easy way to turn off photo Geotags on iPhone. Note that the photos you taken before disabling iPhone's location services for the camera app will still have the Geotag information embedded in the EXIF metadata saved with the photos.
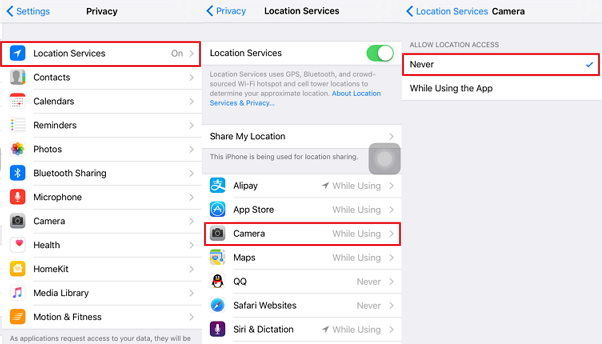
1. Tap the "Settings" icon from your iPhone's home screen.
2. Tap the "Privacy" menu.
3. Choose "Location Services" from the top of the screen.
4. Tap on "Camera" and change the ALL LOCATION ACCEESS to “Never”.

Additional: 6 Tips to Help You Increase Your iPhone Security
Removing Geolocation data from iPhone photos is one of the way to protect your privacy. Below we list other 6 tips to help you protect your iPhone privacy.
1. Set a strong Touch ID. If you're not using 6-digits yet, go to Settings > Touch ID & Passcode, and change your passcode.
2. Turn off lock screen notifications. Go to “Settings” –> “Passcode” (or “Touch ID and passcode”) –> “Allow access when locked” section.
3. Turn off cookies in browsers. Go to “Settings” –> “Safari” –> “Privacy & Security” section –> “Do Not Track: on”, “Block Cookies: Always Block”.
4. Turn off the AutoFill option in browsers. Go to “Settings” –> “Safari” –> “General” section –> “Passwords & AutoFill”; For third party browsers.
5. Disable apps access to your contacts, photos, messages and other private data.
6. Regularly clean up junk files and temporary files on your iPhone. After using your iPhone for a long time, it will pile up with lots of junk files and temporary files which may contain some information about you, your computer or phone, and your preferences, it is necessary to give your iPhone a spring clean with reliable iPhone cleaner software – Tenorshare iCareFone and remove unwanted files to protect your privacy and free up your iPhone at the same time.
Speak Your Mind
Leave a Comment
Create your review for Tenorshare articles

Tenorshare iCareFone
Best Free iPhone Transfer & iOS Backup Tool
Easily, without iTunes


