How to Transfer Music from Phone to Laptop for Android & iPhone
Are you tired of having all your favorite songs only on your phone? Want to transfer them to your computer so you can enjoy them on a bigger screen or save them for future use?
Look no further! In this article, we will guide you through the different ways to transfer music from your phone to your laptop/computer, including using a USB cable, Bluetooth, and cloud services.
- Part 1: How to Transfer Music from Phone to Computer [Android]
- Part 2: How to Transfer Music from Phone to Computer [iOS]
- FAQS about Music Transferring
Part 1: How to Transfer Music from Phone to Computer [Android]
#1. Use USB
Are you wondering how to transfer music from phone to computer with USB? Using a USB cable is one of the easiest and most straightforward ways to transfer music from your Android phone to your computer.
Note that some phones may not be compatible with certain types of computers, which could prevent you from being able to transfer music files. And this method may not support transferring certain file formats, such as music files that are protected by digital rights management (DRM).
Here's how to do it:
- Connect your phone to your computer using a USB cable.
- On your phone, select the "Transfer files" or "File transfer" option from the notification panel.
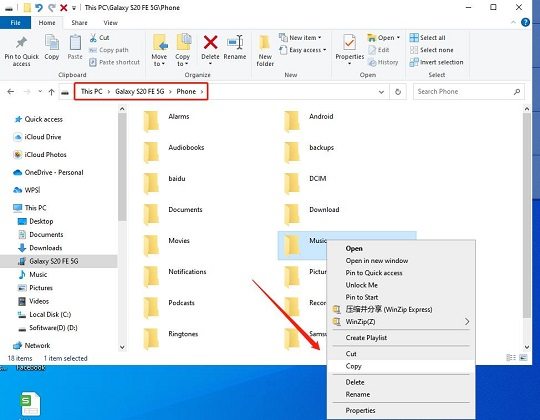
- On your computer, open the file explorer and navigate to your phone's internal storage.
Find the music files you want to transfer and drag/copy them to the desired location on your computer.

Related read Everything You Need to Know about DCIM Folder on Android.
#2. Use Bluetooth
If you don't have a USB cable handy, here is how to transfer music from phone to computer using Bluetooth.
But Bluetooth transfer speeds are generally slower than those of USB cables, so transferring large music files can take a lot of time. And Bluetooth connections can be less reliable than other methods, there's a higher chance of the transfer being interrupted or failing.
Here's how to do it:
- Activate Bluetooth on your PC by searching for it in the Windows search bar.
- Enable Bluetooth on your Android device. Then locate your computer in the Bluetooth settings and initiate the pairing process. You may need to click on "Pair" or "Connect" on your computer and enter a pairing code if prompted.
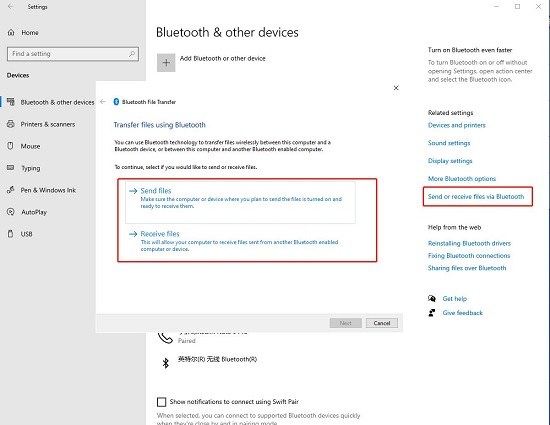
Next, on your computer's Bluetooth settings, click on "Send or receive files" and select "Receive files."

- On your Android phone, choose the music file you want to transfer and tap on the "Share" button. Select Bluetooth and then choose the name of your Windows PC from the list of available devices.
- Once the transfer is complete, the music files will be automatically saved to the Downloads folder on your computer.
#3. Use Google Drive/Dropbox
If you prefer using cloud services, you can also transfer music from your Android phone to your computer using Google Drive or Dropbox.
Both Google Drive (15 GB) and Dropbox (2 GB) offer limited free storage, which means you may need to pay for additional storage if you want to transfer a large number of music files.
Here's how to do it using Google Drive:
- Install the Google Drive app on your phone and sign in with your Google account.
Upload the music files you want to transfer to Google Drive by clicking on the + button.

- On your computer, go to the Google Drive website and sign in with the same account.
- Find the music files you uploaded and download them to your computer.
Part 2: How to Transfer Music from Phone to Computer [iOS]
#1. Use iCareFone to Export iPhone Music with One Click
Transferring music from an iPhone to a PC or Mac has never been easier thanks to Tenorshare iCareFone. This amazing tool allows you to move music from your iPhone to your computer quickly and easily, without the restrictions you typically encounter with iTunes and iCloud.
Unlike these alternatives, iCareFone also enables you to bypass the same Apple ID restrictions, and you don't even need Wi-Fi connectivity to transfer your music.
This tool is a two-way transfer between your iOS device and your computer, and it supports all iPhone models, including the iPhone 14 and earlier models.
If you're wondering how to copy music from your iPhone to your computer, follow these simple steps:
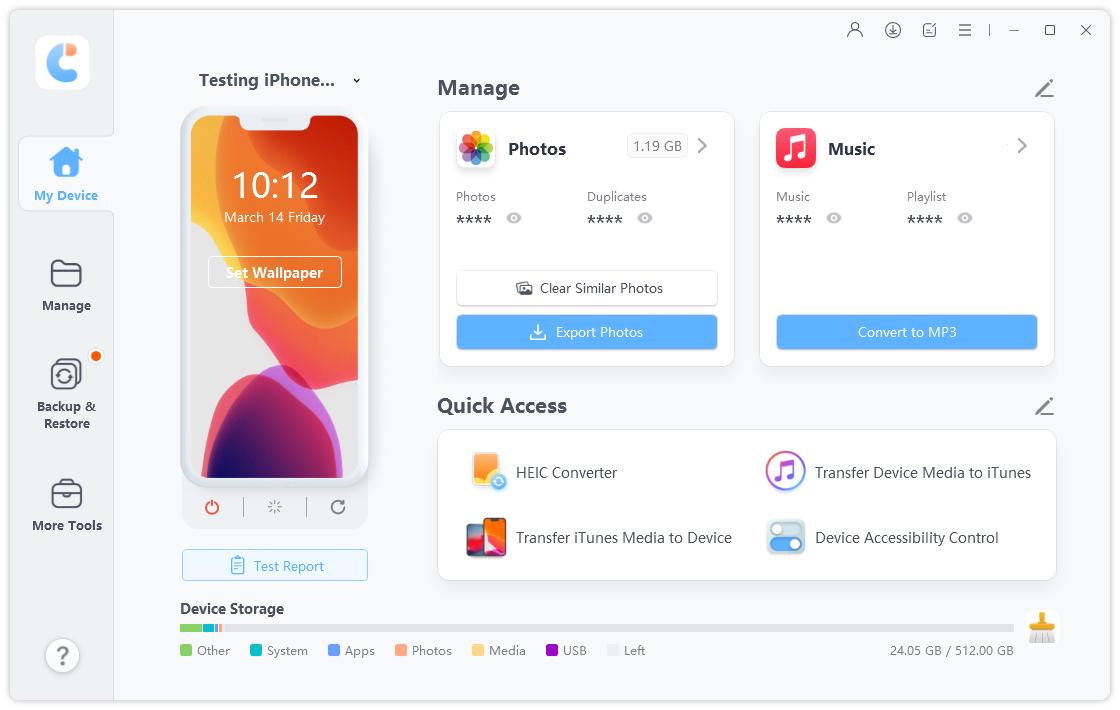
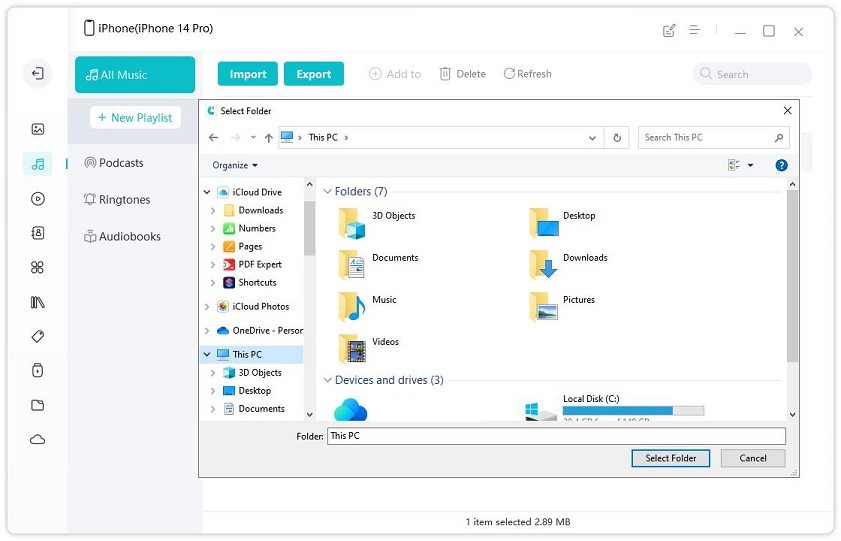
Download and install Tenorshare iCareFone to your computer. You can find the Windows and Mac download buttons on their website. Launch iCareFone on your computer, and connect your iPhone to your computer. Click on the "Manage" tab, which will take you to the main interface of iCareFone.

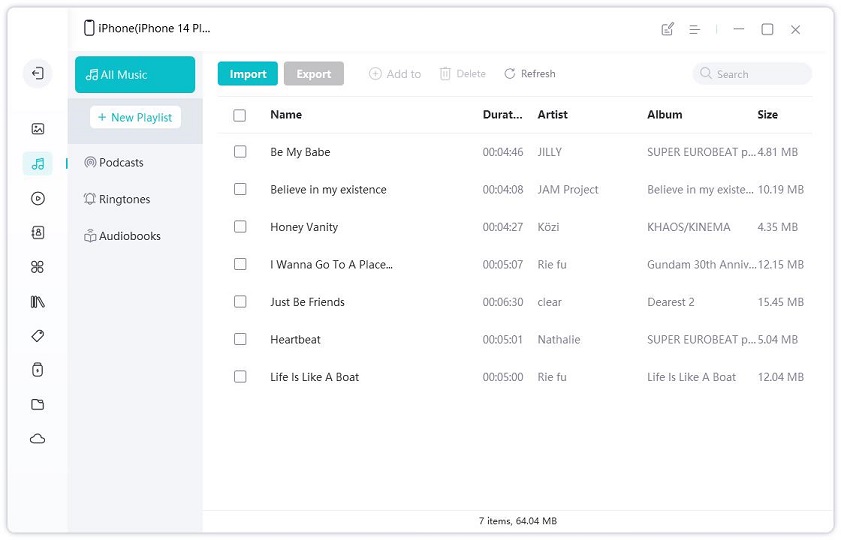
Select "Music." All of the music on your iPhone will be displayed on the screen.

Choose the music that you want to transfer to your computer, and click on the "Export" button.

#2. Sync iPhone Music to Computer with iTunes
When it comes to iPhone data transfer, the most commonly used method is iTunes. iTunes can indeed help us transfer iPhone music to a computer, but the process can be more complicated with multiple steps. And you can only transfer the purchased music.
Additionally, iTunes may frequently encounter freezing or other errors.
If you are accustomed to using iTunes for data transfer, you can follow the steps below:
- Download and install iTunes on your computer. Launch it and connect your iPhone to it.
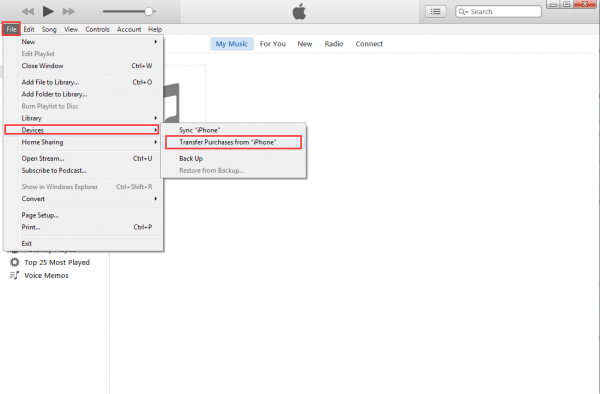
Choose “File” from the top menu. Then choose “Devices > Transfer Purchases”. Follow the on-screen instructions to finish the transfer.

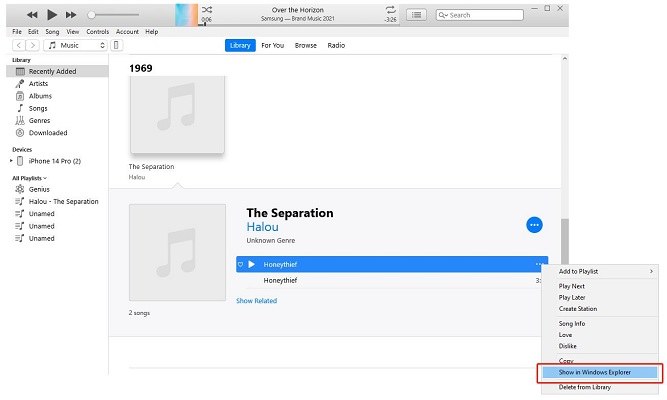
Then choose “Recently Added” from the library. Select the music and click the three dots. Then choose “Show in Windows Explorer”.

- Here you will see the music file location on your computer.
#3. Use AirDrop [Mac Only]
If you’re using a Mac, then AirDrop can be an easy method to transfer music from phone to computer wirelessly.
See how it works:
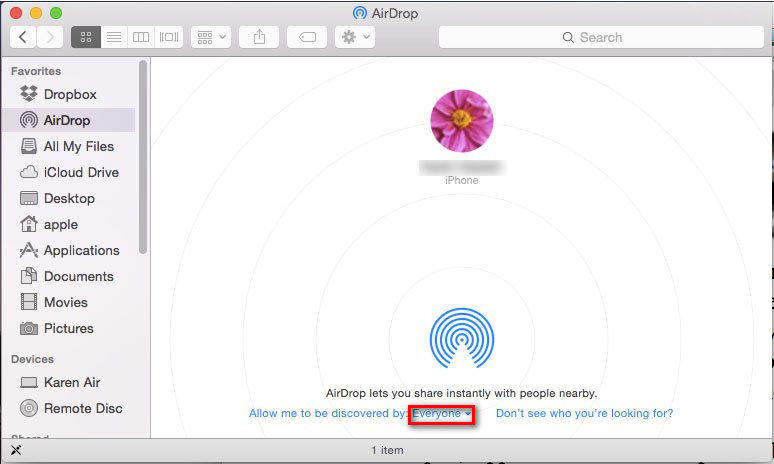
Open AirDrop on your Mac. Go to Finder > AirDrop > Allow me to be discovered by everyone.

- Then on your iPhone, select the music you wish to transfer. Tap the "Share" button and select "AirDrop" from the list of options.
- Select your Mac from the list of available devices in AirDrop.
- Click on "Accept" on your Mac to start the transfer process.
- Wait for the music files to transfer zfrom your iPhone to your Mac.
FAQS about Music Transferring
Q1: Why should I transfer music from my phone to my computer?
A: Transferring music from your phone to your computer allows you to free up space on your phone, enjoy your favorite songs on a bigger screen, and keep a backup of your music files.
Q2: What types of music files can I transfer from my phone to my computer?
A: You can transfer any type of music file, including MP3, WAV, AAC, and more.
Q3: Will transferring music from my phone to my computer delete the songs from my phone?
A: No, transferring music from your phone to your laptop won't delete the songs from your phone. You can choose to keep the songs on both devices or delete them from your phone after transferring them to your computer.
Q4: Is it safe to transfer music from my phone to my computer?
A: Yes, it is safe to transfer music from your phone to your computer. Just make sure to use a trusted method and avoid downloading or transferring files from unverified sources.
Conclusion
Now you know several ways to transfer music from your phone to your laptop/Computer, whether you're using an Android or iOS device. Using a USB cable, Bluetooth, or cloud services like Google Drive or Dropbox, you can easily move your favorite songs to your computer for safekeeping or further enjoyment.
Remember, if you're an iPhone user and you're looking for a quick and easy way to transfer music to your computer, Tenorshare iCareFone is an excellent option.
This powerful tool makes transferring music from your iPhone to your computer a breeze, without the restrictions you typically encounter with iTunes and iCloud. Try out these methods and choose the one that best suits your needs.
Speak Your Mind
Leave a Comment
Create your review for Tenorshare articles

Tenorshare iCareFone
Best Free iPhone Transfer & iOS Backup Tool
Easily, without iTunes
