How to Transfer Photos from Android to Computer in 2025 [Effective]
As camera performance in Android phones is greatly boosted, users become fonder than ever of taking photos, and therefore, the demand for transferring photos from Android to Computer also increases. Whether for photoshop, photo sharing or the saving in phone memory, we will eventually find ourselves in a situation where we need to transfer photos from android to PC.
Transferring your photos from your Android smartphone to a PC would not be a tricky task, depending on whether you know the right methods to go about the situation. In this article, we discuss how to transfer photos from Android to computer running Windows or macOS system. There are numerous ways to do that task, including using a USB cable and wireless using cloud storage services or third-party tools.
- Part 1: How to Transfer Photos from Android to Computer (Windows 10)
- Part 2: How to Transfer Photos from Android to Mac
- Extra Tips: How to Mirror Android to PC
Part 1: How to Transfer Photos from Android to Computer (Windows 10)
If you have a Windows PC, here are several common ways on how to transfer photos from Android to PC Windows 10.
Way 1: Transfer Files from PC to Android using Bluetooth
One of the simplest and most straightforward ways to transfer pictures from Android to PC is through a USB cable. You don’t need to install any third-party app or tool to use this method.
Here's how to transfer photos from Android to computer directly using a USB cable.
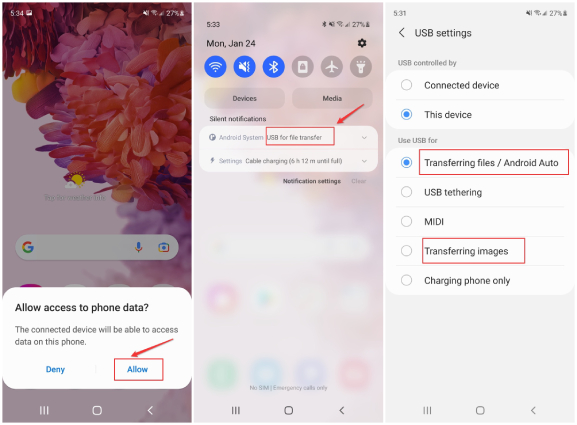
- Connect your phone to the Windows PC using a compatible USB cable. Tap “Allow” when a notification pops up asking you to allow access to phone data.
Depending on your model of phone, tap the “Charging this device via USB” or “USB for file transfer” notification on your smartphone, then select “File Transfer” listed under Use USB For.

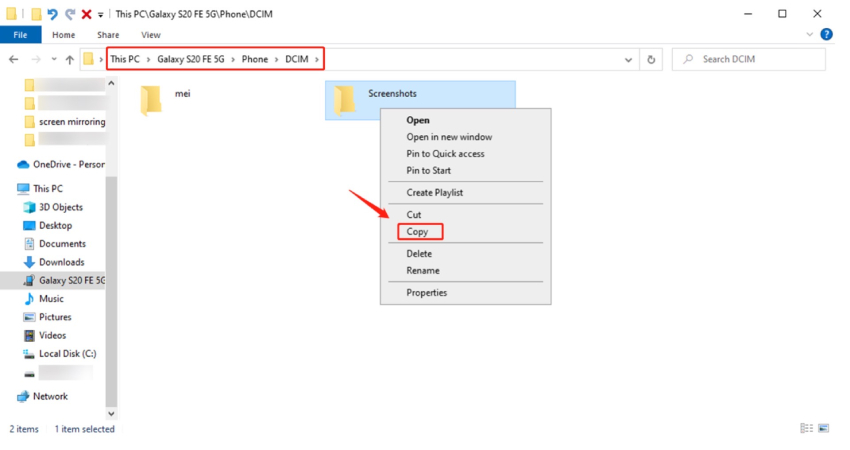
Open This PC on your computer and you should find the connected phone in Devices and drives section. Double click your phone’s name.
- Navigate to “DCIM” or “Pictures” folder to access your photos.
Copy the photos that you wish to transfer and paste them anywhere on your PC’s hard drive.

Way 2: Transfer Pictures from Android to PC via Bluetooth
If you’re wondering how to transfer photos from Android to PC without USB, Bluetooth is the obvious answer. However, Bluetooth could be pretty slow according to today’s standards, and transferring photos with it may not be the fastest process ever.
Anyway, here’s how to transfer pictures from Android phone to computer using Bluetooth.
- Enable Bluetooth on both devices.
- Pair your Windows PC to your Android phone.
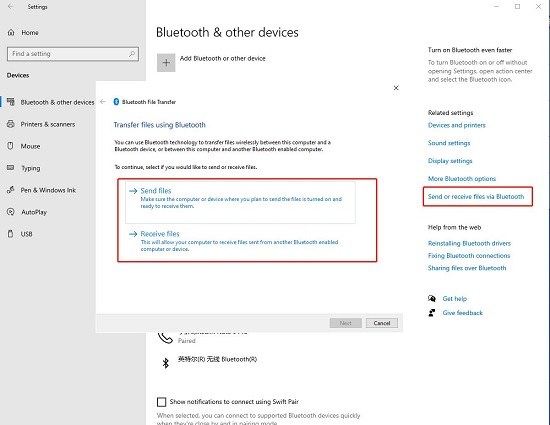
To transfer pictures from your phone, click “Send or receive files” and then select “Receive files” on your PC.

- Select the photos you want to transfer in the Photo Gallery app of your phone.
Tap the Share icon and select Bluetooth from the list. Then Select your PC’s name from the list of available BT devices.

Your computer will automatically begin downloading the photos. Choose a location where you want to save your photos once the transfer is complete. Then click “OK” and “Finish”.

On your Windows, open Settings > Devices > Bluetooth & other devices to turn on Bluetooth.
On your Android phone, go to Settings > Connections to switched the Bluetooth option to On.
Go back to Bluetooth & other devices settings on your PC, click “Add Bluetooth or other device” and choose Bluetooth. Select the name of your Android device from the list and click on “Connect”.
On your phone, tap “Pair” to have your phone paired with the PC.
Way 3: Transfer Photos from Android to Windows 10 Using OneDrive
If you’re thinking about how to transfer photos from Android to computer wirelessly without using Bluetooth, OneDrive is a safe solution. With the OneDrive being built into Windows 10, you can easily transfer photos from Android to PC by uploading them on phone and download them from OneDrive.
Here’s how to get pictures from phone to computer using OneDrive.
- 1.Download and install Microsoft OneDrive on your Android device from the Play Store.
- Sign in to your Microsoft Account. You can create one if you don't have a Microsoft acount.
- Tap the Plus icon at the top right corner and select Upload. Then tap "TURN ON CAMERA UPLOAD" to access all your photos and vides on your Android device.
Now select all the photos you want and tap "Select" at the top right corner of the screen. All the selected phone will be uploaded to your OneDrive cloud storage.

Wait for the upload to complete and you can view the progress in the Photos page.

- When it's done, open OneDrive on your Windows 10 PC and sign in with your Microsoft account.
The photos should appear in the OneDrive folder. Copy and paste them anywhere on your PC and wait for the download to complete.

Part 2: How to Transfer Photos from Android to Mac
If you’re a Mac user and wondering how to transfer photos from Android to computer running MacOS , here’s how you can do that in various ways.
Way 1: Transfer Files from Android to Mac Using Bluetooth
You can use Bluetooth to transfer photos from Android to Mac. To do that, follow the steps.
- Turn on Bluetooth on both devices.
You should see your Android device in the list of Devices. Click Connect next to the name of your device.

- On your phone, you should receive a notification. Simply tap “Pair” and wait for both devices to be paired with.
Now go to System Preferences > Sharing on your Mac. Make sure that the box next to Bluetooth Sharing is checked. You can also specify a folder for saving received photos.

- Open the Gallery app of your phone and select the photos you want to transfer.
- Tap the Share icon and select Bluetooth from the available options.
- Select your Mac’s name from the list of available BT devices and wait for the photo transfer to complete.
On your Mac, click on the Apple logo and open System Preferences > Bluetooth. Click on the “Turn Bluetooth On” option.
One your phone, go to Settings > Connections to turn on Bluetooth.
Way 2: Transfer Photos from Android to Mac with Android File Transfer
Apart from using Bluetooth connection, you can also transfer photos from Android to Mac using USB cable, with the help of a third party app called Android File Transfer.
Here’s how to transfer photos from Android to Mac using USB cable.
- Download and install Android File Transfer on your Mac and then connect your phone to the Mac using a USB cable.
- Enable File Transfer by tapping on the “Charging” notification on your phone.
- Launch Android File Transfer.
Access photos on your phone by doble clicking the DCIM or Pictures folder.

- Copy all the files you want to transfer, then paste them into any folder on your Mac.
Way 3: Transfer Photos from Android to Mac with AirDroid
If you're wondering “How do I transfer photos from my Android to my Mac wirelessly without using Bluetooth?”, AirDroid can do you a favor. As an Android manager, AirDroid is quite famous for its function of moving files between Android and Mac.
Here's how to transfer photos from Android to Mac wirelessly.
- Install AirDroid Personal App on your Android device and login to your account.
Tap on “AirDroid Web” and then tap “Scan QR code” on screen from your Android device.

- Open AirDroid web client on your Mac’s browser and scan the QR code on the website with your phone
Tap on "Sign in" on your phone.

- Once the connection is established, you will be able to navigate your Android phone content in browser from Mac.
Click on the Photos icon. From there, select the photos you want and click on "Download" to save them on your Mac.

Extra Tips: How to Mirror Android to PC & Mac
If you'd like to see your Android device's content on your computer and also control it using your mouse and keyboard, Tenorshare Phone Mirror is the perfect tool for you.
Phone Mirror lets you view your smartphone's screen on your computer's display, and interact with it with your mouse and keyboard. Follow the steps to do that.
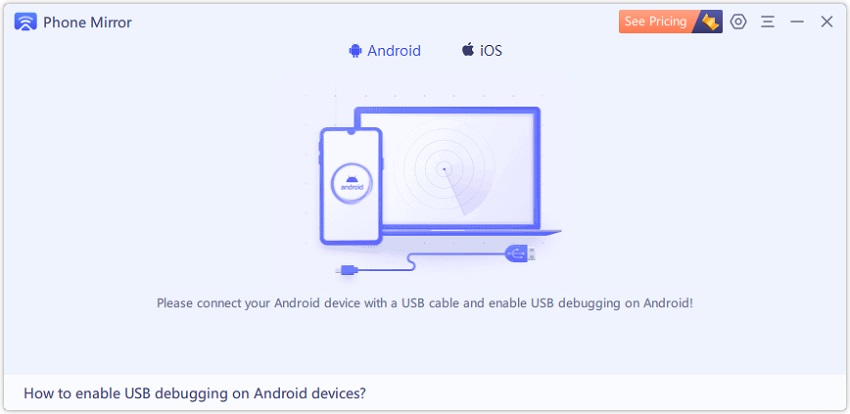
Download and install Phone Mirror on your PC and connect your phone to the PC using a USB cable.

Enable USB Debugging on your smartphone by following the on-screen instructions.

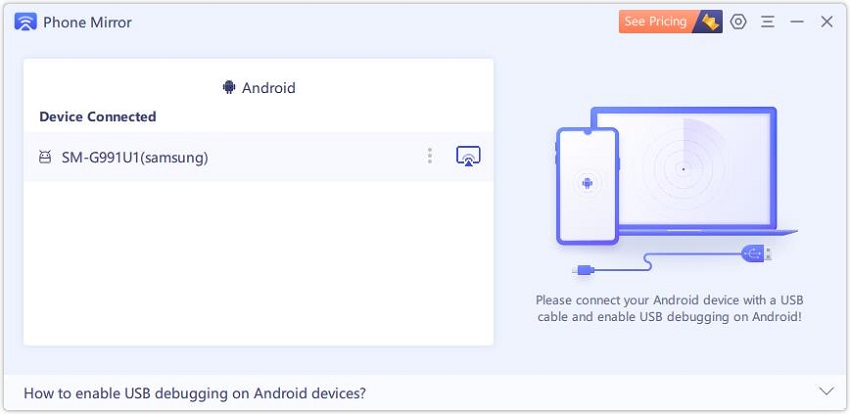
Once the device is detected, click the Mirror icon as shown below.

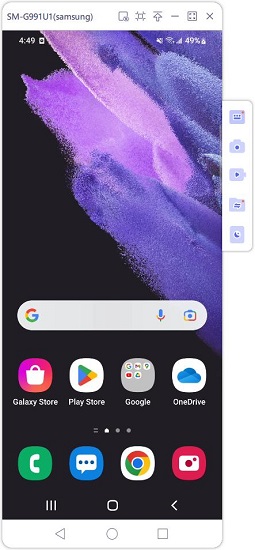
That's it! You can now view and even control your Android device from the PC using your mouse.

Conclusion
There you have it — these are all the best methods you should be using to transfer your photos from your Android device to your PC or Mac. You will no longer be struggle in solving your file transferring issues. Additionally, If you want to view your smartphone's content on the PC and also interact with it using your mouse, give Tenorshare Phone Mirror a shot!
Speak Your Mind
Leave a Comment
Create your review for Tenorshare articles
