How to Disable UEFI Secure Boot in Windows 8/8.1
On Windows 8, or 8.1 PCs using the UEFI ( in place of BIOS) boot standard, Secure Boot, a feature designed to prevent malicious software and unauthorized media from loading during the system start-up process, is enabled by default.
While UEFI secure boot provides an additional layer of security, it has become a bit of pain for people who want to dual boot, either with Linux or any other OS. Therefore, you are suggested to disable UEFI secure boot in Windows 8/8.1 for the following reasons:
- Install an older version of Windows
- Install Linux, BSD, or another operating system
- Run system-repair CDs or utilities
- Perform advanced PC maintenance procedures
- Need to recover Windows local or domain password with Windows password recovery tool
How to Disable UEFI Secure Boot in Windows 8/8.1
To disable secure boot in UEFI settings, you need first of all to access UEFI settings, which is not as easy as accessing BIOS settings by simply pressing F10 or F12 at boot time. In the following content, we will give a detailed and complete introduction on how to turn off UEFI secure boot in Windows 8 & 8.1 PCs.
Step 1: Go to Windows 8/8.1 PC Settings
Swipe in from the right corner of the screen, and tap Settings. Within the "Settings" charm, you click on "Change PC settings".

Step 2: Restart Advanced Startup
Under PC settings, there is a slight difference between Windows 8 and Windows 8.1. for different versions, we do different to go to Advanced startup:
| Windows 8 | Under PC settings, go to General > Advanced startup > Restart now |
|---|---|
| Windows 8.1 | Under PC settings, go to Update and recovery > Recovery > Advanced startup > Restart now |
Step 3: Access UEFI Settings
- In the new menu that appears, click "Troubleshot".
- In Troubleshoot menu, select "Advanced options".
- Then click "UEFI Firmware" button.
- Choose "Restart" option to reboot your device in UEFI settings.

Step 4: Disable UEFI Secure Boot Windows 8/8.1
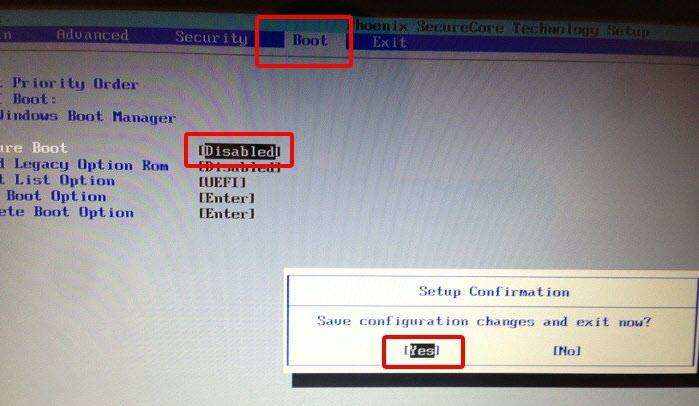
- After you have been booted in to UEFI utility, you continue going to Boot tab, and find Secure Boot option, which has been set "Enabled".
- Go to Secure Boot option by using arrow key, and press "Enter" to select it. Use "+" or "-" to change its value. Then confirm it.
- Click on "Yes" when a Setup Configuration window pop up to save the changes and exit.

But you should bear in mind that secure boot is of great help to protect users from rootkits and other low-level malware attacks. Don't disable UEFI secure boot unless you have to run operating systems that won't boot with secure boot enabled.
Have other Windows 8/8.1 problems? Go for Tenorshare Windows system enhancement utilities to seek help.

Speak Your Mind
Leave a Comment
Create your review for Tenorshare articles


