then write your review
UltData - No.1 Android Data Recovery Tool
Recover Lost Data Without Root or Backup for Any Android Devices!
UltData: No.1 Android Recovery Tool
Restore Lost Android Data Without Root
Some of you might know that you can directly save photos to your SD card from your Android mobile device. For those who do not know, let us tell you that Android save photos to SD card by default, no matter which Android phone you have in use. There exist some versions of Android that might not allow you to do this, but there are still some ways to reserve storage on your device.
The procedure to perform this change is more or less the same for all the phones with micro SD card slots. You can use the SD card as the default storage to prevent clogging the space with so many photos. Besides, it is your camera app that lets you perform this function however, you just can expect every camera app to do so as not every manufacturer gives this option.
So, if you want to know how to automatically save photos to SD card? Keep following the post!
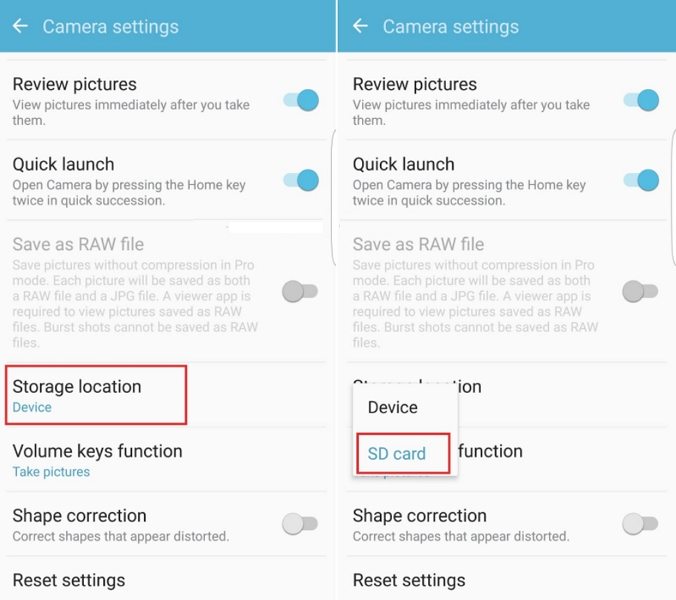
If you are using the phone with Android 11, you might not get the option to set SD card as default. Therefore, if you want to know how to set SD card as default storage on Galaxy S7? it is better to check your camera settings before implementing anything.
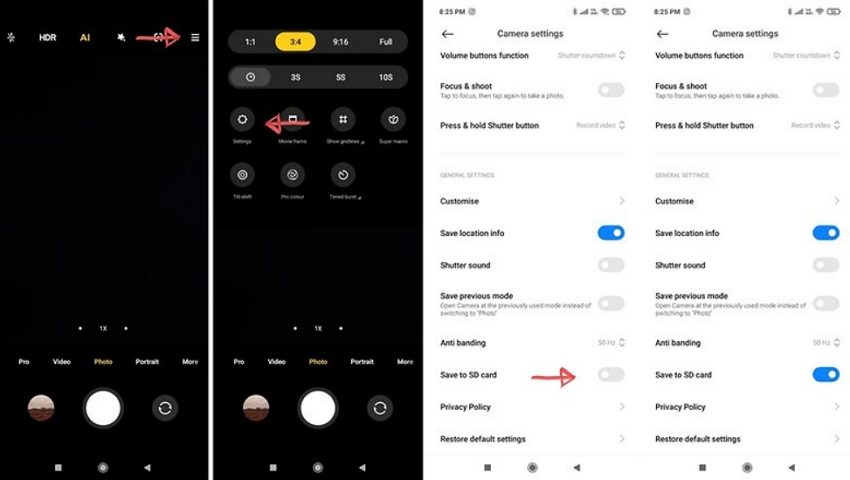
The phones using the stock Android option to save images to an SD card might not appear until the SD card is inserted hence, try inserting the card first and then see for the options in the camera settings. The below steps will guide you on how to make your SD card default storage on Android running on MIUI12 as per Android 11.
From the Storage location, select the option “Save to SD card” to make changes.

The above steps explain how to set SD card as default storage on galaxy s7 and on other Andoid phones.
The steps to convert your SD card into internal storage is pretty straightforward. However, keep in mind that the SD card will be formatted while using these steps therefore, it's necessary to maintain the data backup.
Moreover, there can be a case that adoptable storage is not available in the device you are using, but you can use the command line to allow your device to adopt this feature.
So, if you are wondering how do I set my SD card as default storage on Galaxy S5, follow the given steps:
Click on the three dots to select Storage Settings.

Once the formatting is done, you can remove the SD card and continue using it as permanent storage. However, keep in mind that this card won't work as a hot-swappable portable SD card. So, remove only using the eject option.
The below-given steps will tell you how to use the Camera MX app to set Android to save photos to an SD card by default.
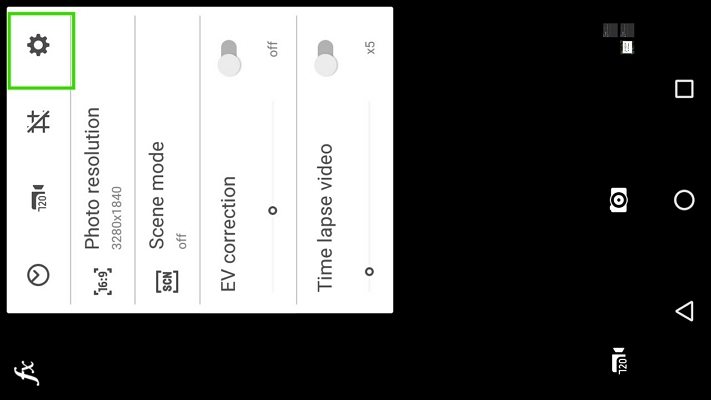
Launch the app and go to the menu icon or three dots at the top right of the screen.

After this, you can choose to change the settings of scene mode etc and then click on the gear icon to proceed to the camera settings.

Click on the “Custom storage location” option to use an SD card as default storage for images or photos. In case, it prompts for permission, click on Allow.

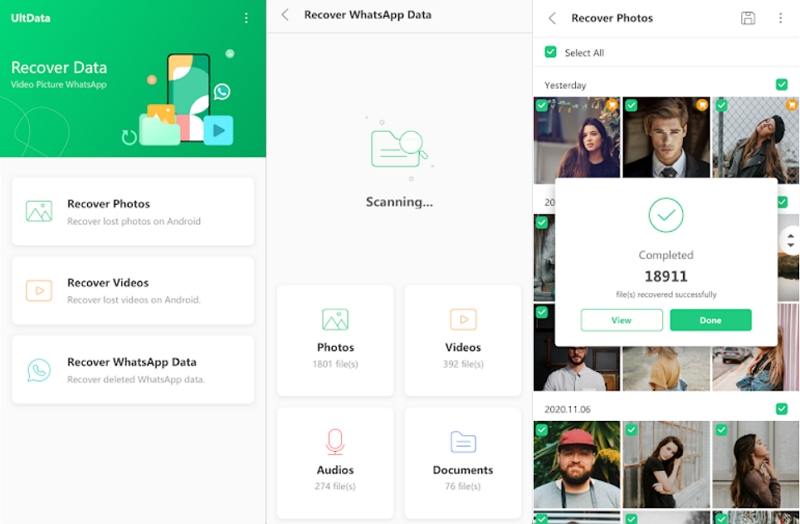
Lost photos from Android SD card without backup? If you happen to delete important photos from the SD card on an Android phone, don't fear. You can use UltData – Android Data Recovery App to recover deleted photos from SD card on Android without computer.
Download and intall UltData for Android app from Google Play. Launch the app and select “Recover Photos” from the main interface. After scanning, select the photo then click on “Recover” to recover the selected photos.

In this way you can easily recover photos from SD card on Android without computer. Not only photos, UltData app also can recover deleted WhatsApp messages on Android without computer.
This guide provides in-depth solutions to save photos to SD cards by default in Android devices. So, if you were confused with the question, how do I set my SD card as default storage on Galaxy s5 or any other model, just follow the given methods to do it now!
then write your review
Leave a Comment
Create your review for Tenorshare articles
By Jenefey Aaron
2025-04-17 / Android Tips
Rate now!