

ReiBoot - No.1 Free iOS System Repair Software
Fix 150+ iOS Issues without Data Loss & Safely Upgrade/Downgrade
ReiBoot: No.1 iOS Repair Tool
Fix 150+ iOS Issues, No Data Loss
Since the iOS 17 update, there have been reports that the feature didn't get enabled. Or it was working just fine at one point and is suddenly not working. If you’re experiencing iOS 17 voice message transcription not working, we're going to help you. In this article, you'll find out how to enable the Audio Message Transcription, why it is not working on your iPhone, and how you can fix it in no time.
How many times have you had to pause your favorite song just to listen to an audio message? iPhone has solved this inconvenience for you with a new feature in iOS 17 called "Audio Message Transcription," where the audio message gets transcribed into a simple text. That way, you can read the contents of the audio message without playing it.
You must be wondering how to enable audio messages on your iPhone. Well there is nothing you need to do except make sure your device is running on the latest iOS version. Audio message transcriptions are automatically enabled in iOS 17, so go to Settings > General > Software Update. See if there is a pending update and install if there is one. Once your iPhone is running iOS 17:
Even after updating to iOS 17, audio message transcription may still not work for some users. There are a few reasons for your iOS voicemail transcription not working.
One common cause is that Live Transcription may simply be disabled by default. Live Transcription in Messages is currently only available for voice messages sent between iPhones set to English in the United States or Canada. If either device is configured for a different language or region, transcription will not occur.
It is also important that the sender and the receiver are running their devices on the latest iOS version. Moreover, general bugs or glitches that occurred during or after the iOS update process may cause the “iOS 17 voice message transcription not working” problem.
Let us tell you some quick and easy ways you can fix iOS 17 voice message transcription not working.
The first thing you can do is enable Live Voicemail option on your iPhone. Live Voicemail is an opt-in feature controlled in the Phone settings that allows supported voicemails and voice messages to be transcribed automatically. To check the status of Live Voicemail and turn it on if needed, follow these steps:
Turn it on.

If voice message transcription is still not working after enabling Live Voicemail, check that the iPhone regional and language settings are compatible with the feature. Live Voicemail transcription is currently limited to iPhones configured to English as the device language and set to a region of either the United States or Canada. Here’s how to set your Language and Region:
Go to Language & Region.
Select Canada or the United States.
If Live Voicemail is enabled but voice message transcription is still not working, restarting the iPhone is a simple step you can do.
To restart an iPhone:
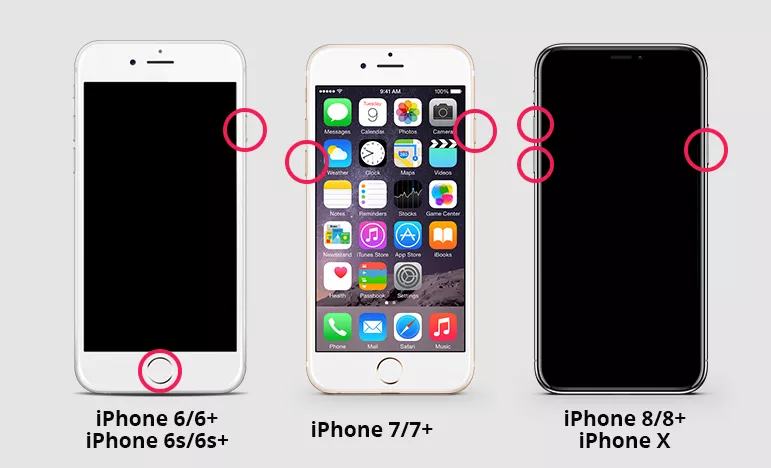
To force restart an iPhone:
Then press and hold the side button until the Apple logo appears.
Voice message transcription needs an active internet connection to work properly. If you’re experiencing iOS 17 voice message transcription not working even after you’ve taken the steps mentioned above, your internet connection could be the problem.
To check the internet connection:
If your internet connection is unstable, consider restarting the router.
Another thing you can try is resetting all settings, which returns all system and app settings to their default. This can help resolve issues caused by corrupted preference files that may be preventing certain features from activating properly.
To reset all settings:
Choose Reset, then “Reset All Settings.”
If you’ve tried everything and voice message transcription is still not enabled, it’s time for a deeper repair. Tenorshare ReiBoot helps you resolve all of your software problems that are preventing the voice message transcription feature.
Tenorshare ReiBoot is a reliable software that solves all your iOS-related problems within a few minutes. Here’s how to install and use Tenorshare ReiBoot - Standard Repair in a few simple steps.


Download and install Tenorshare ReiBoot on your PC or Mac. Connect your iPhone with the computer using a Thunderbolt cable. Click on Standard Repair after the program launches.
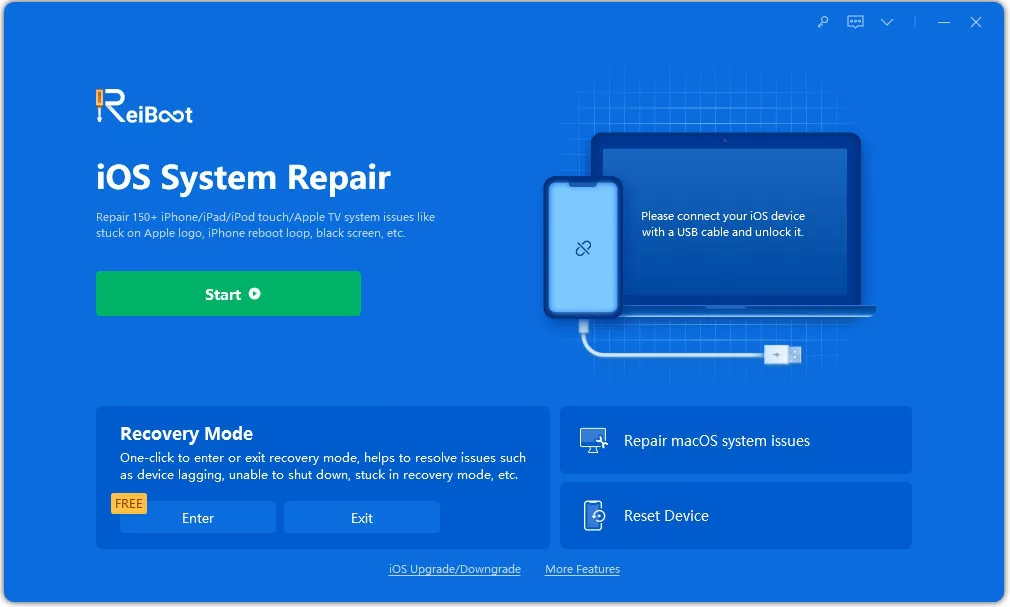
Once Tenorshare ReiBoot has detected your iPhone, continue to download the latest firmware package by clicking ‘Download’. Wait for the firmware package to download.
Choose Standard Repair. Read the instructions to get an idea about the requirements of the tool.
Wait for the progress bar to finish. You’ll see a confirmation message once it’s done. Click Done when standard repair is completed.
By following the fixes mentioned in this article, you should now have your iPhone's voice message transcription feature up and running smoothly again with iOS 17. However, if voice message transcripts still fail to appear even after trying everything, Tenorshare ReiBoot is your way to go.
So, the next time someone sends you a voice message, don't waste time looking for earbuds or struggling to hear in a noisy environment. Just relax, open Messages, and let iOS 17 do the transcribing for you. It's that simple!

Tenorshare ReiBoot - Fix iOS Issues


then write your review
Leave a Comment
Create your review for Tenorshare articles
ReiBoot - No.1 Free iOS System Repair Software
Fix 150+ iOS Issues without Data Loss & Safely Upgrade/Downgrade
ReiBoot: No.1 iOS Repair Tool
Fix 150+ iOS Issues, No Data Loss
By Sophie Green
2025-04-17 / iOS 17
Rate now!