

iCareFone - Free iOS Backup tool & Easy Data Manager
Backup/Transfer/Restore/Manage iOS Data with Simple Clicks
Backup/Manage iOS Data Easily
Backup/Manage iOS Data in Clicks
Transferring MP3 to iPhone from PC or Mac can seem tricky, especially since iTunes has been replaced with the Music app and Finder on macOS. While iTunes allows music syncing, it can overwrite existing files, leading many users to seek alternative methods. If you're wondering how to transfer MP3 to iPhone from PC or Mac, you can use Finder, third-party software, or cloud services. Whether you prefer a wired or wireless transfer, there are simple solutions available. This guide will walk you through the best methods step by step.
Transferring MP3 files to an iPhone without iTunes can be a challenge, as Apple limits direct file transfers. While iTunes was once the primary option, many users now look for faster and easier alternatives. Tenorshare iCareFone is one such tool that makes the process simple.
It allows you to transfer MP3s from PC to iPhone effortlessly, whether in bulk or selectively. Plus, it works with both Windows and Mac and supports all music file types. If you’re tired of iTunes restrictions, this tool is the perfect solution.


Steps to Transfer MP3 to iPhone Without iTunes
Step 1: Download and install Tenorshare iCareFone on your PC. Open the app and connect your iPhone using a USB cable.
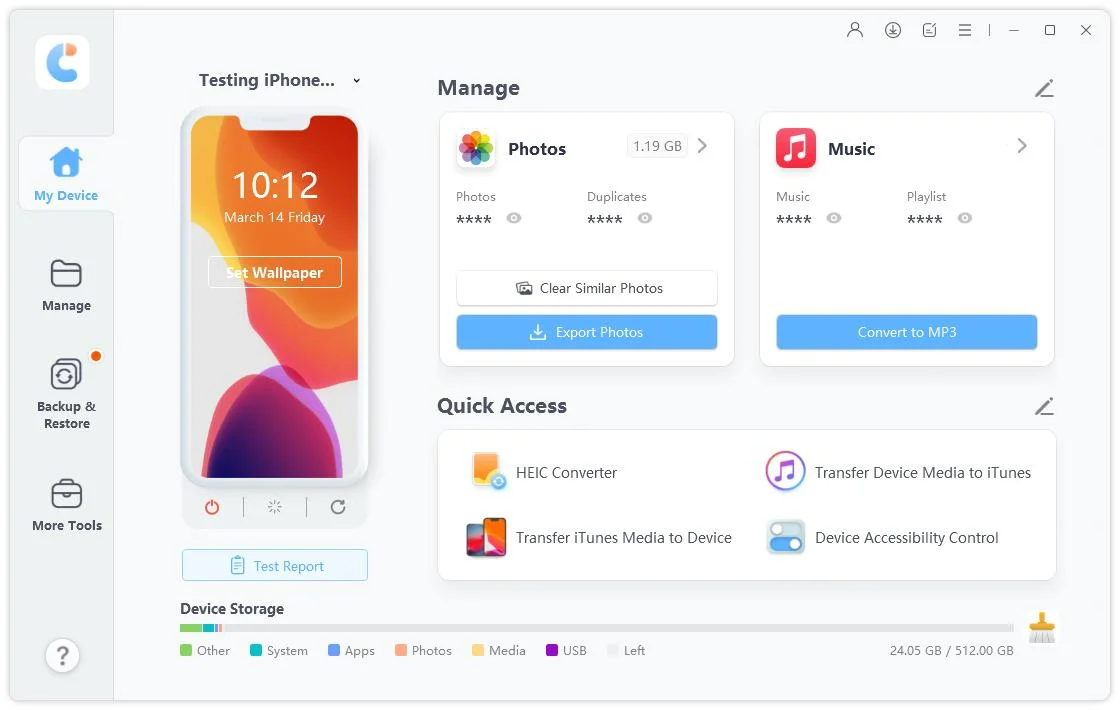
Step 2: Once your iPhone is detected, go to the "Manage" tab in iCareFone and click on "Music."
Step 3: Click on "Import", choose the MP3 files from your computer, and confirm the transfer.

Step 4: The files will be transferred in seconds. Open the Music app on your iPhone and start listening!
iTunes remains one of the official ways to transfer MP3s to your iPhone, especially for users on macOS Mojave or earlier. This method allows you to sync music directly from your computer. However, iTunes has some limitations—it can overwrite your existing library, making it less ideal for those who want to keep their current playlists intact.
Additionally, syncing requires a USB connection and may take longer compared to other transfer methods.
Steps to Transfer MP3s to iPhone Using iTunes
Step 1: Use a USB cable to connect your iPhone to your computer.
Step 2: Open iTunes and click the Device icon at the top. Under the General tab, check Manually Manage Music… in the Options section.
Step 3: Click File > New > Playlist, then drag and drop MP3 files from your PC or Mac into this playlist.

Step 4: In the Settings menu, click Music and check Sync Music. Confirm the selected music, then click Apply to transfer MP3s to your iPhone.

Finder is a great alternative to iTunes for transferring MP3 files from your Mac to your iPhone, especially on newer macOS versions. It allows you to sync music, manage files, and even back up your device without needing additional software.
This method is simple and efficient, but it requires a USB connection and only works for Mac users. If you're looking to transfer MP3 to iPad without iTunes, follow these steps to use Finder.
Steps to Transfer MP3 to iPhone Using Finder
Step 1: Use a USB cable to connect your iPhone to your Mac. Ensure Finder recognizes your device.
Step 2: In the Finder sidebar, select your iPhone under Locations.
Step 3: Click the Music tab and check Sync Music onto [your device name].
Step 4: Choose Entire music library or Selected artists, albums, genres, and playlists.
Step 5: Drag and drop MP3 files into the Finder window, then click Apply to sync music to your iPhone.

If you’re wondering how to move MP3 to iPhone without a USB cable, AirDrop is a great wireless option. It allows quick file transfers between macOS and iOS devices using Wi-Fi and Bluetooth. This method is simple and doesn’t require third-party apps.
However, it only works between Apple devices, requires a stable connection, and may be slower than wired transfers. If you meet the AirDrop requirements, follow these steps to transfer MP3 files wirelessly.
Steps of how to move mp3 to iphone via AirDrop
Step 1: On your iPhone, open Control Center, tap AirDrop, and select Everyone or Contacts Only. On your Mac, open Finder, go to AirDrop, and ensure it’s set to Everyone or Contacts Only.

Step 2: Find the MP3 file you want to transfer on your Mac.
Step 3: Right-click the MP3 file, select Share, and choose AirDrop. Select your iPhone from the pop-up window.
Step 4: A prompt will appear on your iPhone. Tap Accept and choose where to save the MP3 file.

Since macOS Catalina (10.15), Apple replaced iTunes with the Music app for managing local music files. If you want to transfer MP3s to iPhone, you can manually import them into the Music app and sync them to your iPhone using a USB or Lightning cable. This method is simple and efficient, but it requires a Mac and a wired connection.
Steps of how to put mp3 on iphone via the Music App
Step 1: Launch the Music app on your Mac.
Step 2: If your MP3 files are not already in the Music app, click File > Import and select the MP3 files.
Step 3: Use a USB or Lightning cable to connect your iPhone to the Mac. Ensure your iPhone appears in the Music app under the Devices section.
Step 4: Go to your Library and find the MP3 files. Drag and drop them onto your iPhone in the Devices section.

Step 5: Open the Music app on your iPhone to find and play the transferred MP3s.
The process to Transfer MP3 to iPhone from PC or Mac may seem complex, but with the right method, it can be done efficiently. With Tenorshare iCareFone, you can move your music quickly and effortlessly—no iTunes, no syncing issues. This tool works on both Windows and macOS, allowing you to transfer both purchased and non-purchased songs without limitations. Whether you need selective or bulk transfers, iCareFone makes the process smooth and efficient.

Tenorshare iCareFone - Best iOS Backup Tool and File Manager


then write your review
Leave a Comment
Create your review for Tenorshare articles
iCareFone - Free iOS Backup tool & Easy Data Manager
Backup/Transfer/Restore/Manage iOS Data with Simple Clicks
Backup/Manage iOS Data Easily
Backup/Manage iOS Data in Clicks
By Jenefey Aaron
2025-04-22 / iOS File Transfer
Rate now!